
Launching the App #
In this tutorial, you will practice three different methods to launch the YouTube app installed on a smartphone:
- Launching by clicking the home screen icon
- Launching by searching for the app name
- Launching directly using the app’s unique identifier (‘Package Name’ or ‘Bundle ID’)
Launching by clicking the home screen icon #

Step 1. Create a new step.
Note) When creating a new step, the default action is automatically set to 'Touch.'

Step 2. After analyzing the screen, select “OD” as the analysis tool.
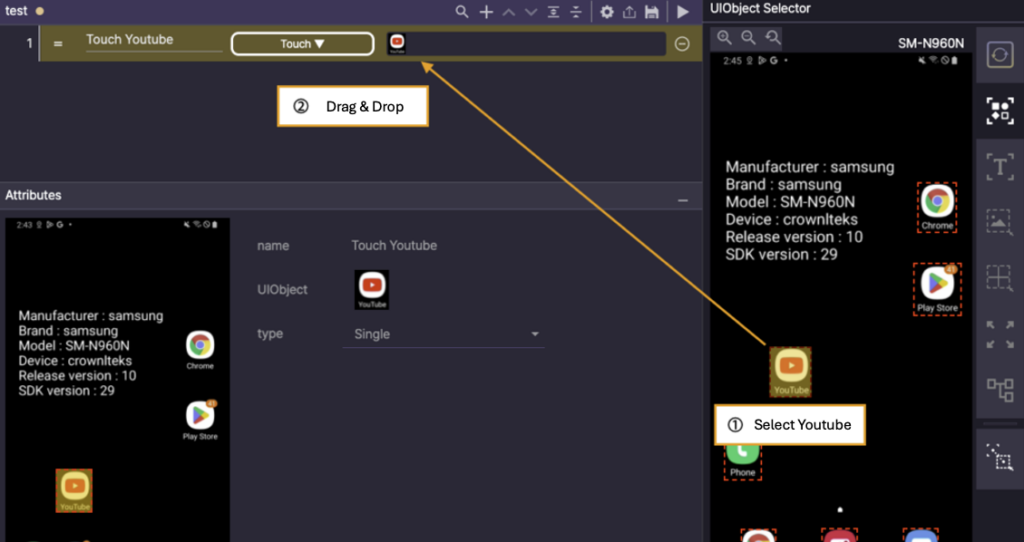
Step 3. Select “YouTube” on the screen, then drag and drop it to add it as a UIObject for the step.

Step 4. Execute the created step.
Launching by searching for the app name #
To search for the app name, you must first navigate to the search bar.

Step 1. Create a new step and select the “Scroll” action.

Step 2. After analyzing the screen, select “Full Screen” as the analysis tool.
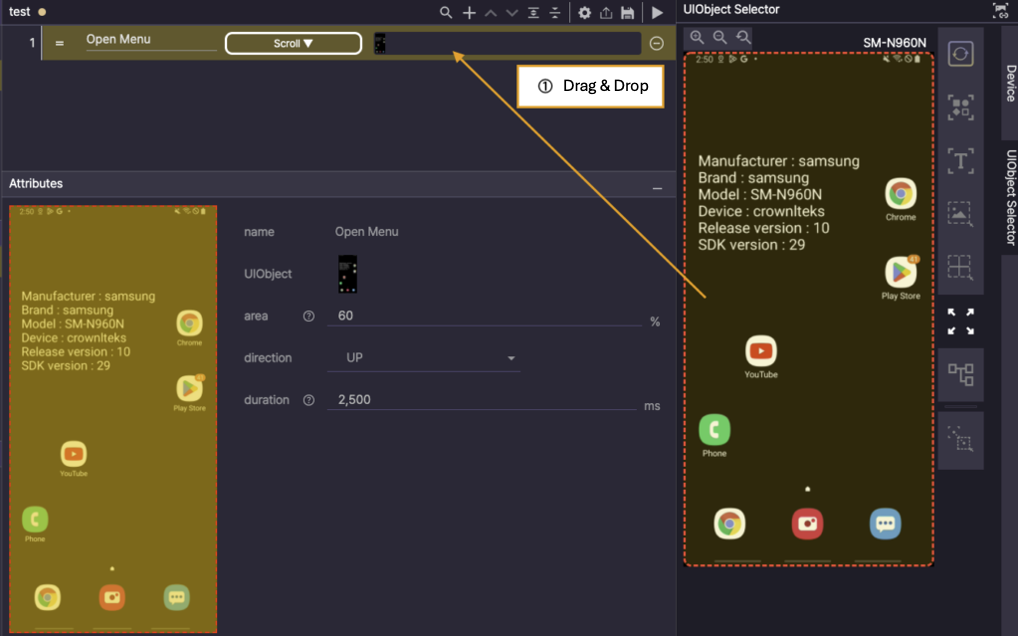
Step 3. Drag and drop the selected “Full Screen” to add it as a UIObject for the step.
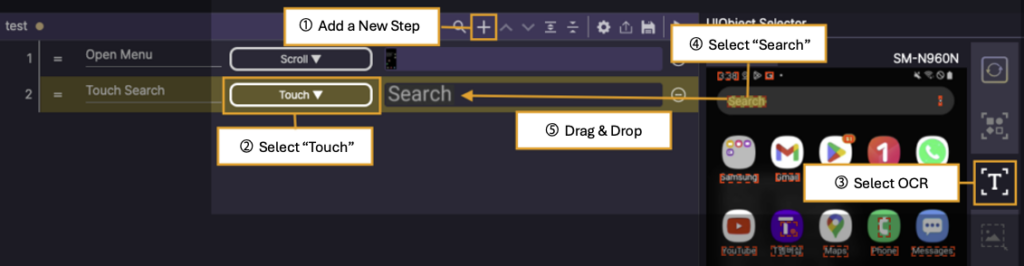
Step 4. Create a new step and select “Touch”. Choose OCR as the screen analysis tool, then drag and drop “Search” from the screen to add it as a UIObject.

Step 5. Create a new step and select “Input”. Choose Full Screen as the screen analysis tool, then drag and drop the entire screen to set it as the UIObject.
Then, enter “YouTube” in the value field.

Step 6. Create a new step and select “Touch”. Choose Crop Image from the screen analysis tools, then drag and select the app icon using the mouse, and drag and drop it to add it as a UIObject.
Launching directly using the app’s unique identifier (‘Package Name’ or ‘Bundle ID’) #

Step 1. Create a new step and select the “Launch” action.

Step 2. Enter the App ID of the app you want to launch (YouTube).
For Android devices, enter the App ID in the Package Name field under the Attributes section at the bottom of the screen.
For iOS devices, enter the App ID in the Bundle ID field.

Step 3. Execute the created step.
Scrolling to Find an Item #
When a video to be played is located somewhere in the middle of a long list, you can create a scenario that scrolls until the desired video appears.

Step 1. Launch YouTube, search for Apptest.ai, and find the desired video.

Step 2. Create a new step and select the “Loop UIObject” action.

Step 3. After analyzing the screen, select “OCR” as the analysis tool.


Step 4. Select “Fully Automated” on the screen, then drag and drop it to add it as a UIObject.

Step 5. Right-click the step, select “Insert Child”, and create a child step.
Set the action to “Scroll”, select “Full Screen”, and drag and drop the entire screen to add it as the child step’s UIObject.

Step 6. Click the Loop UIObject step to activate the Attributes panel.
Since the desired video is not on the screen, change the comparator to NOT EXISTS.

Step 7. Set the connected device to the initial screen and run the created steps.
Verifying a Specific Word at a Given Location #
You can identify a specific word at a designated location and inputting it into a search engine.

Step 1. Create a new step and select the “Store Content” action.
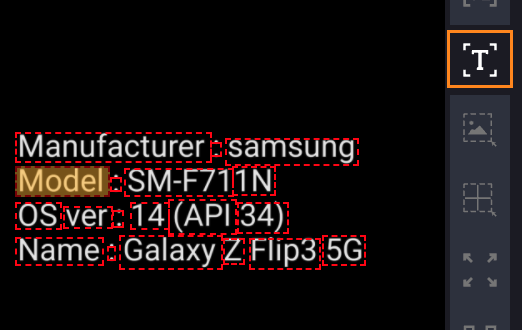
Step 2. Analyze the screen and select “OCR” as the analysis tool.
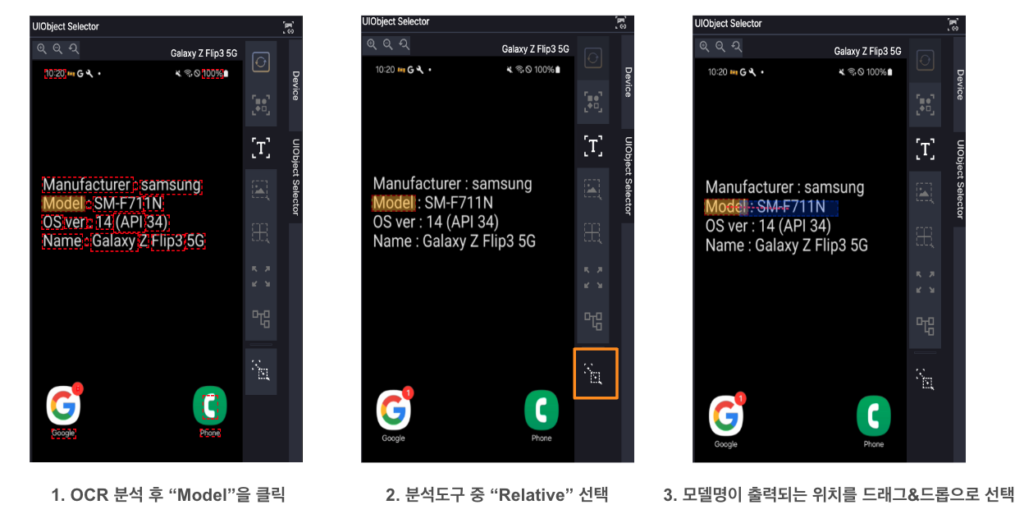
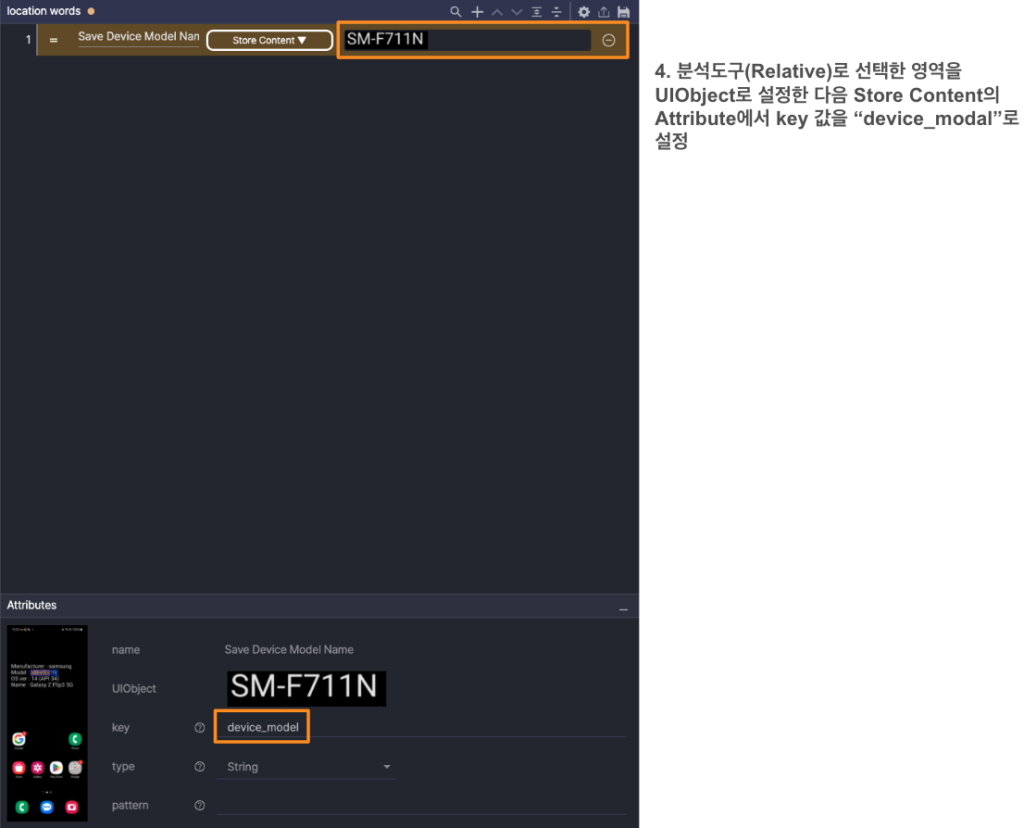
Step 3. Select “Model” on the screen, then choose “Relative” from the analysis tool, drag and drop the model name to add it as a UIObject in the step.

Step 4. Create a step to click the search bar on the home screen, then create an input step. In the input action Attributes, enter “${device_model}” as the value.
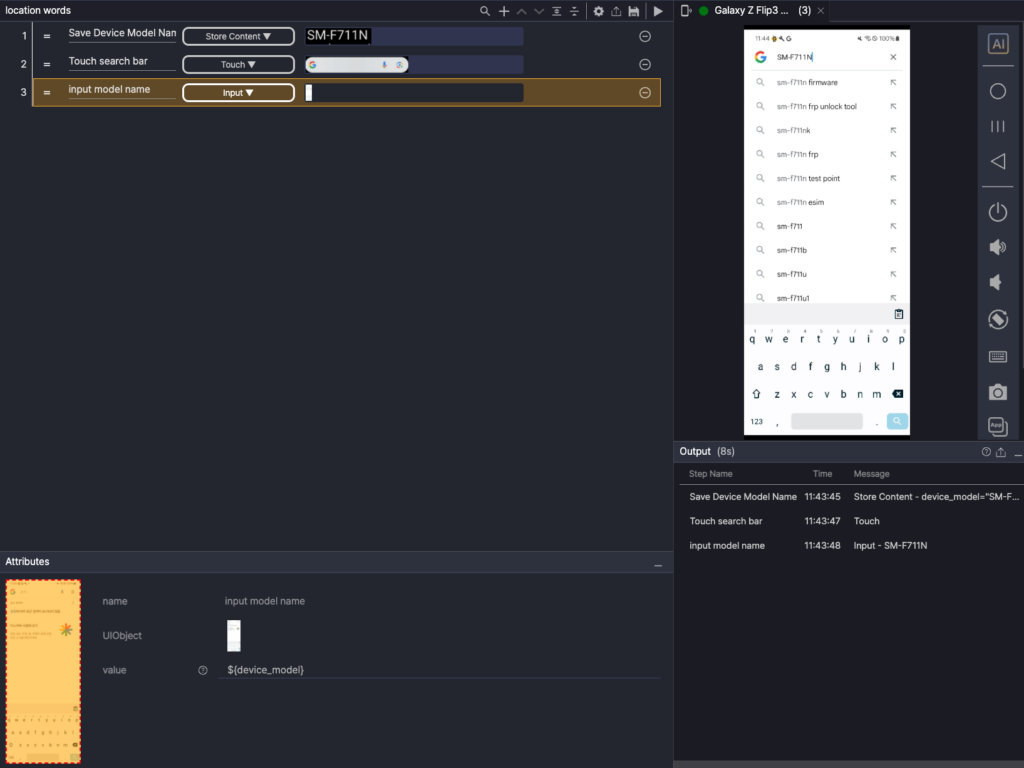
Final Step. Reset the device to the initial screen and execute the scenario to verify that the value set in the “Store Content” step is entered in the search field.
Zooming In on Google Maps #
This scenario shows how to find a location in Google Maps and zoom in.
First, search for Los Angeles in Google Maps.

Step 1. Launch Google Maps and create a new step, selecting the “Touch” action.

Step 2. Analyze the screen and select “OCR” as the analysis tool.

Step 3. Select “Search” on the screen, then drag and drop it to add it as a UIObject.

Step 4. Create a new step, select “Input” as the action, choose “Full Screen” from the analysis tools, then drag and drop the entire screen as a UIObject.
Enter “Los Angeles” in the value field of the Attributes panel.

Step 5. Create a new step, select “Touch” as the action, analyze the screen using OCR, then drag and drop “Angeles” from the screen as a UIObject.


Step 6. Since there are multiple instances of “Angeles” on the screen, modify the Selector value to 2 to select the second occurrence.
Click the UIObject Field to open the attributes panel and update the Selector value.
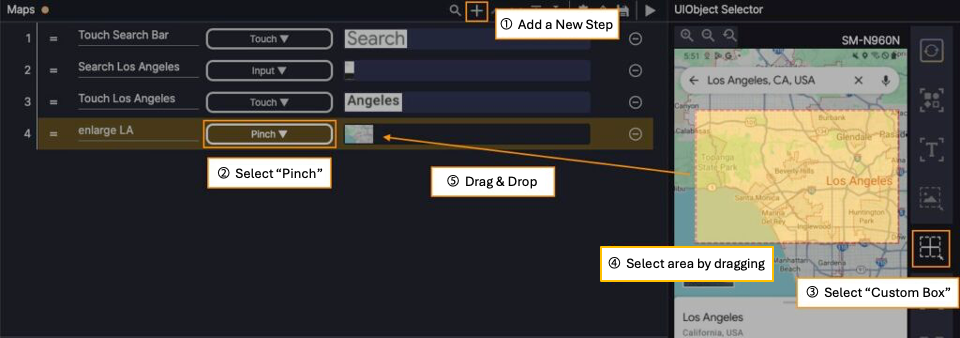
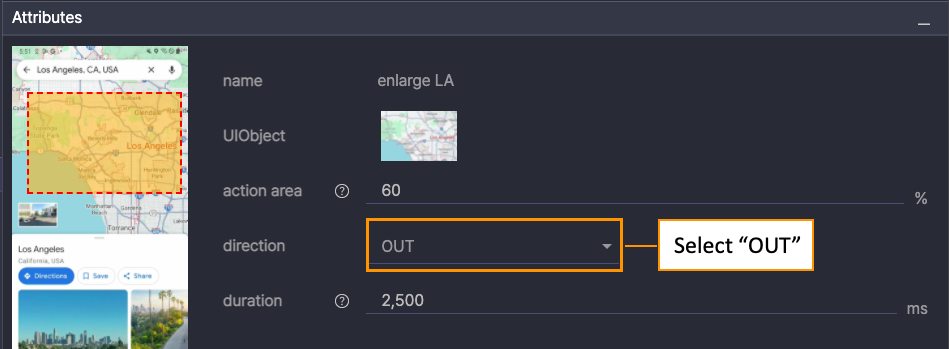
Step 7. Create a new step, select “Pinch” as the action, set the direction to “OUT” in the Attributes panel, and use the Custom Box analysis tool to select the center of the screen. Then, drag and drop the selected area as a UIObject.

Step 8. Clear the Google Maps search bar and run the scenario.
Using Conditional Actions #
This scenario demonstrates how to use “Store Content” and “If Value” action to check the category of the current top-ranked game in the Play Store and update it to “Role Playing” if necessary.
Through this example, you will learn how to utilize the Relative screen analysis tool, store and retrieve text from a specific screen area, and create conditional workflows.
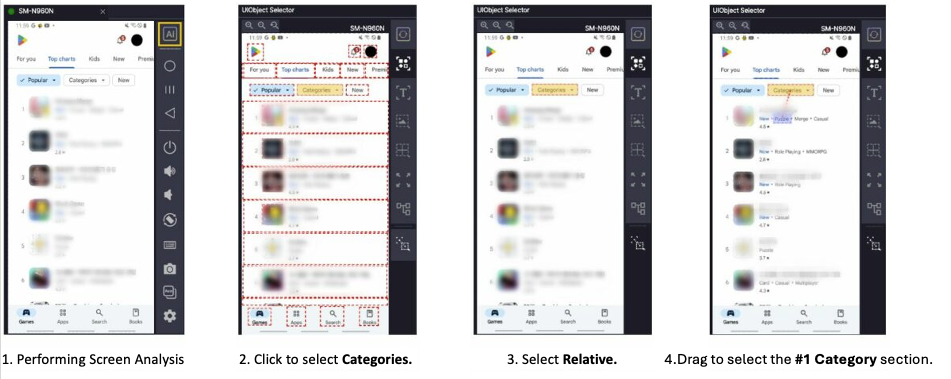
Step 1. Open the Play Store, navigate to the Games section, and read the category of the top-ranked app using the Relative analysis tool.

Step 2. Create a new step, select the “Store Content” action, and add the top-ranked app’s category as a UIObject.

Step 3. Click the created step to open the Attributes panel and enter “first_category” in the key field.


(Attributes of If Value Action)
Step 4. Create a new step, select the “If Value” action, then click the step to activate the Attributes panel.
Enter “first_category” as the key, set the comparator to “!=”, and enter “Role Playing” as the value.
If the value stored under the key “first_category” does not match the text “Role Playing” (first_category != Role Playing), the child step will be executed.

Step 5. As a child step of the If Value step, create steps to select “Categories” and then select “Role Playing” from the category list.

Step 6. After resetting the scenario to its initial state on the device connected to Stego, the created steps are executed from the beginning.
Stopping a Playing Video #
This scenario detects screen changes while a video is playing in the YouTube player and stops playback using a double-touch action.
Through this, you will learn how to define an area using the “Custom Box” screen analysis tool and control actions using the “If Changed” action.

① Create a new step and select the ‘If Changed’ action.
② Choose ‘Custom Box’ from the screen analysis tools and analyze the screen.
③ Drag and select the video playback area on the device screen, then drag and drop it to add it as a UIObject.

④ Right-click the ‘If Changed’ step and select ‘Insert child’ to create a child step.

⑤ Create a child step and select the ‘Touch’ action.
⑥ Set the type to ‘Double’ to enable a double-touch action.
⑦ Since the UIObject created in the first step can be reused, select the existing image and drag and drop it into the child step.
Note) You can use the Custom Box to add the video playback area to the child step's UIObject, but since the UIObject was already created in the first step, it can be reused by dragging and dropping it into the desired step.
Setting an Alarm Time #
This scenario demonstrates how to set an alarm time in the Android clock app.
You will learn to adjust the alarm time using the “Loop Content” and “If Content”.

① Create a new step.
② Select the ‘Touch’ action.
③ Choose ‘OD’ from the screen analysis tools.
④-⑤ Drag and drop the ‘+’ button as a UIObject.

① Create a new step and select the ‘Loop UIObject’ action.
② Choose ‘OCR’ from the screen analysis tools.
③ Drag and drop the number ‘9’ as a UIObject.

④ In the Attributes tab, set the comparator to NOT EXISTS.
⑤ Set the “limit” to 12, as the hour values range from 1 to 12.

① Add a child step.
② Select the ‘Scroll’ action.
③ Select ‘Custom Box’ from the screen analysis tools while ensuring that a number smaller than ‘9’ is visible on the device screen.
④ Drag and select the number ‘6’ and add it as a UIObject.
Exception Handling) When setting the time to 9 o’clock, adjustments may be needed if the current time is 8 or 10.
– If the time is set to 8, the hour value should be scrolled down one step to reach 9.
– If set to 10, the hour value should be scrolled up to 9.

① Create a new step and select the ‘If UIObject’ action.
② Choose ‘OCR’ from the screen analysis tools.
③ Drag and drop the number ‘7’ as a UIObject.

① Create a new step and select the ‘If UIObject’ action.
② Choose ‘OCR’ from the screen analysis tools.
③ Drag and drop the number ‘11’ as a UIObject.

① Create a child step.
② Select the ‘Scroll’ action.
③ Select the ‘Custom Box’ from the screen analysis tools.
④ Drag to select the number ‘10’ and drop it as a UIObject.
⑤ In the Attributes tab, set the direction to DOWN.
Note) The ‘direction’ attribute in the Scroll action specifies the direction in which the screen will scroll when touched.
     For example, to set the time from 10 to 9 o'clock, you need to touch 10 and move your finger downward until 9 is positioned in the center of the time area.
     In this case, setting the direction to ‘DOWN’ ensures the correct movement.

① Create a new step and select the ‘Touch’ action.
② Select ‘OCR’ from the screen analysis tools.
③ Drag and drop the ‘Save’ from the screen to add it as a UIObject.
Verifying Disappearing UI #
This scenario tests UI elements that appear for a short time and disappear automatically (e.g., toast pop-ups).
It verifies whether the options menu disappears properly after clicking “Save to Watch later” in the YouTube app.
This example will help you learn how to use the Assert Message action.

Scenario Preparation:
① Connect the device to Stego and launch the YouTube app. Search for “apptest ai”, and scroll until the first video from apptest appears at the top.
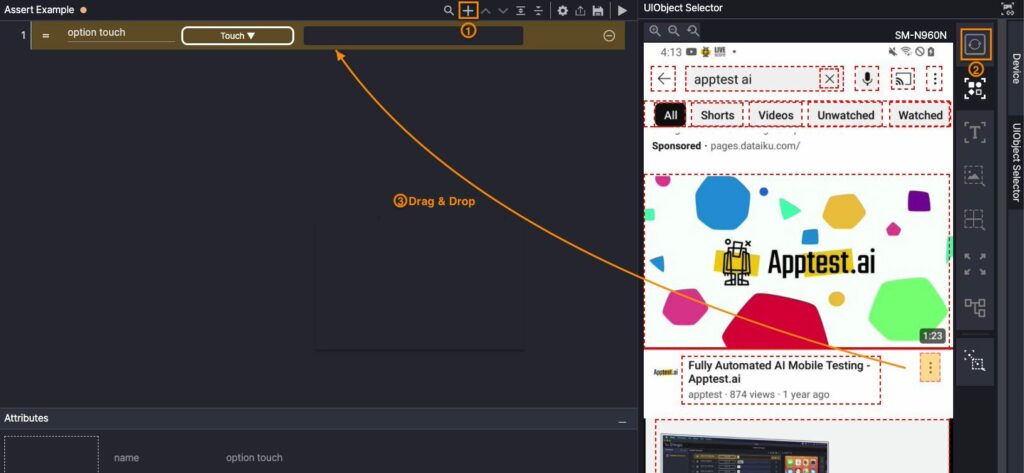
① Create a new step.
② Click the “AI screen analysis” button in the device panel toolbar.
③ Drag and drop the video options button into the new step.
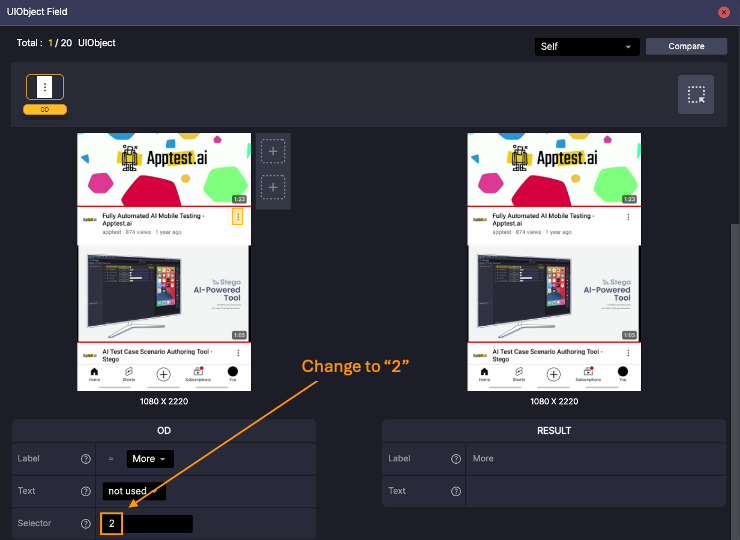
Since multiple kebab menu icons may appear on the screen, update the Selector value to 2 to ensure the correct button is touched.
Open the UIObject properties panel by clicking the UIObject Field in the step.
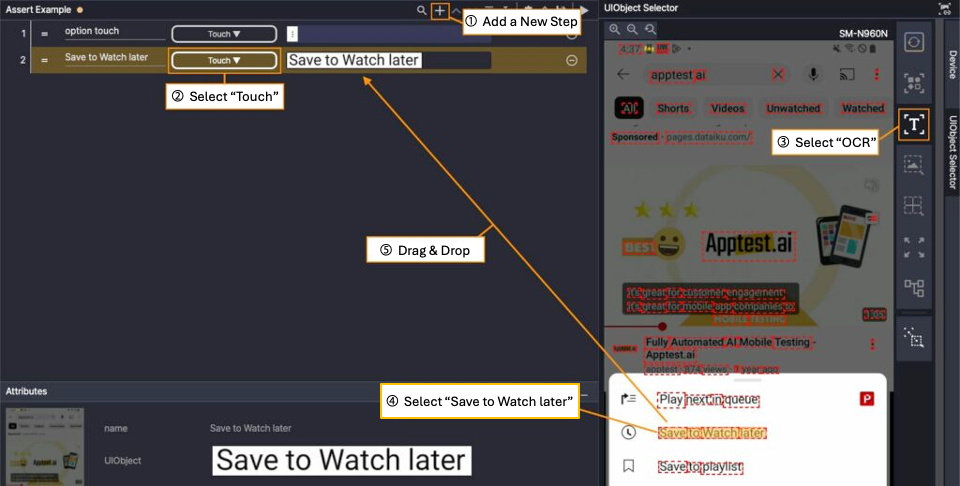
① Create a new step.
② Select the ‘Touch’ action.
③ Choose ‘OCR’ as the screen analysis tool.
④ Drag and drop the “Save to Watch later” option to add it as a UIObject.
Note) When using OCR, words may be detected separately. If multiple words are dragged and selected from the OCR result, they will be recognized as a single sentence.

① Create a new step.
② Select the ‘Assert Message’ action.
③ Verify if the toast pop-up message “Saved to Watch later” appears.
④ Select ‘=‘ as the comparator in the Attributes panel.
⑤ Check the toast popup message and enter it in the value field.
Note) The Assert Message action detects text on the same line as a single string. If you want to verify part of the message, set the comparator to *= to check for partial matches.
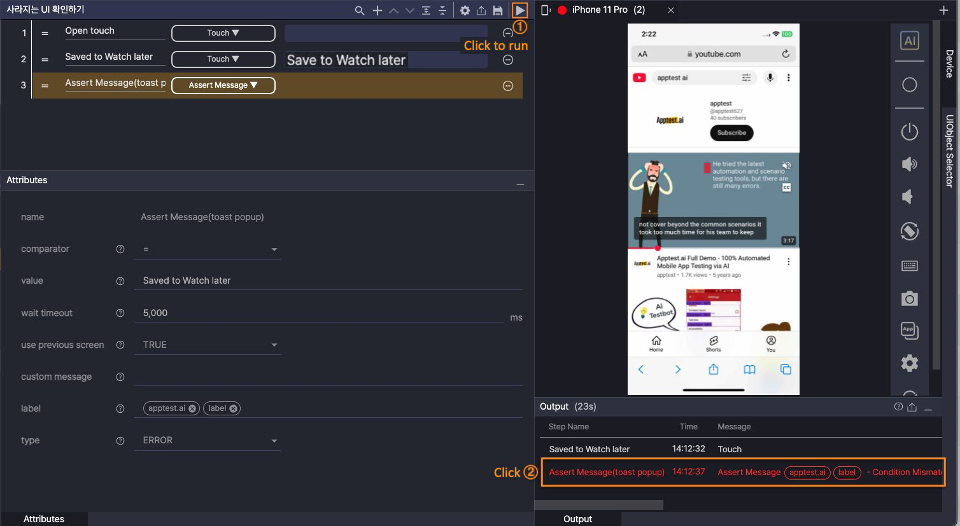
① Run the scenario.
② Review the results in the Output panel.

① Check the test results in the results window.
Checking for Home Screen Icons #
This scenario verifies whether the Play Store app icon is present on the home screen.
If the app icon is not found, the test will output an error message: “Play Store app icon is not present on the home screen.”

Step 1. Create a new step and select the ‘Assert UIObject’ action.

Step 2. Click the AI button in the device panel.
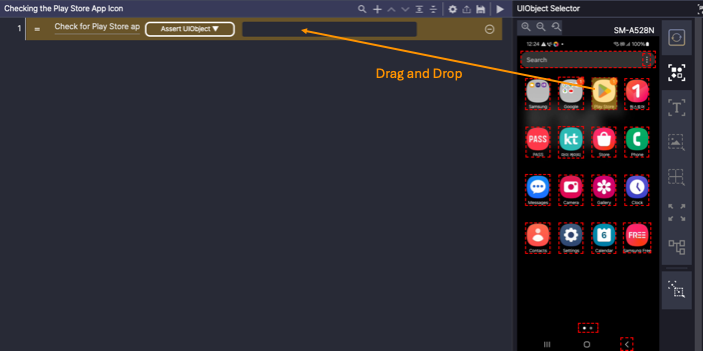
Step 3. Select ‘OD’ as the screen analysis tool and drag and drop the Play Store app icon as a UIObject.
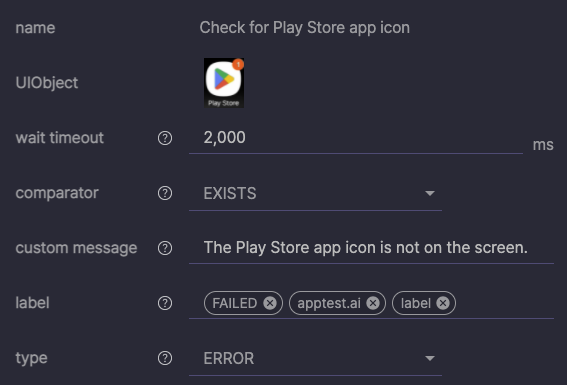
Step 4. In the Attributes panel, set the comparator value to ‘EXISTS’ and input the custom message:
Play Store app icon is not present on the home screen.
Note) The custom message will appear in the Output panel if the comparator condition is false.
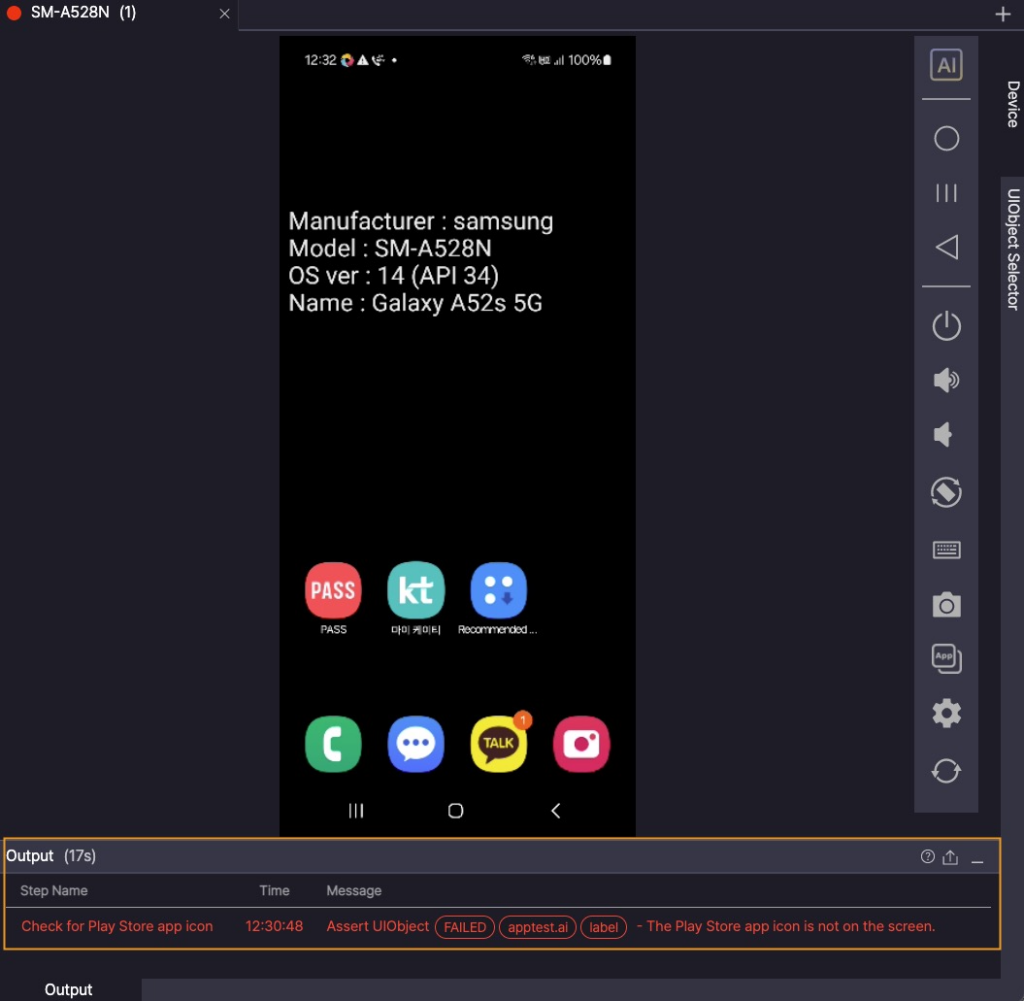
Step 5. Run the scenario after removing the Play Store icon from the home screen and check the Output panel for error messages.
What is a Common Scenario? #
A Common Scenario is a reusable scenario that can be created for repetitive tasks and called from other scenarios.
By defining frequently used processes as a common scenario, you can avoid the need to recreate them in multiple scenarios.
For example, if an app requires a login, you can create a separate scenario for the login process and set it as a Common Scenario.
This enables other scenarios to reuse the login process without having to recreate it each time.
Note) Common scenarios can only be used within the same folder.
Once a general scenario includes a common scenario, it cannot be converted into a common scenario itself.
Creating a Common Scenario #
This example demonstrates how to launch an app using its ‘Package Name’ (for Android) or ‘Bundle ID’ (for iOS).
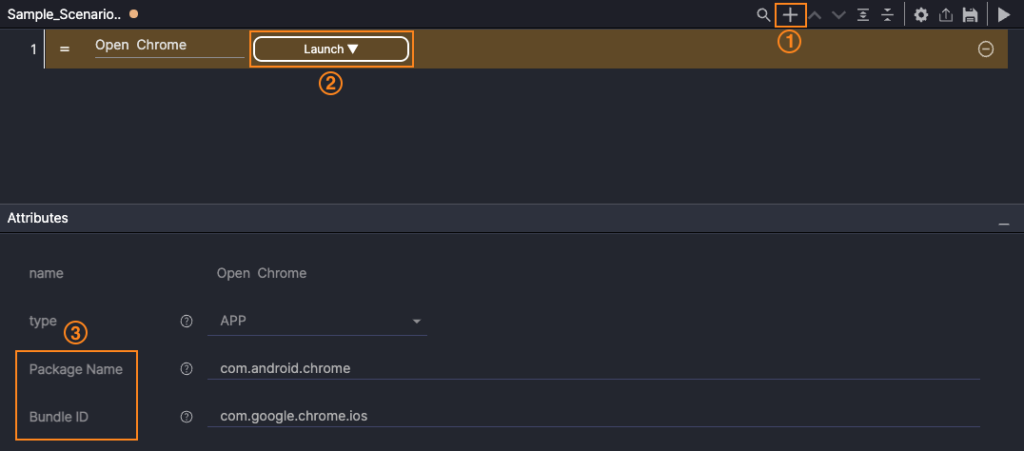
① Create a new step.
② Select the ‘Launch’ action.
③ Enter the exact ‘Package Name’ (for Android) or ‘Bundle ID’ (for iOS) of the app.
Note) The Package Name and Bundle ID can be verified by copying the name of the currently active app in Device Tab mode.
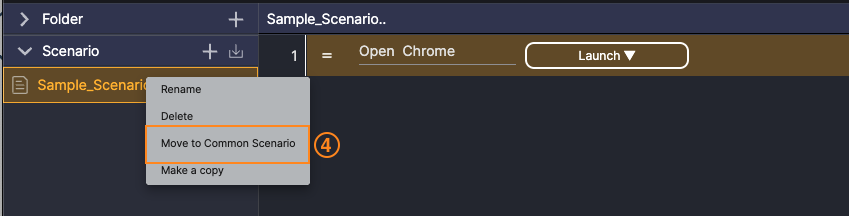
④ Right-click the created scenario in the scenario list panel and click the ‘Move to Common Scenario’.
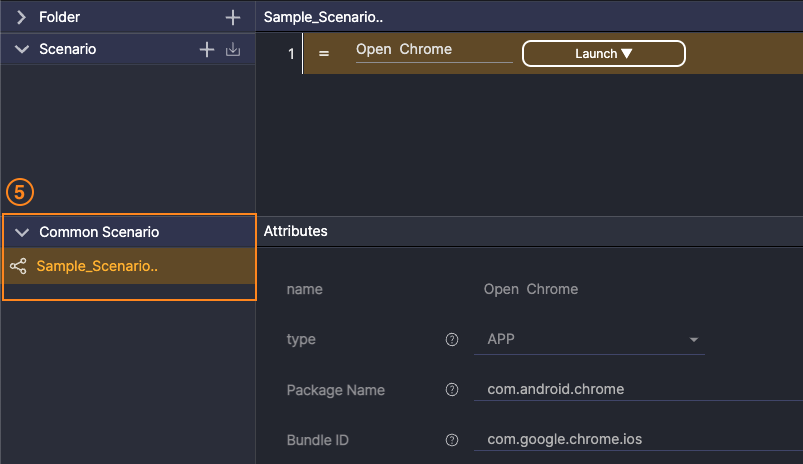
⑤ You can see that the scenario is removed from the scenario list panel and added to the common scenario list panel below.
Using a Common Scenario #

① Add a new scenario.
② Create a new step within the added scenario.
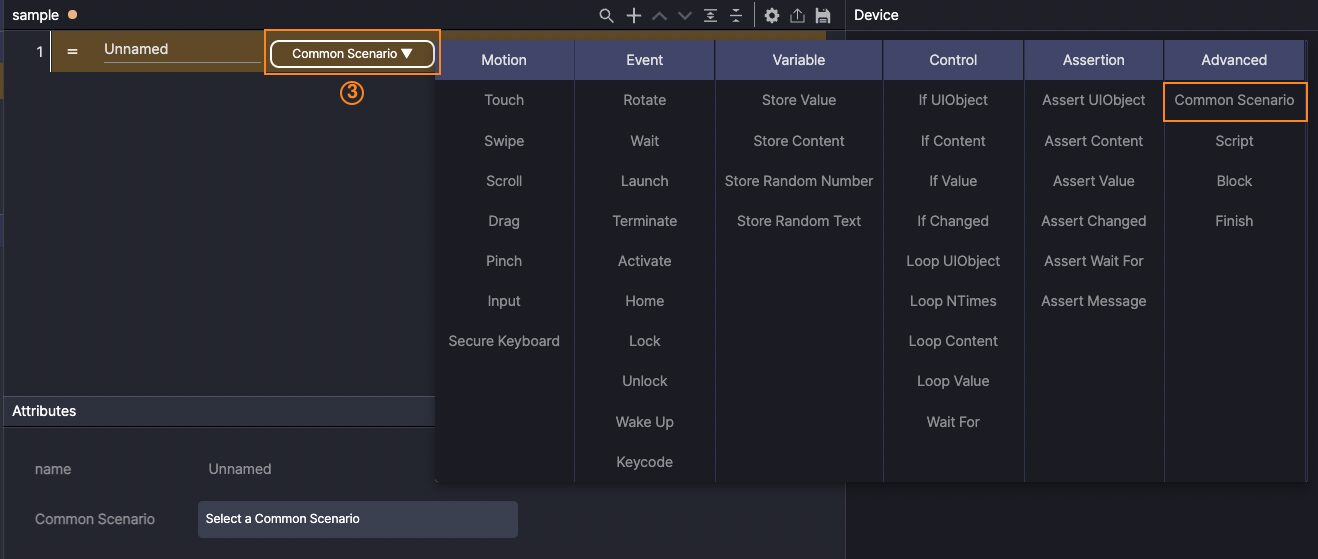
③ Select the ‘Common Scenario’ action.
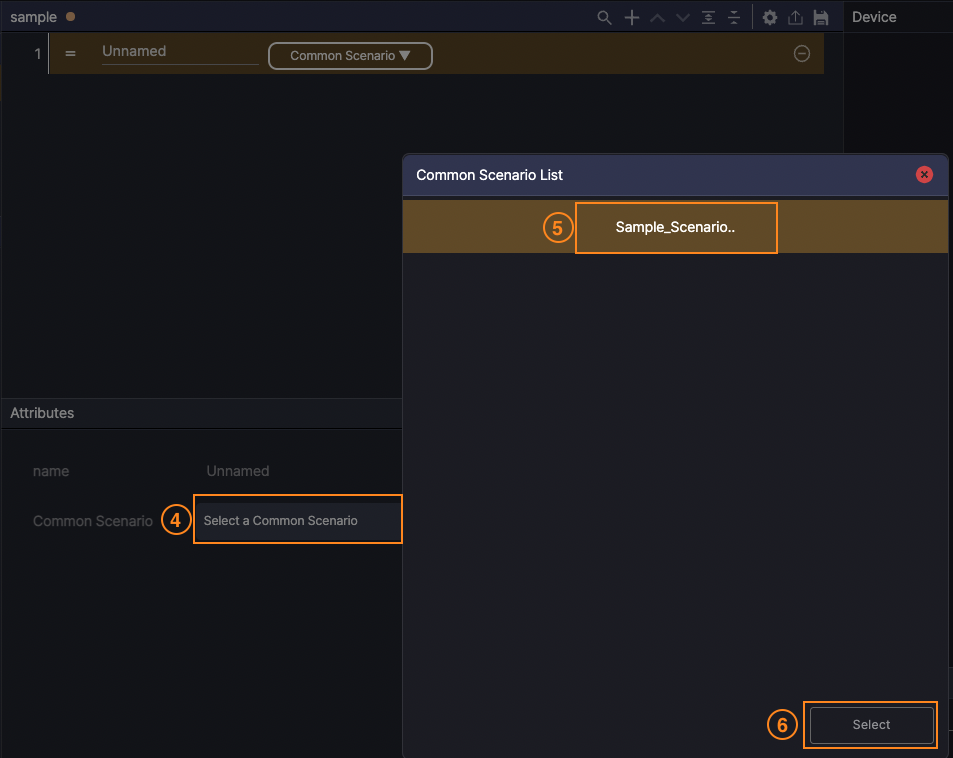
④ Select the common scenario in the Attributes tab.
⑤-⑥ Select the previously created scenario from the common scenario list.
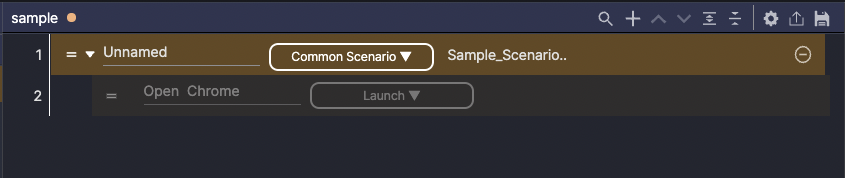
Once the selected common scenario is successfully added, it cannot be edited and will be displayed in a disabled state.