When completing and testing a scenario, unexpected step failures may occur.
In such cases, it is recommended to verify the screen elements added in the UIObject Field window.
To do this, click the space to the right of the step action to open the UIObject Field window and proceed with verification.

Using the UIObject Field #
The UIObject Field allows you to modify and validate the properties of a UIObject.
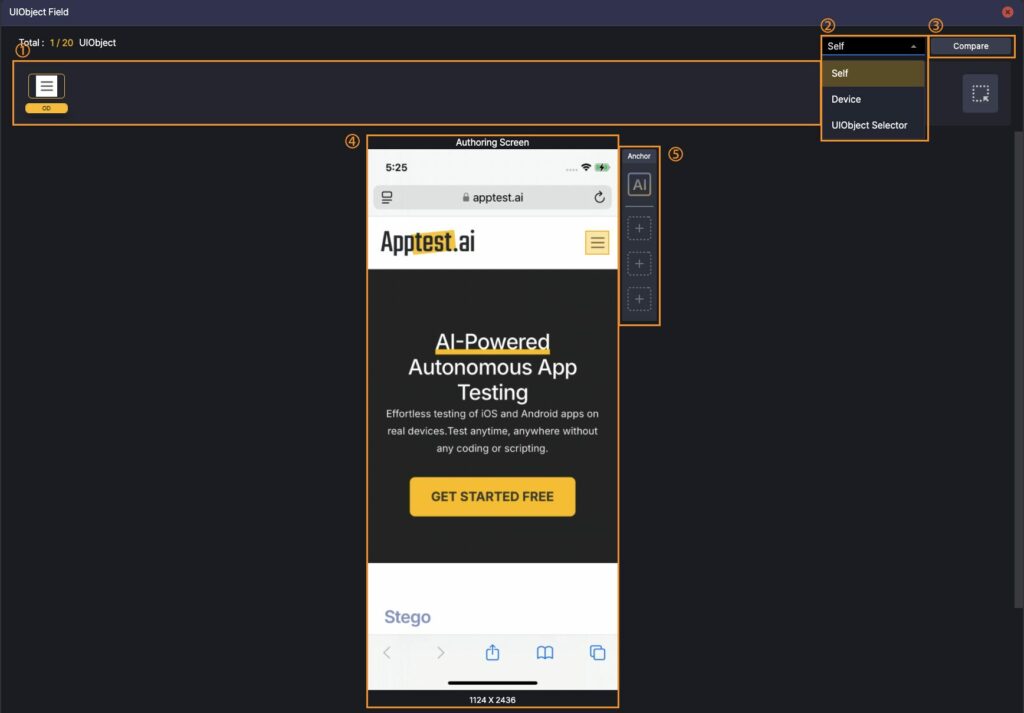

① You can register multiple UIObjects for a single step.
– If at least one of them is found on the screen during execution, the condition is considered met.
② To validate a UIObject, you must specify the screen image to use as a comparison baseline.
– You can choose from the following options:
* Self: The screen captured during scenario authoring (Authoring Screen)
* Device: The current screen of the connected device
* UIObject Selector: A screenshot selected using the UIObject Selector tool
③ Compare the Authoring Screen with the selected baseline screen to verify the presence and accuracy of the UIObject.
④ Added UIObjects are highlighted in yellow on the Authoring Screen for easy identification.
⑤ You can add Anchors to enhance UIObject detection accuracy.
– For more details, see Utilizing the Anchor Feature.
How to Verify Screen Elements #

You can begin the verification process in the following steps:
① Select the screen element to verify.
② Choose a verification method.
There are three verification methods available:
- Self : Verifies using the image captured at the time of creation.
- Device : Verifies using the currently active device screen.
- UIObject Selector : Verifies using an image loaded via a URL.
③ Click the Compare button to verify.
Once the verification is complete, the following screen will be displayed:

① Original Image
② Result Image
③ Matching Result Message
The result message varies depending on the status:
- No message is displayed when the verification is successful.
- Test Failure :

- Test Failure (Mismatched UI) :

Improving Screen Element Matching Accuracy #
If the target UI element cannot be identified, it is necessary to refine the screen elements added in the UIObject Field window.
Stego provides three methods to accurately locate the target UI element:
- Handling screen elements using OCR
- Modifying element attributes to redefine conditions
- Utilizing the Anchor feature to establish relationships between screen elements
Locating Elements Using OCR Conditions #
Although AI accurately detects most screen elements, there may be cases where recognition fails.
For example, if the Object Detection (OD) fails to detect a “Login” button,
You can resolve the issue by configuring the OCR (Optical Character Recognition) to recognize the “Login” text.
Open the UIObject Field window by clicking the space to the right of the step action.

Drag and drop the designated area to add the OCR-recognized “Login” text element.
Modifying Attributes #
Attributes serve as criteria for matching UI elements with the same information during test execution.
The information provided varies depending on the method used—OD, OCR, or Crop Image—allowing for fine-tuning to precisely match the desired target.
The following tasks can be performed by modifying attributes:
- Strengthening matching criteria to attempt more accurate UI matching.
- Selecting the Nth UI element among multiple matched elements on the screen.
Ensuring Accurate UI Element Matching #
By default, Stego applies flexible matching criteria to ensure more stable scenario creation.

(Example of Unintended Matching)
When attempting to locate the word ‘launched’ in the left image, the matching result in the right image may display a similar word, ‘launche.’
This happens because the Text Similarity value is set to 0.87, which exceeds the threshold of 0.8.
To match only the intended target, adjust the Text Similarity value to 1.

(Example of Intended Matching)
In addition to adjusting the Text Similarity value, various attribute values can be modified to locate the desired target.
For more details on attribute values, refer to the Screen Analysis Tools.
Ensuring Nth UI Element Matching #
If multiple UI elements with the same attribute values exist on the screen, you can modify the Selector value to match the desired Nth UI element.
For example, if there are 8 instances of the word “test” on the screen below, using the default condition, the “test” located at the top of the screen will be matched.

(Example of Unintended Matching)

(Example of Intended Matching)
If you need to locate the fifth occurrence of the word “test” on the screen, you can set Selector=5.
Alternatively, you can use the “-” function to search from the bottom of the screen and set Selector=-3 to locate the third occurrence from the bottom.
Utilizing the Anchor Feature #
Starting from Stego version 1.10.x, the Anchor feature can be used to locate screen elements based on a specific UI reference, in addition to selecting the Nth matching element.
Feature Overview #
The Anchor feature consists of the following steps:
- Anchor Element Matching
- The first step involves identifying and matching the screen element that serves as the Anchor, which acts as the reference point. The system locates and verifies the user-specified Anchor element on the screen.
- Target Element Matching
- The system searches for the Target element, which forms a relationship with the Anchor. Precisely identifying and matching the Target element is crucial.
- Verifying the Spatial Relationship Between Anchor and Target
- The final step verifies the spatial relationship between the Anchor and Target elements using their position information, including distance, direction, and relative placement. Once this relationship is clearly defined, subsequent actions can be performed accordingly.
Through this process, the system can understand relationships between specific elements on the screen and execute additional tasks accordingly.

The Target’s position is determined using eight possible directions relative to the Anchor. Once the Anchor is added, Stego automatically applies the positioning.
How to Use #
Follow these steps to add an Anchor element:

① Click the + button on the right side of the Authoring Screen to load the image captured at the time of creation.
② Select the desired screen analysis type and drag and drop the UI element using the + button.

The added Anchor element will be highlighted in purple, and users can click on it to modify or delete it.
Up to three Anchors can be added, and all added Anchors must be present during testing to match with the Target.
Detailed Analysis of Anchor Matching #
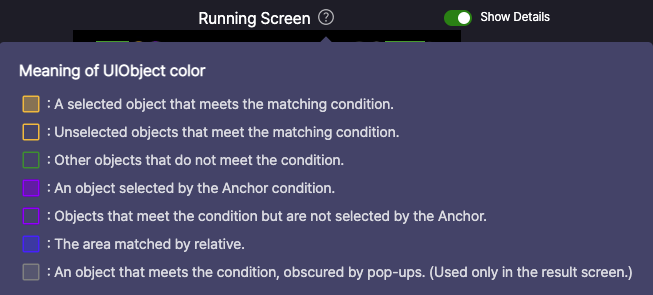
Enabling the Show Details switch on the right side of the Result Screen allows you to view analysis results for various UIObjects through color indicators.
Additionally, hovering over the help button on the Result Screen provides descriptions of the UIObject colors.