
Configure the test environment in your project’s Settings.
Open it from the settings icon in the project list, or select a project and click the Settings tab.
Tab structure #
Settings has four tabs: Details, Test Settings, Manage App, and User-Defined Message.
Details #
Edit basic project information.
- Project name: Name for the project. Must be unique within the team.
- Project Icon: Enter an icon URL. The icon appears in the project list.
- Test in Parallel: Allow multiple Test Suites to run at the same time within the project.
- Enabled by default. When disabled, only one test runs per project at a time.
Test Settings #
Test Duration #
Set the test run time. Default is 15 minutes.
Device Settings #
- Device Language: Language for test devices.
- Re-sign App File: Re-sign the app file before testing. Enabled by default.
Test Run Settings (Optional) #
- Enable video recording for test run: Record video during each test step.
- Enable network capture: Collect network traffic as HAR data.
- Enable lighthouse: Collect Lighthouse data.
- Enable code coverage (Android only): Measure app code execution coverage.
- Enable JaCoCo (Android only): Measure code coverage using JaCoCo.
Advanced Settings (Optional) #
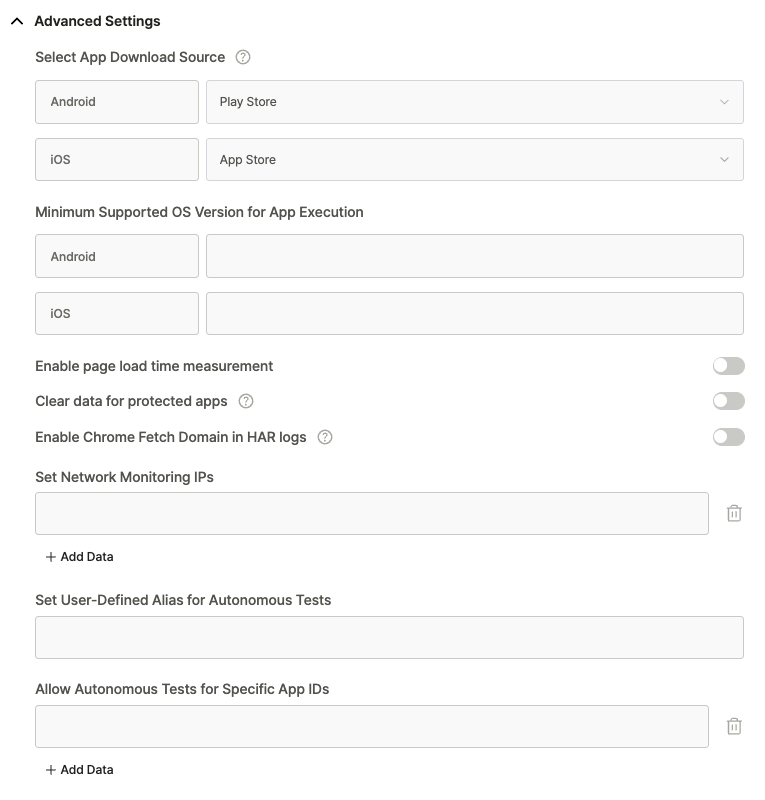
- Select App Download Source: Set the app installation source.
- Android: Play Store (default) or Firebase
- iOS: App Store (default) or TestFlight
- Firebase and TestFlight require dedicated devices.
- Minimum Supported OS Version for App Execution: Set the minimum OS version.
- Only devices running this version or higher will be assigned.
- Enable page load time measurement: Collect TTI (Time to Interactive) data.
- Clear data for protected apps: Delete data for apps registered as protected.
- Enable Chrome Fetch Domain in HAR Logs: Collect HAR data using Chrome Fetch Domain.
- Set Network Monitoring IPs: IP addresses to ping during tests for network status logging.
- Set User-Defined Alias for Autonomous Tests: Set custom aliases for autonomous test rules.
- Allow Autonomous Tests for Specific App IDs: Define packages allowed for autonomous testing.
Manage App #
Specify the app to test.
- App ID: If the app is not installed on the device, it will be downloaded from the store before testing.
- Binary file: Run tests using the uploaded app file. If a file has already been uploaded, the new file replaces it.
User-Defined Failure/Warning Messages #
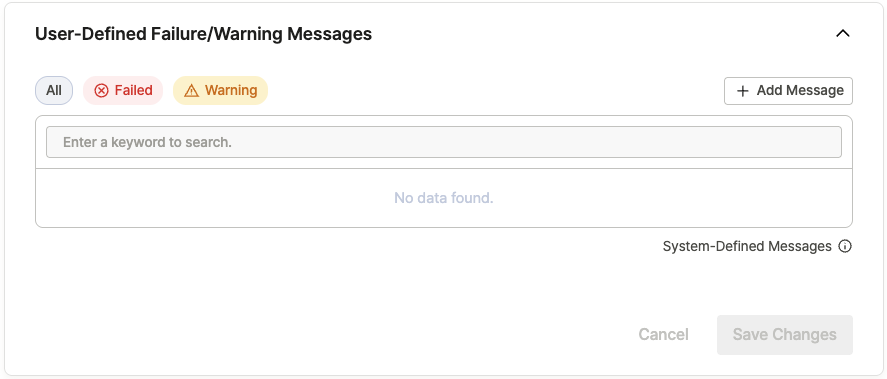
Automatically change the test result status when specific text appears on screen during a test run.
- Failed: Classify the test as Failed when an error message is detected.
- Warning: Classify the test as Warning when a caution message is detected.
Click + Add Message to add a message, then specify the text to detect and the result status (Failed or Warning).