
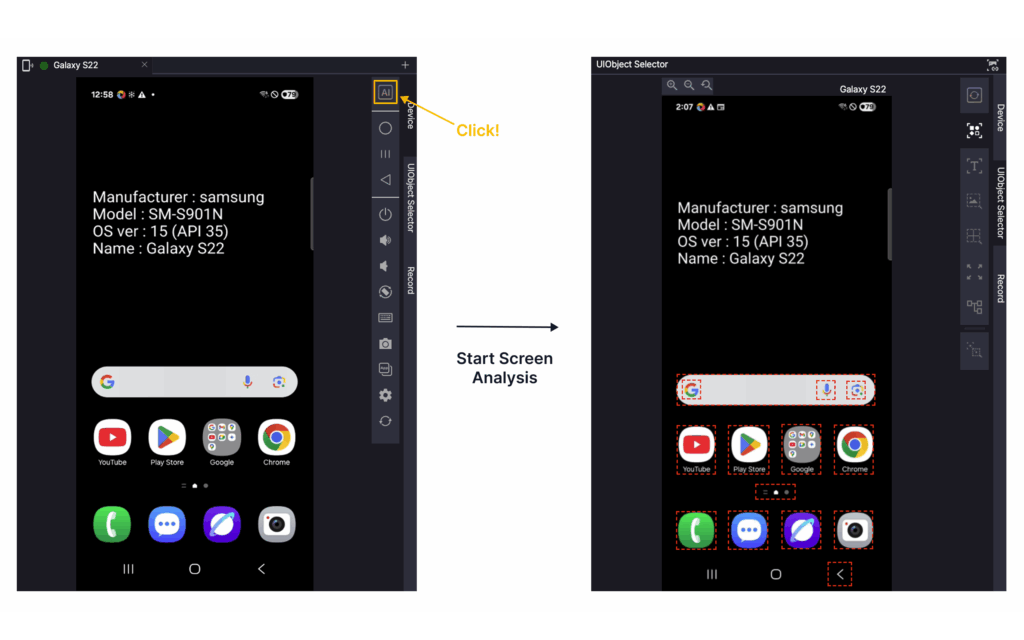
Each example assumes that the scenario has already been created and the devices are connected.Launch the app #
This section describes three ways to launch the YouTube app.
- Launch the app by tapping its icon on the Home screen
- Search for and launch the app name
- Launch the app using the app ID (
Package NameorBundle ID)
Tap the app icon on the Home screen #

Step 1. Create a new step.
Step 2. Analyze the screen and select OD as the analysis tool.

Step 3. Select “Youtube” on the screen, then drag & drop to add it as a UIObject in the step.
Search for and launch the app name #

Step 1. Create a new step and select the Scroll action.
Select Full Screen from the Screen Analysis tool and add it as a UIObject in the step.
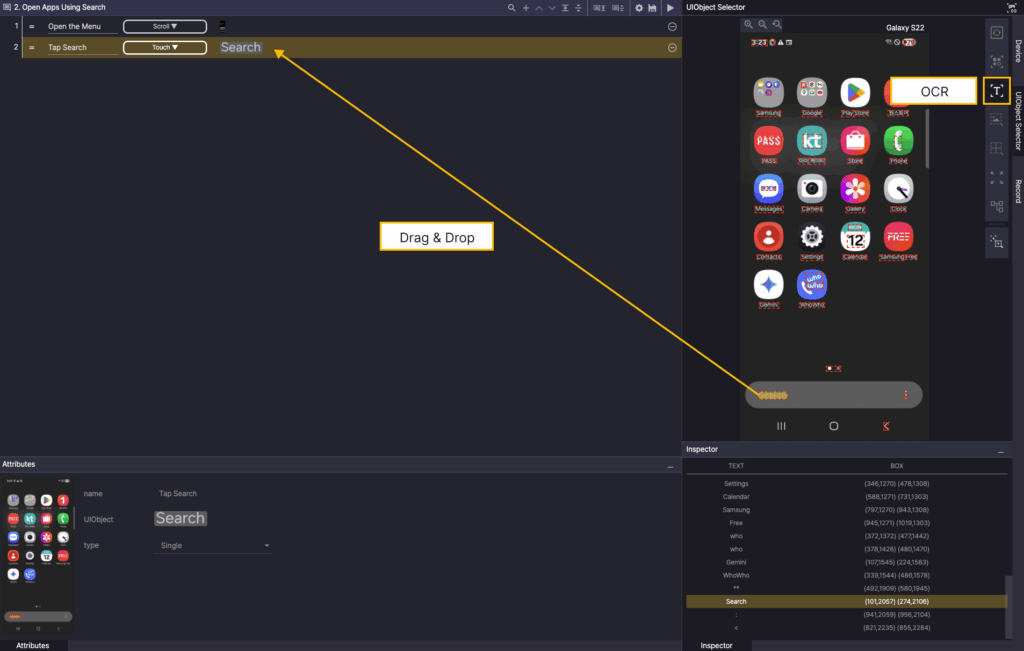
Step 2. Create a new step and select Touch Action.
In the Screen Analysis tool, select OCR, and add Search OCR as a UIObject in the step.
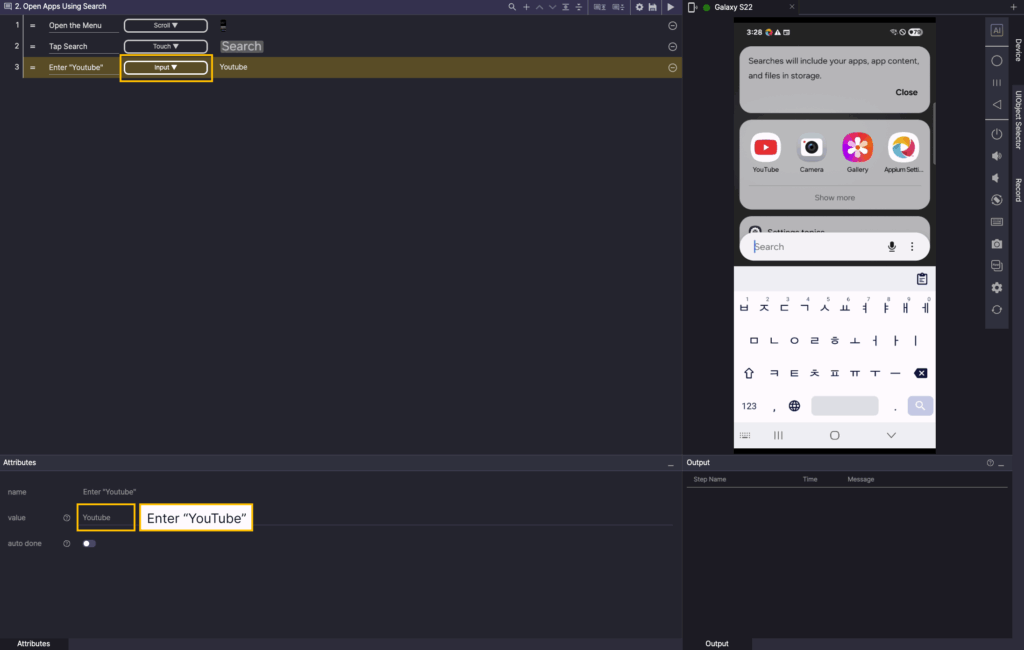
Step 3. Create a new step, select the Input action, and enter Youtube in the value of Attributes.
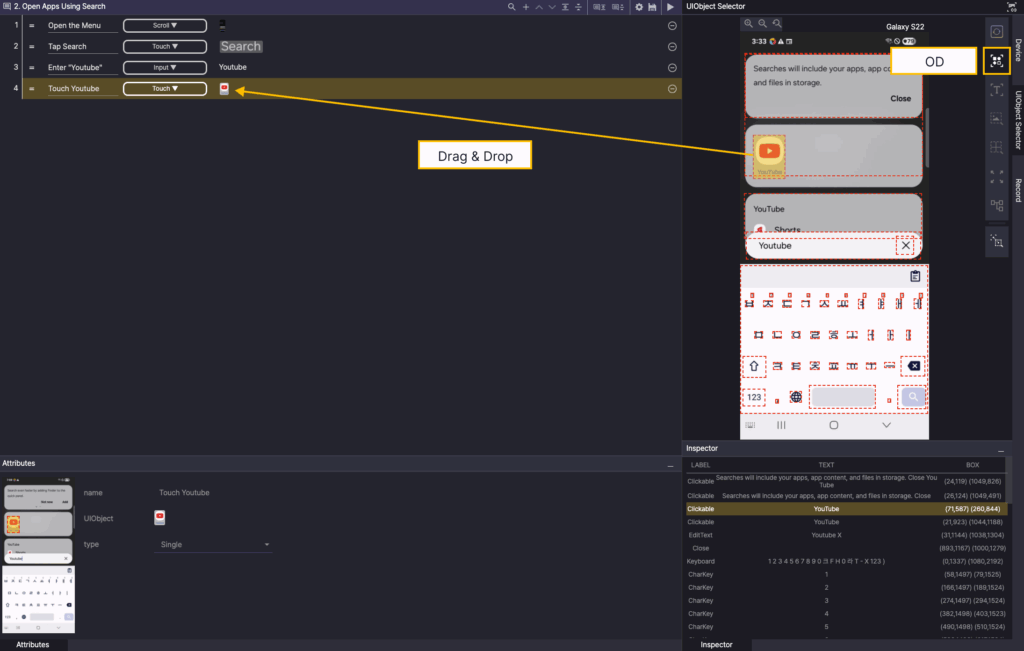
Step 4. Create a new step and select the Touch action.
In the Screen Analyzer, select OD and add the YouTube object as a UIObject.
Launch the app using the app ID #
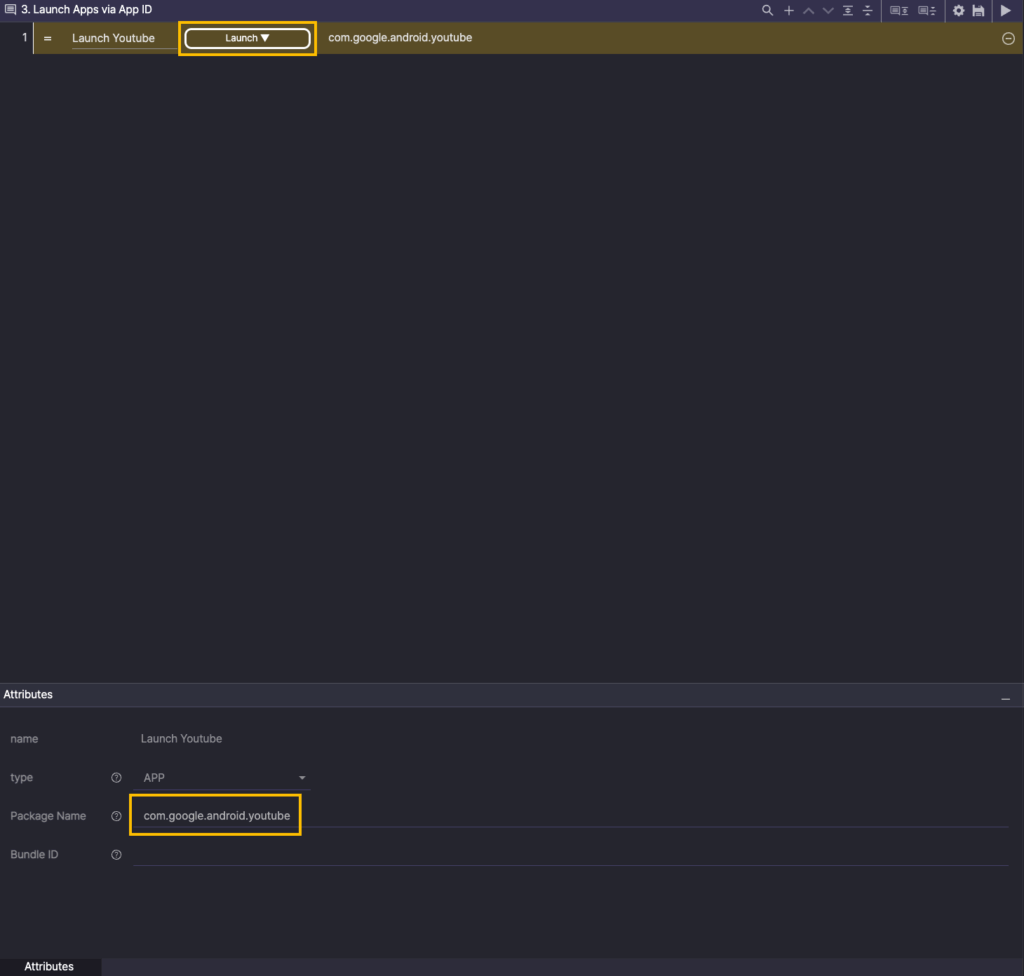
Step 1. Create a new step and select the Launch action.
For Attributes, in the PackageName, enter the app ID (com.google.android.youtube) for Youtube.
Scroll to find videos #
An example scenario that scrolls through YouTube search results until the Fully Automated AI Mobile Testing – Apptest.ai video appears.
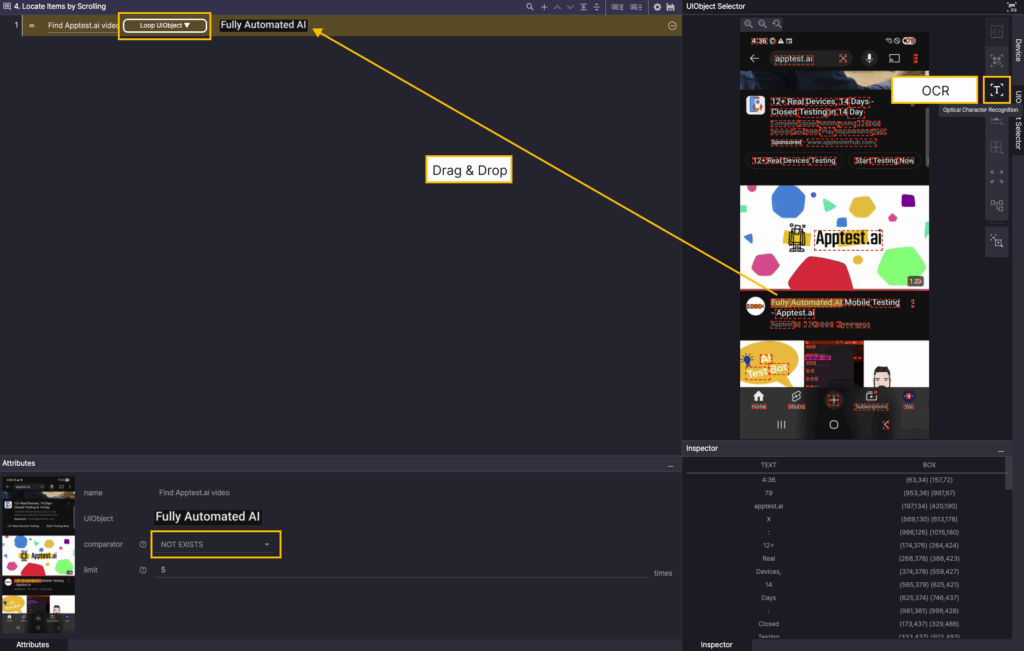
Step 1. Create a new step, select the Loop UIObject action, and set the comparator of the Attributes to NOT EXISTS.
In the Screen Analysis tool, select OCR, and then add Fully Automated AI OCR as a UIObject in the step.
You can select multiple OCR targets at once by dragging.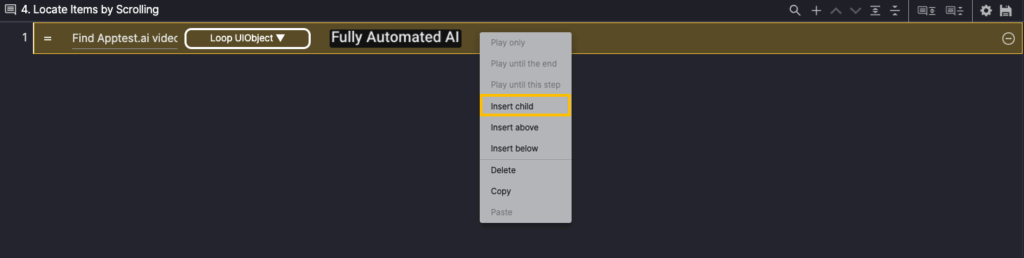
Right-click Step 1, and then select Insert child to add a Child Step.
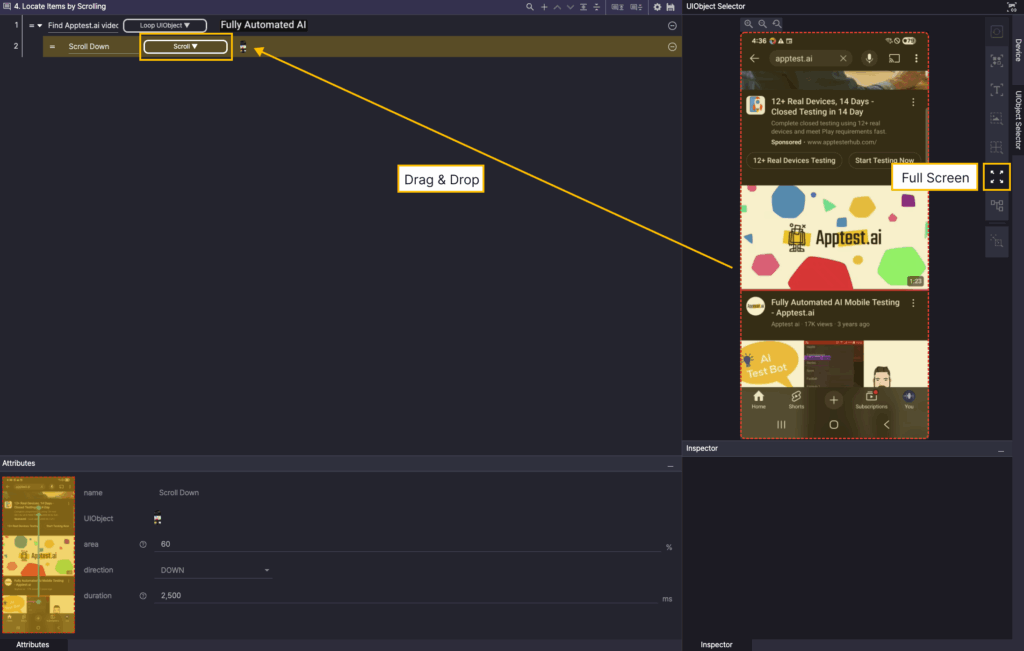
Step 2. Select the Scroll action from the created step.
Select Full Screen from the Screen Analysis tool and add it as a UIObject in the step.
Check for specific location words #
After identifying a specific word present in a given location, let’s create a process scenario that searches for it by typing it into a search engine.
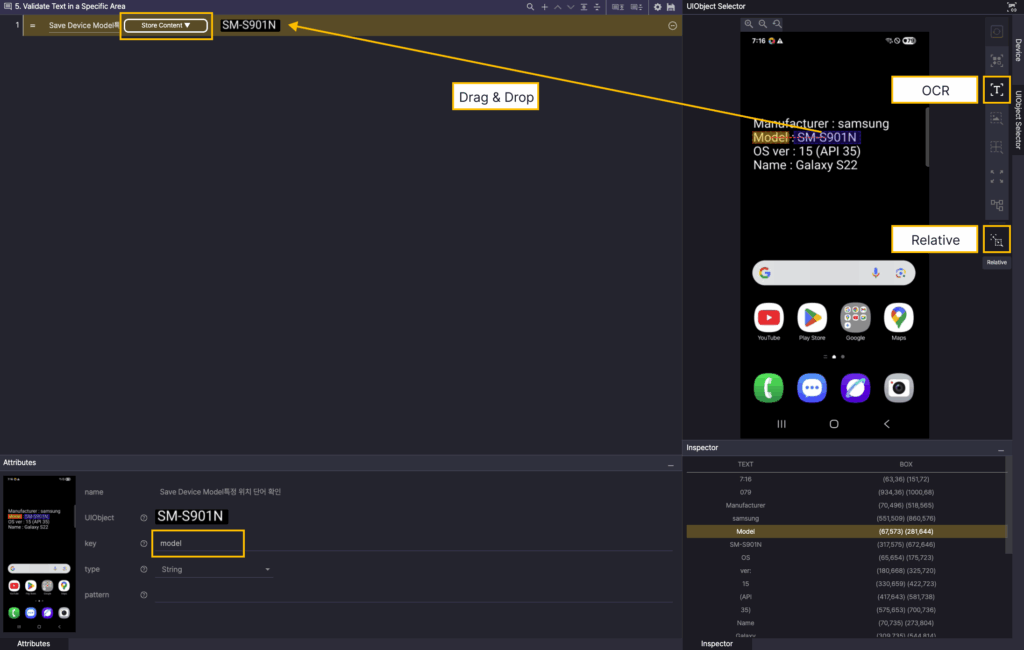
Step 1. Create a new step, select the Store Content action, and enter the model in the key of the Attributes.
In the Screen Analysis tool, select OCR, and then specify the Model OCR for the device screen. Then select Relative, and drag the area where the model name is exposed to add that area as a UIObject.
When the scenario runs, the text in the Relative area is stored in the model variable.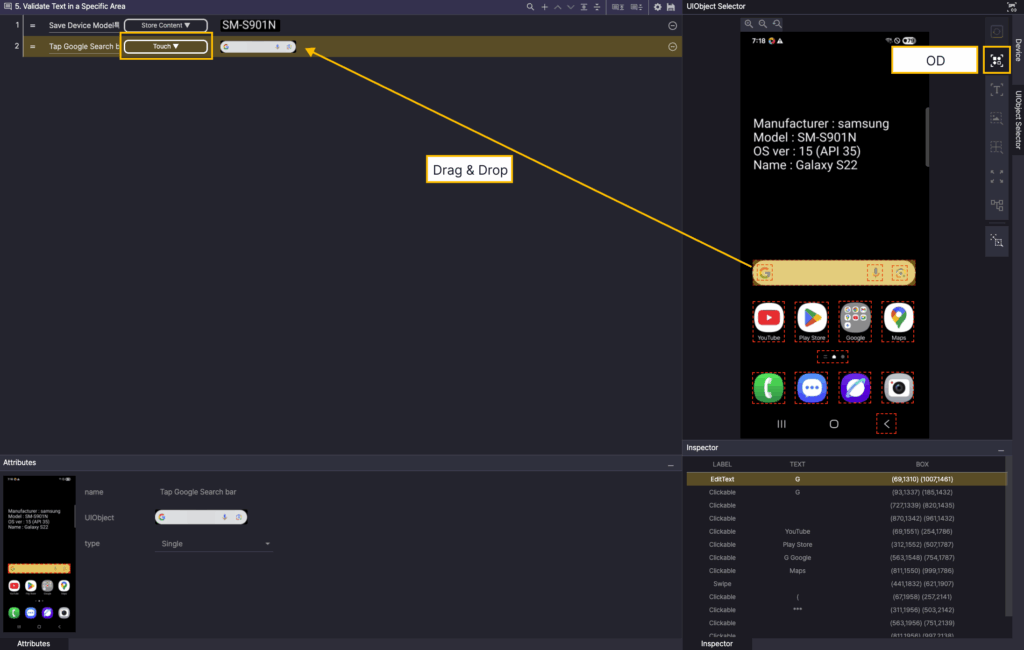
Step 2. Create a new step and select Touch Action.
In the Screen Analyzer, select OD, and then add the Google Search bar OD as a UIObject in the step.
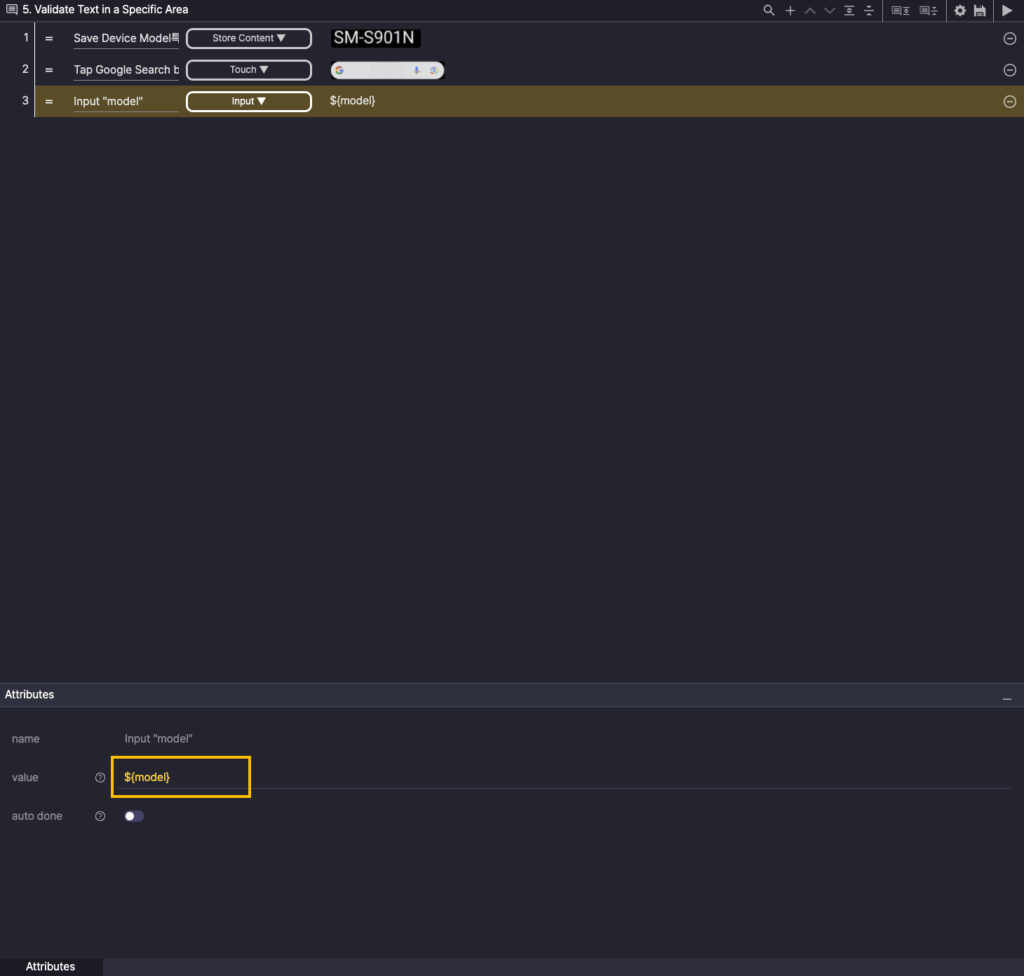
Step 3. Create a new step, select the Input action, and enter ${model} in the value of the Attributes.
Adjust the Google Maps zoom level #
An example scenario that searches for Apptest.ai, 3003 N First Street, San Jose, CA 95134, United States on Google Maps and zoom out on the map.
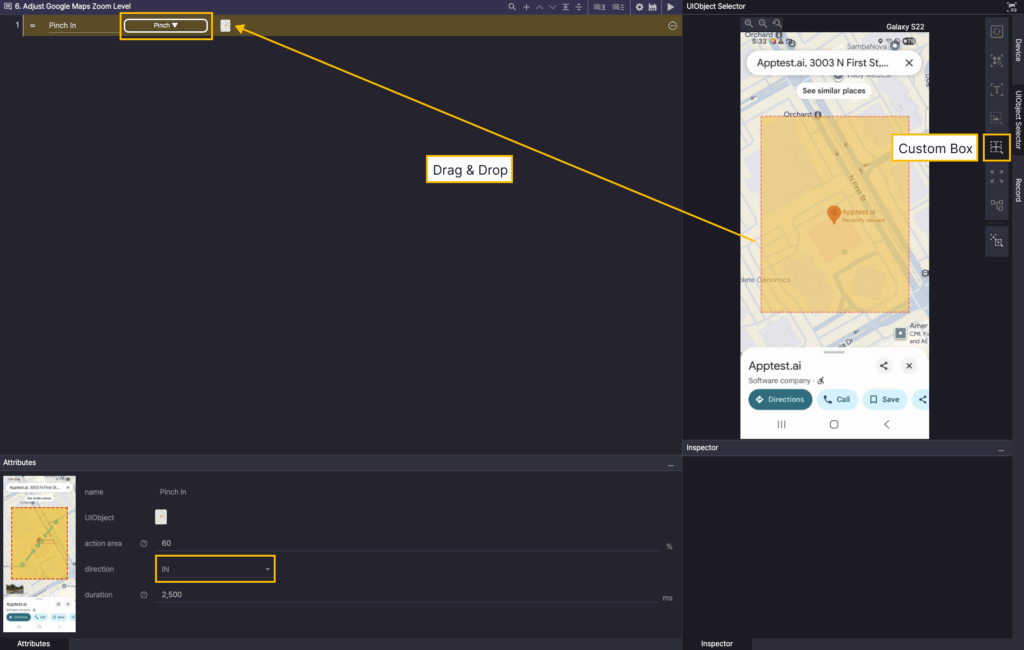
Step 1. Create a new step, select the Pinch action, and set the direction of the Attributes to IN.
In the Screen Analysis tool, select Custom Box, and then drag the area where you want to perform the Pinch In action to add it as a UIObject.
Use conditional actions #
Let’s use the Store Content action and the If Value action to create a scenario where the Top charts category in the Play Store changes the category to Android Auto if it is not already set to Android Auto.
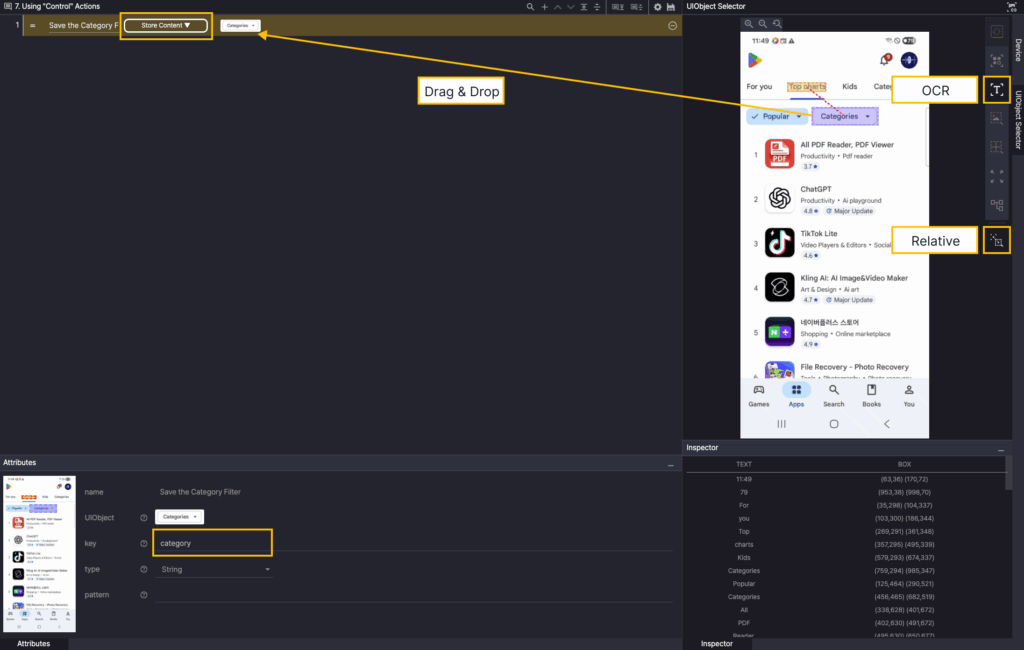
Step 1. Create a new step, select the Store Content action, and enter category in the key of Attributes.
In the Screen Analysis tool, select OCR, and then click Top charts OCR on the device screen.
Then select Relative, and drag the area where the Categories are exposed to add that area as a UIObject.
When the scenario runs, the text in the Relative area is stored in the category variable.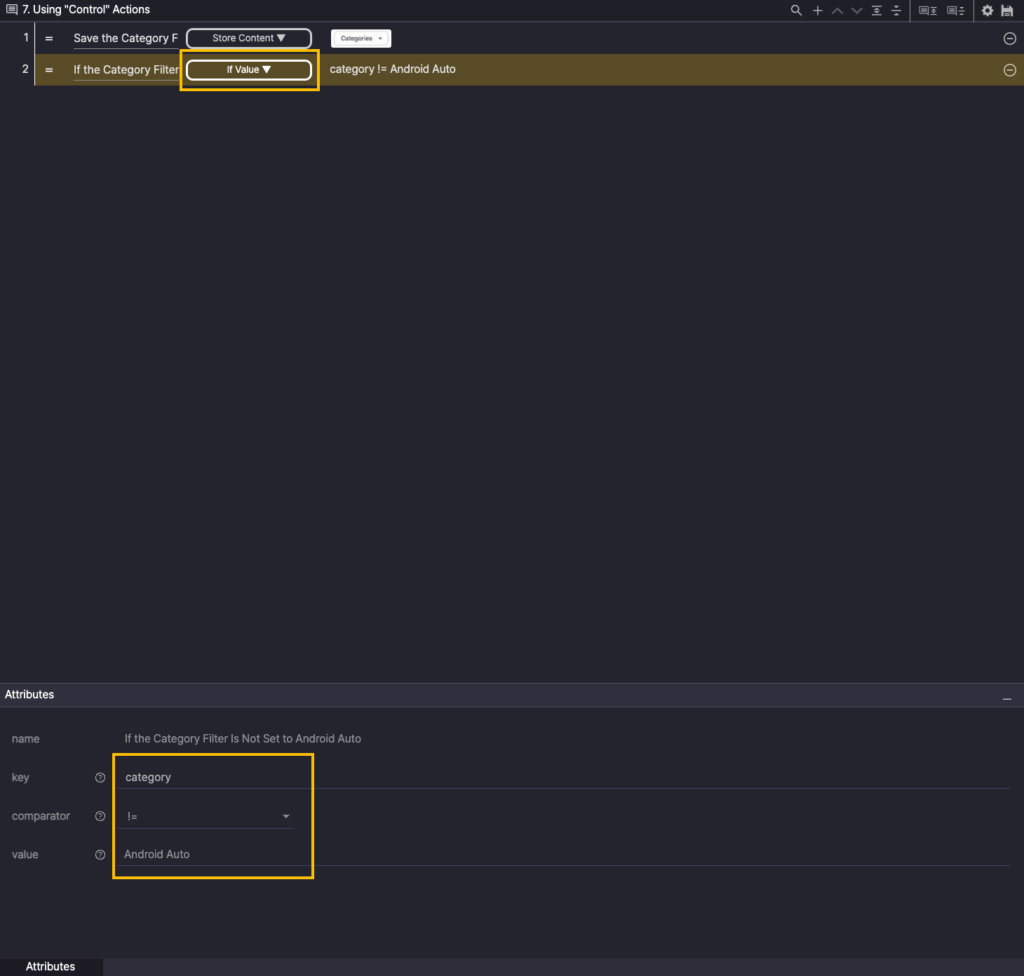
Step 2. Create a new step, select the If Value action, and enter category in the key of Attributes.
Specify the comparator as !=, and enter Android Auto in value.
If the value stored in category is not Android Auto, the child step of the If Value action is executed.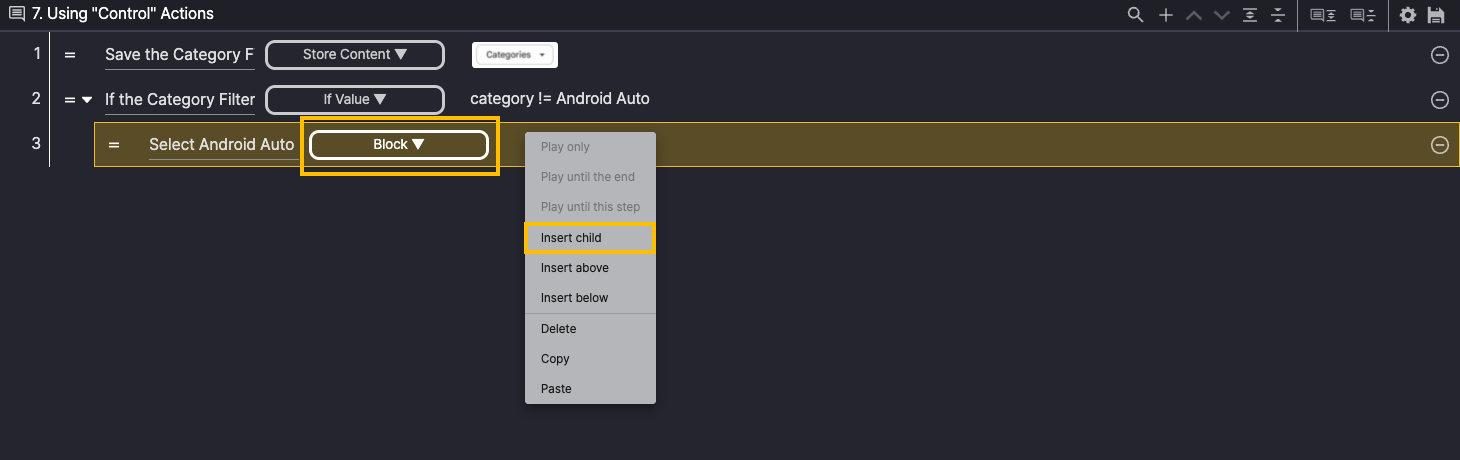
Step 3. Create a new step and select the Block action.
Right-click Step 3 and select Insert child to add a Child Step.
You can use the Block action to group the steps required to select Android Auto as the category.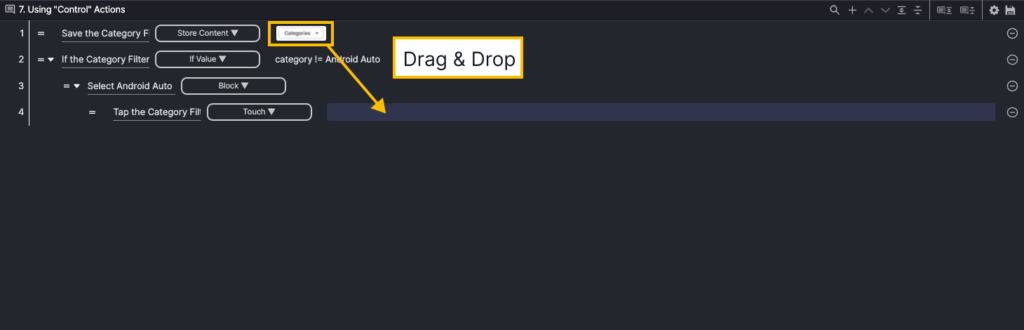
Step 4. Select the Touch action from the created step. Add the UIObject from Step 1 as the UIObject from Step 4.
A UIObject used in one step can be reused in other steps.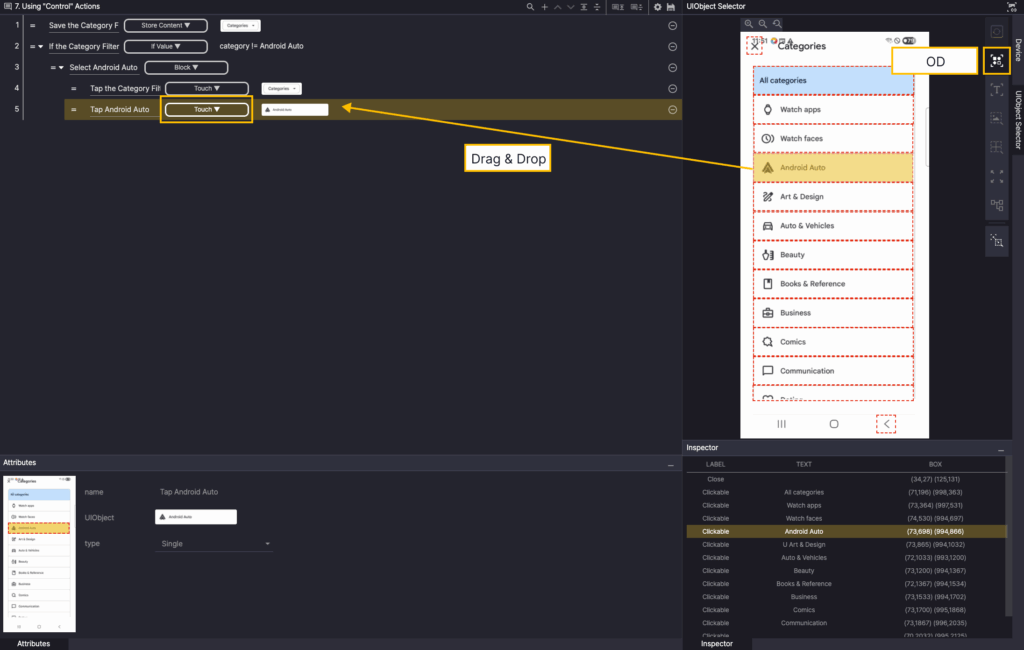
Step 5. Create a new step and select a Touch action.
In the Screen Analyzer, select OD, and then add the Android Auto OD as a UIObject in the step.
Pause a video that’s playing #
Let’s write a scenario where the Fully Automated AI Mobile Testing – Apptest.ai video on YouTube pauses the video if it is currently playing.
This allows you to learn how to specify areas with the Custom Box among the screen analysis tools and control the action with the If Changed action.
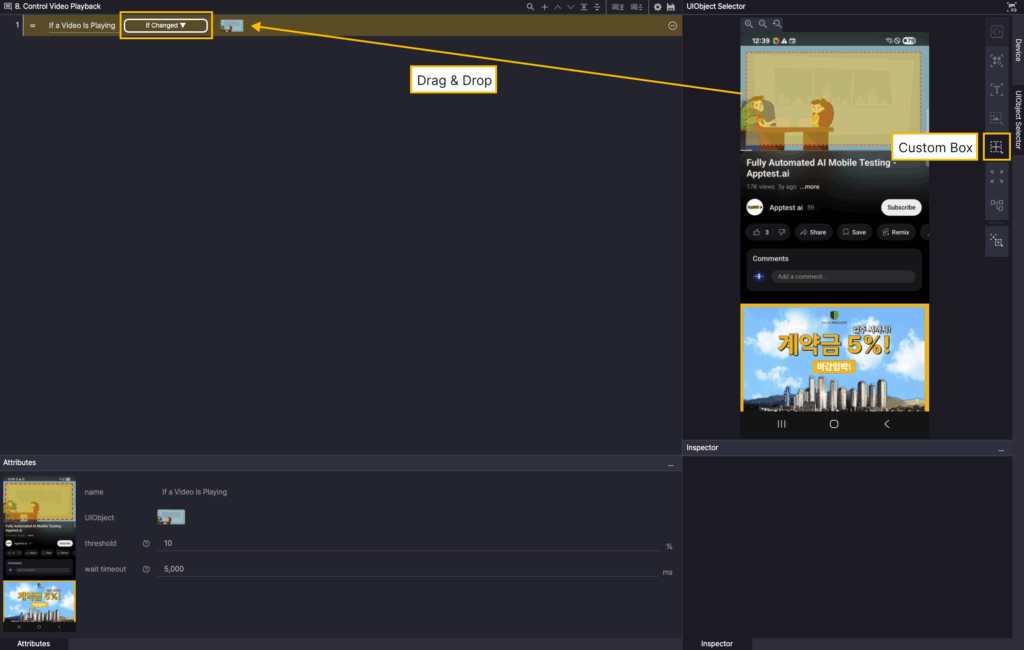
Step 1. Create a new step and select the If Changed action.
Select Custom Box in the Screen Analysis tool, and then drag the playing video area of the device screen to add that area as a UIObject.
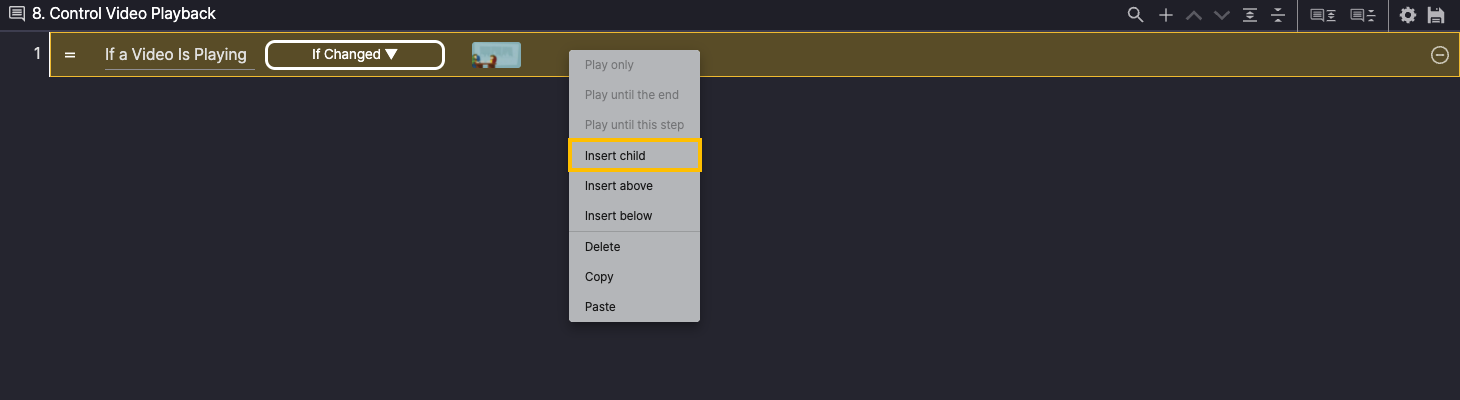
Right-click Step 1, and then select Insert child to add a Child Step.
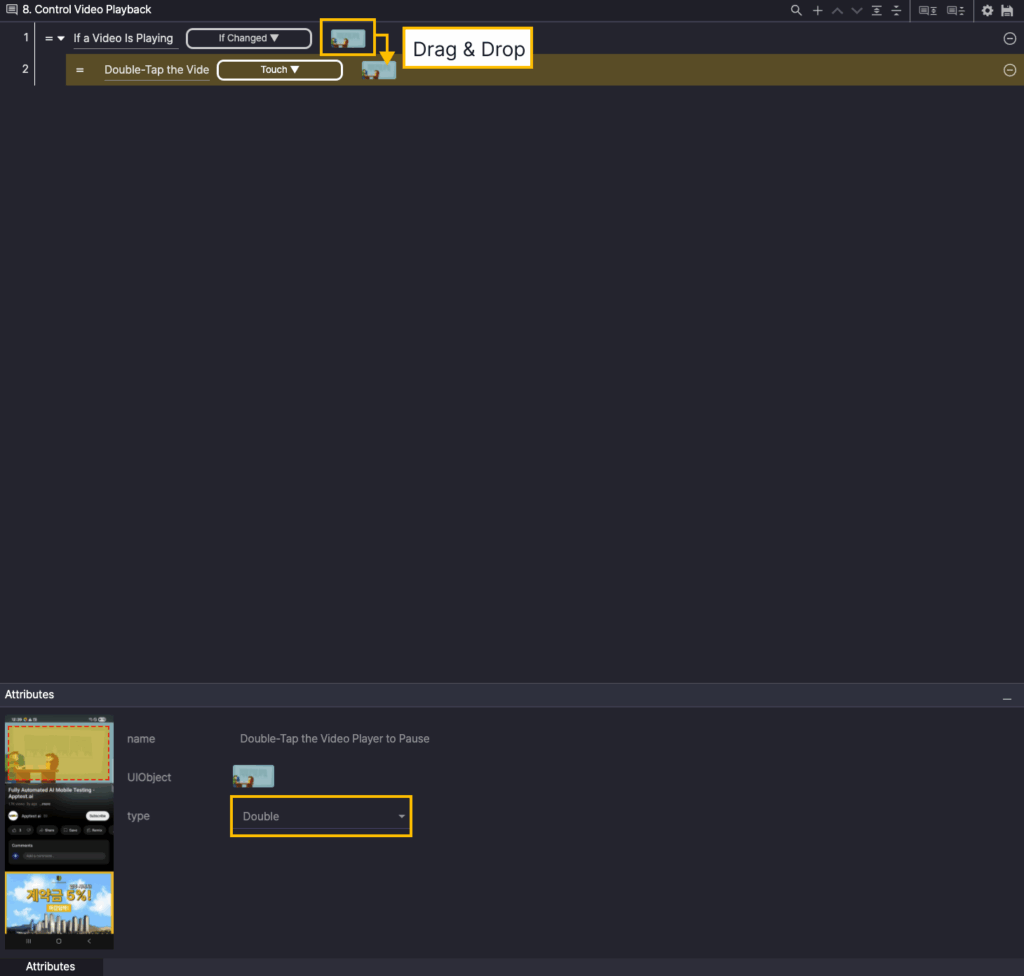
Step 2. Select the Touch action from the created step and add the UIObject from Step 1 as the UIObject from Step 2.
A UIObject used in one step can be reused in other steps.
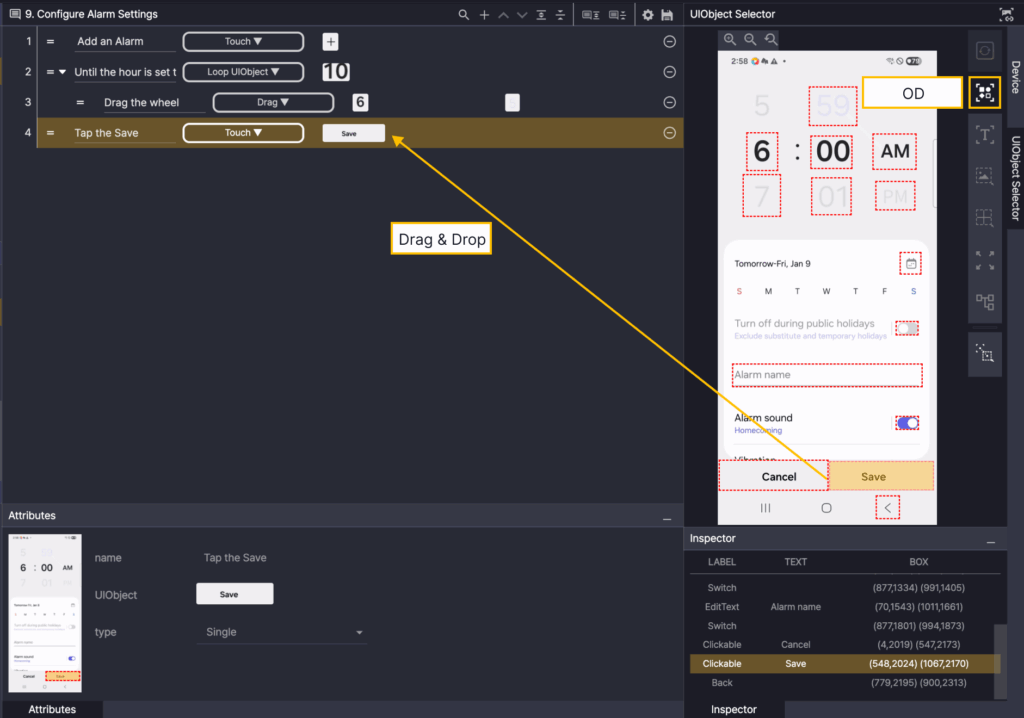
Set an alarm time #
This scenario is an example of an Android clock app where the user sets the desired alarm time. You can use Loop UIObject to learn how to adjust the alarm time.
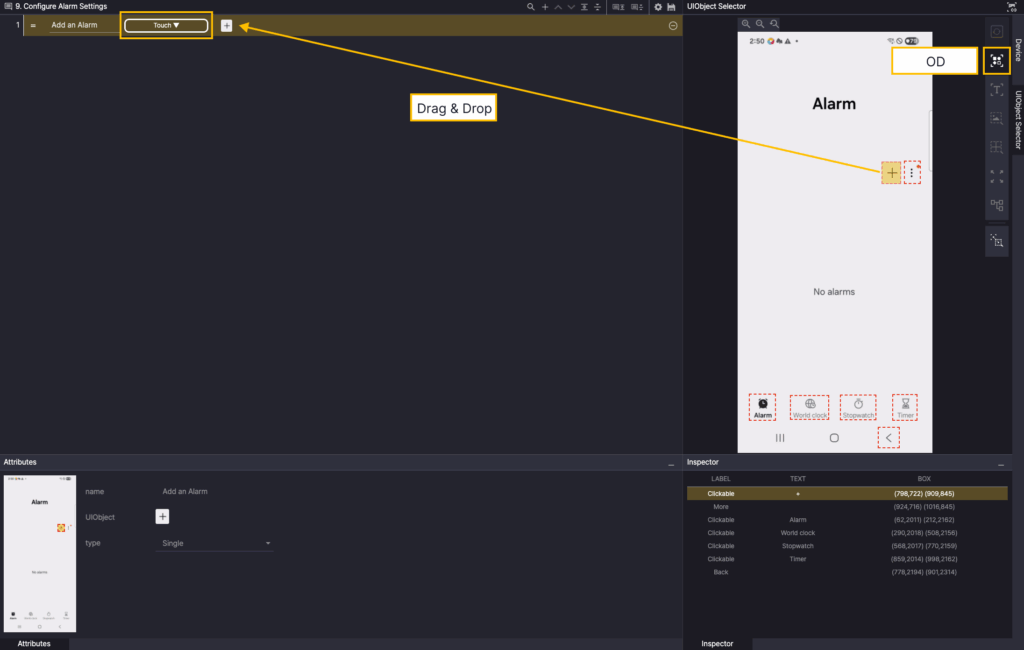
Step 1. Create a new step and select Touch Action.
In the Screen Analyzer, select OD and add the + Button object as a UIObject.
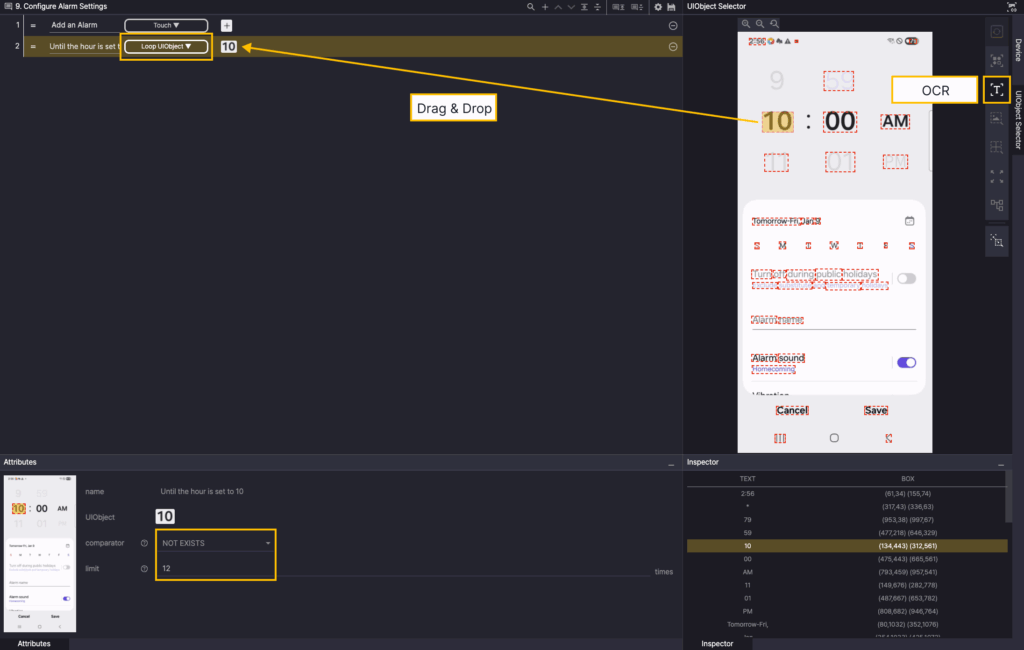
Step 2. Create a new step and select the Loop UIObject action. Specify the comparator of the Attributes as NOT EXISTS, and enter 12 for limit.
In the Screen Analyzer tool, select OCR, and then add 10 OCR as a step UIObject.
If 10 does not exist, the child step of the Loop UIObject action is repeated up to 12 times.
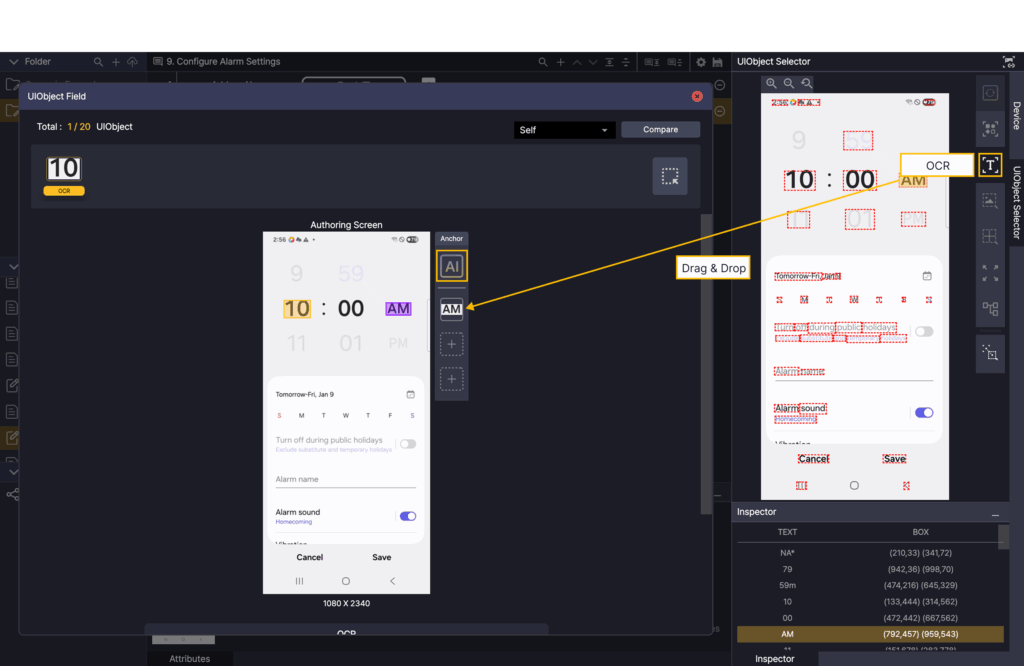
Click UIObject in Step 2 to open the UIObject Field.
Click the AI button in the UIObject Field, select OCR in the Screen Analyzer tool, and add AM OCR as an Anchor.
Since the "10" at the center-left of AM represents the 10 o’clock hour,
AM OCR is used as an anchor to detect the correct time selection area.
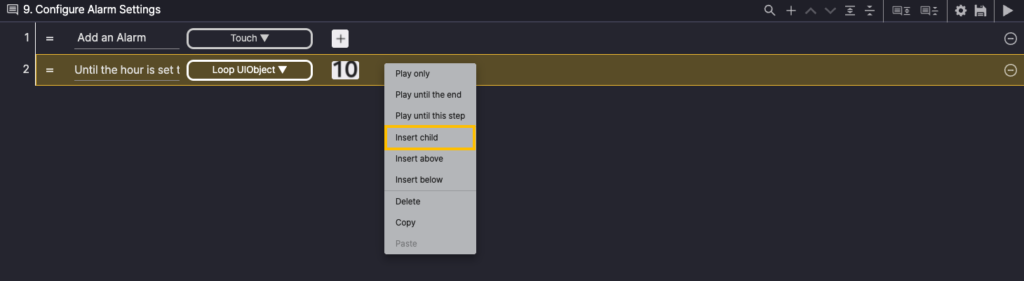
Right-click Step 2, and then select Insert child to add a Child Step.

Step 3. Select the Drag action from the created step.
Select the Custom Box in the Screen Analyzer tool, and then drag the time selection to add it as start UIObject.
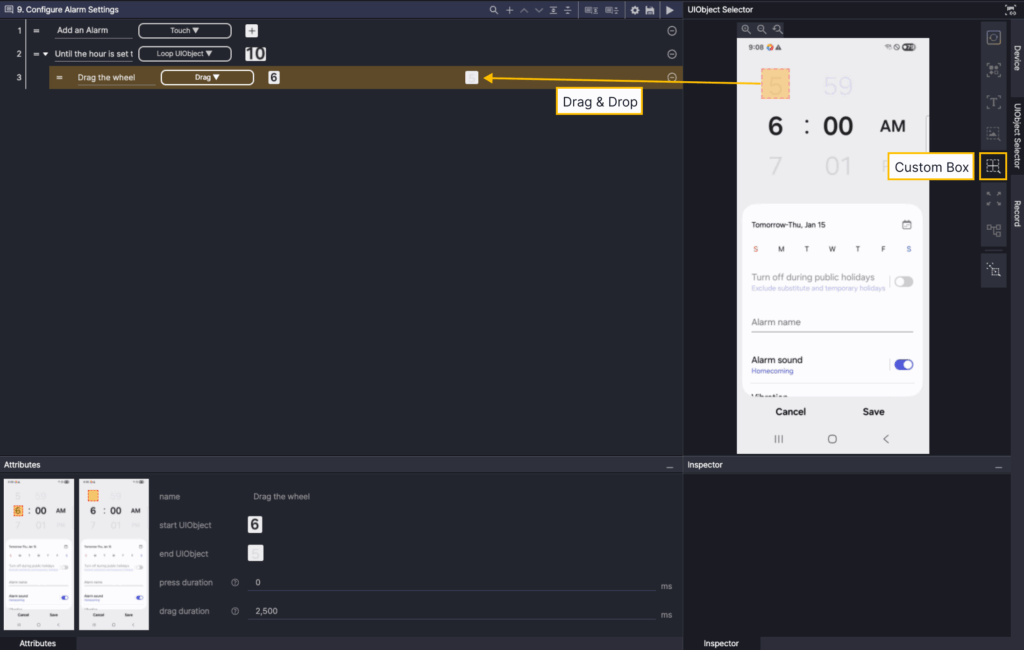
Select the Custom Box in the Screen Analysis tool, and then drag the drag to the destination area to add it as the end UIObject in Step 3.
Step 4. Create a new step and select the Loop UIObject action. Specify the comparator of the Attributes as NOT EXISTS, and enter 12 for limit.
In the Screen Analyzer tool, select OCR, and then add 10 OCR as a step UIObject.
Check your notification messages #
This is an example scenario to validate that a notification message (e.g. toast pop-up) is exposed. This example will help you learn how to use the Assert Message action.
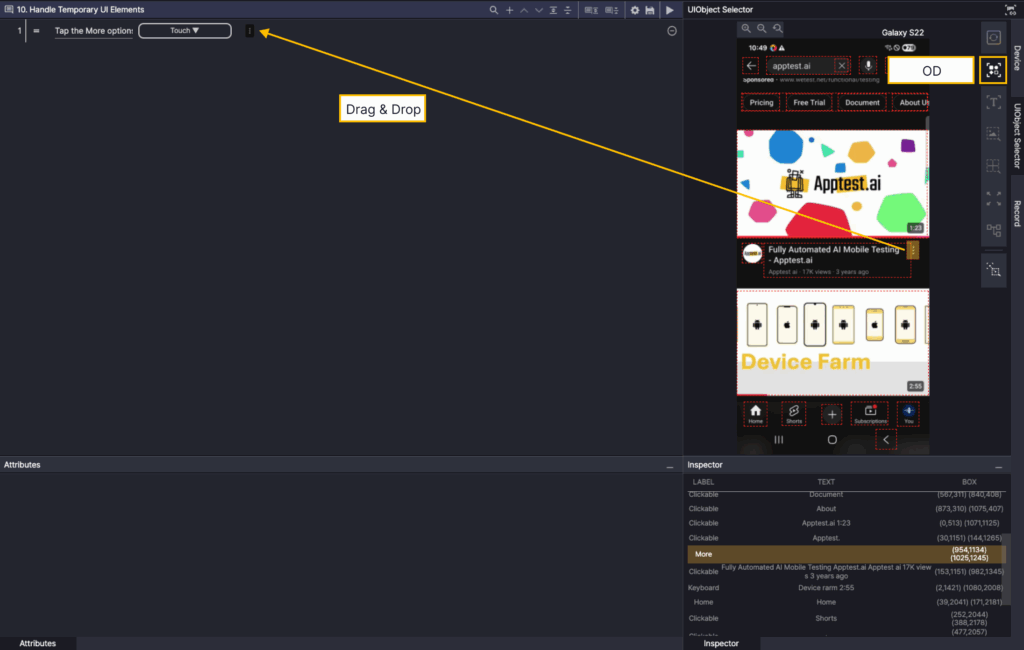
Step 1. Create a new step and select Touch Action.
In the Screen Analyzer, select OD and add the More button object as a UIObject.
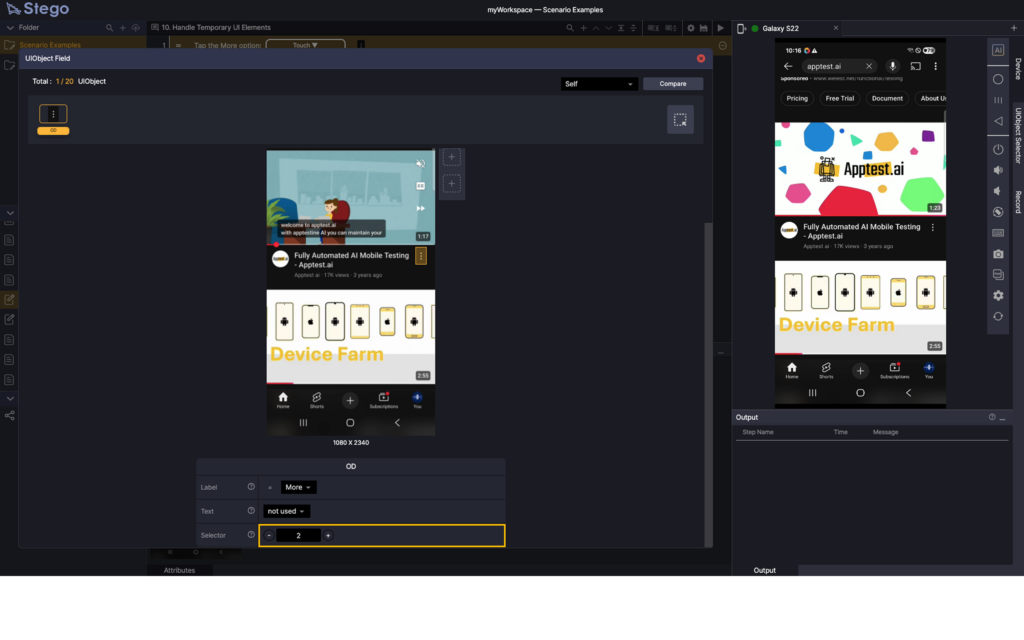
Since there are multiple More icons on one screen, you need to modify the Selector value among the UIObject property values.
In this example, we need to enable the option in the video, so we need to modify the Selector value to 2 so that the second icon is touched.
To bring up the UIObject Properties panel, click on the UIObject Field in the step.
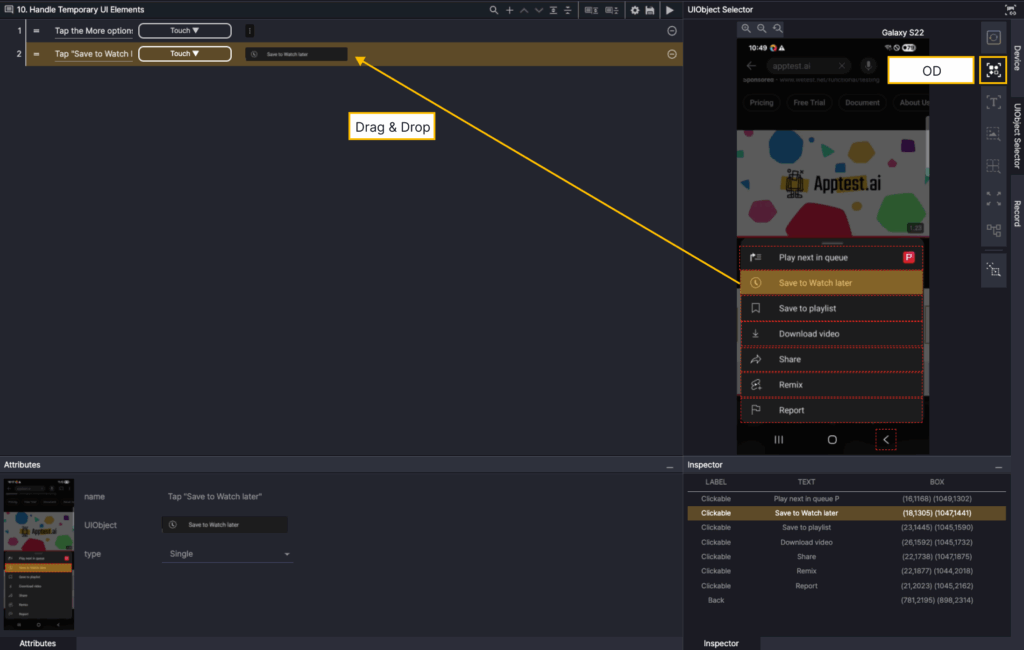
Step 2. Create a new step and select the Touch action.
Select the OD in the Screen Analyzer tool, then click the Save to Watch later button to add the OD as the step’s UIObject.
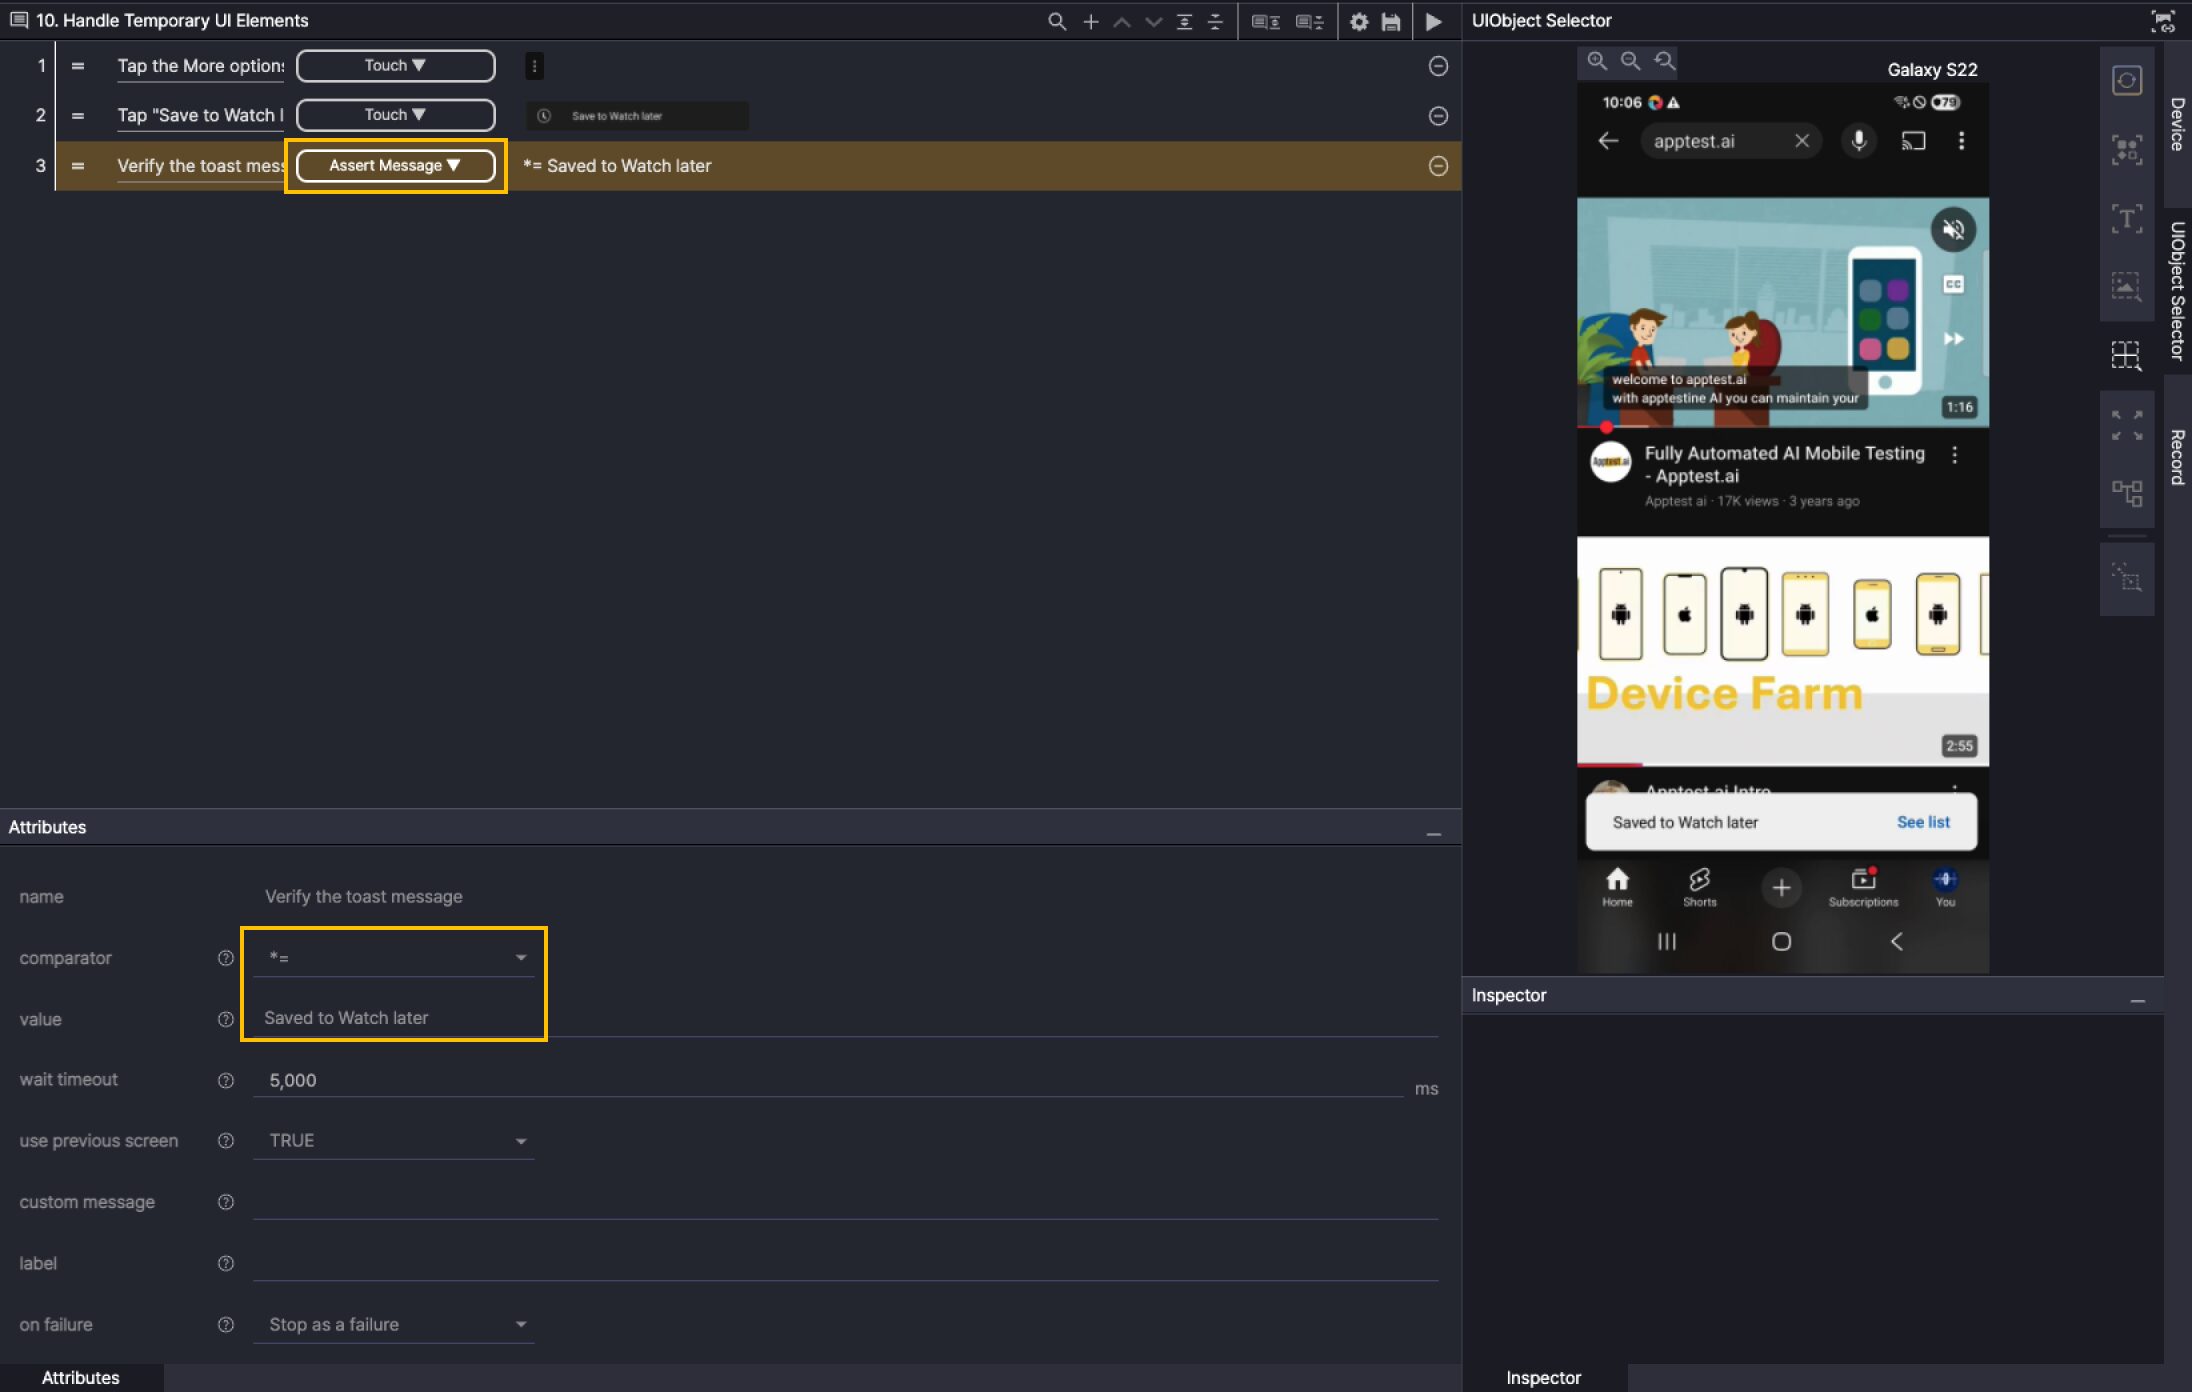
Step 3. Create a new step and select the Assert Message action.
Set the comparator for Attributes to *=, and enter Saved to Watch later in value.
This verifies whether a toast message containing “Saved to Watch later” appears on the screen.
Inspect Home Screen icons #
Here’s an example of checking the Home Screen for the Play Store app icon.
If the Play Store app icon is not found on the Home Screen, the test result displays the message:
“Play Store app icon not found on the Home Screen.”
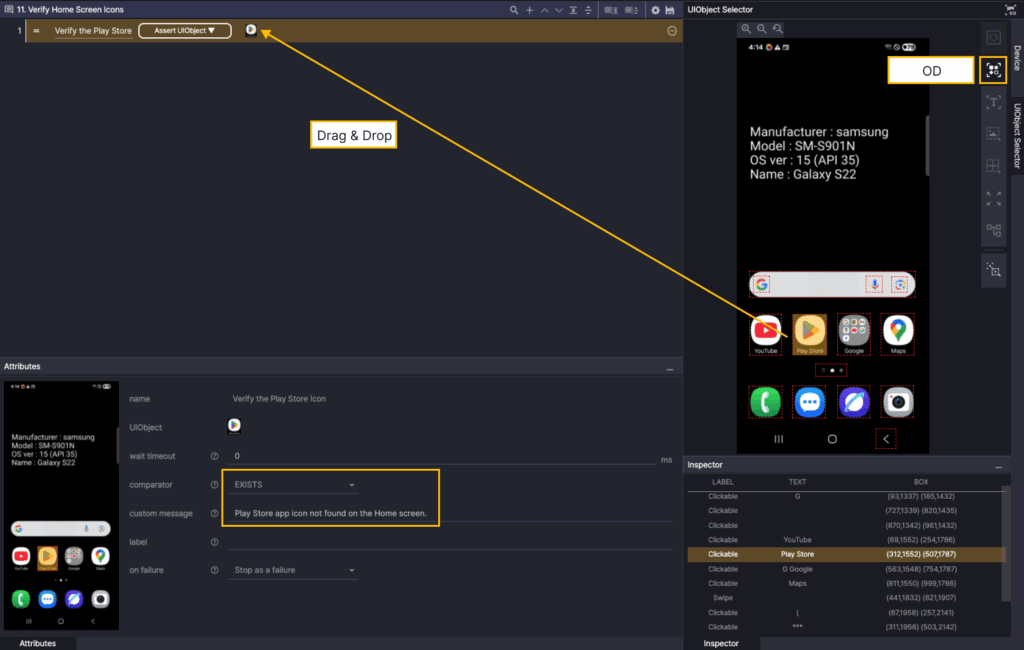
Step 1. Create a new step and select the Assert UIObject action.
Set the comparator for Attributes to EXISTS, and set the custom message Play Store app icon not found on the Home Screen.
In the Screen Analyzer, select OD, and then add the Play Store icon OD as UIObject.
This verifies whether the Play Store icon OD appears on the screen. If it does not appear, the custom message is displayed.
Leverage the Common Scenario #
You can create an app execution scenario as a Common Scenario so that you can reuse it in other scenarios.
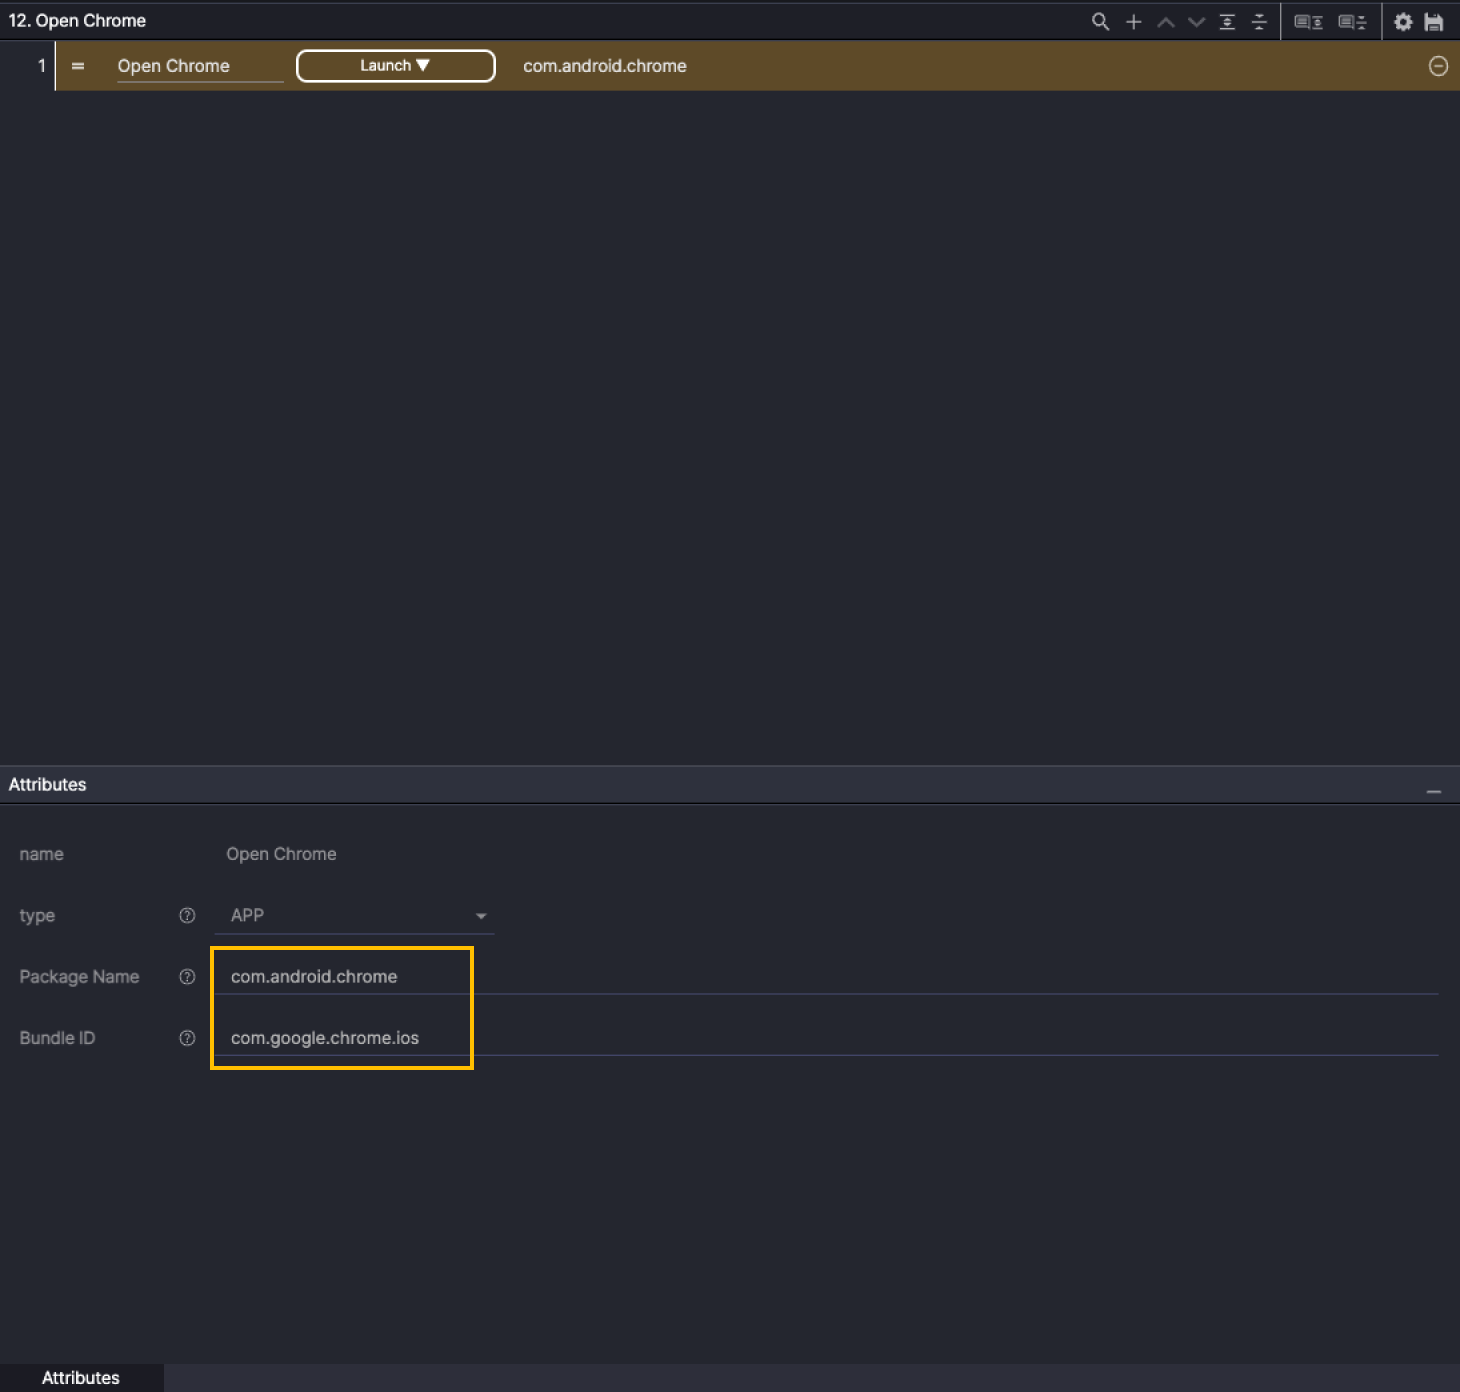
Step 1. Create a new step and select the Launch action.
For Attributes, enter Chrome’s Android app ID for Package Name, and for Bundle ID, enter Chrome’s iOS app ID.
Save this scenario as Open Chrome and use it as a reusable Common Scenario across multiple scenarios.
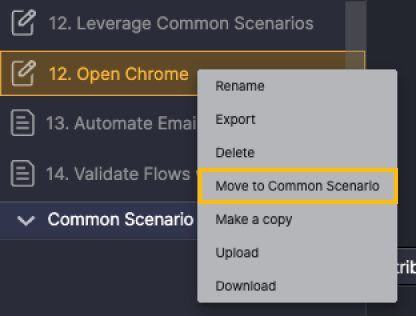
Right-click Open Chrome Scenario in the Scenario panel, and then select Move to Common Scenario to set it to Common Scenario.
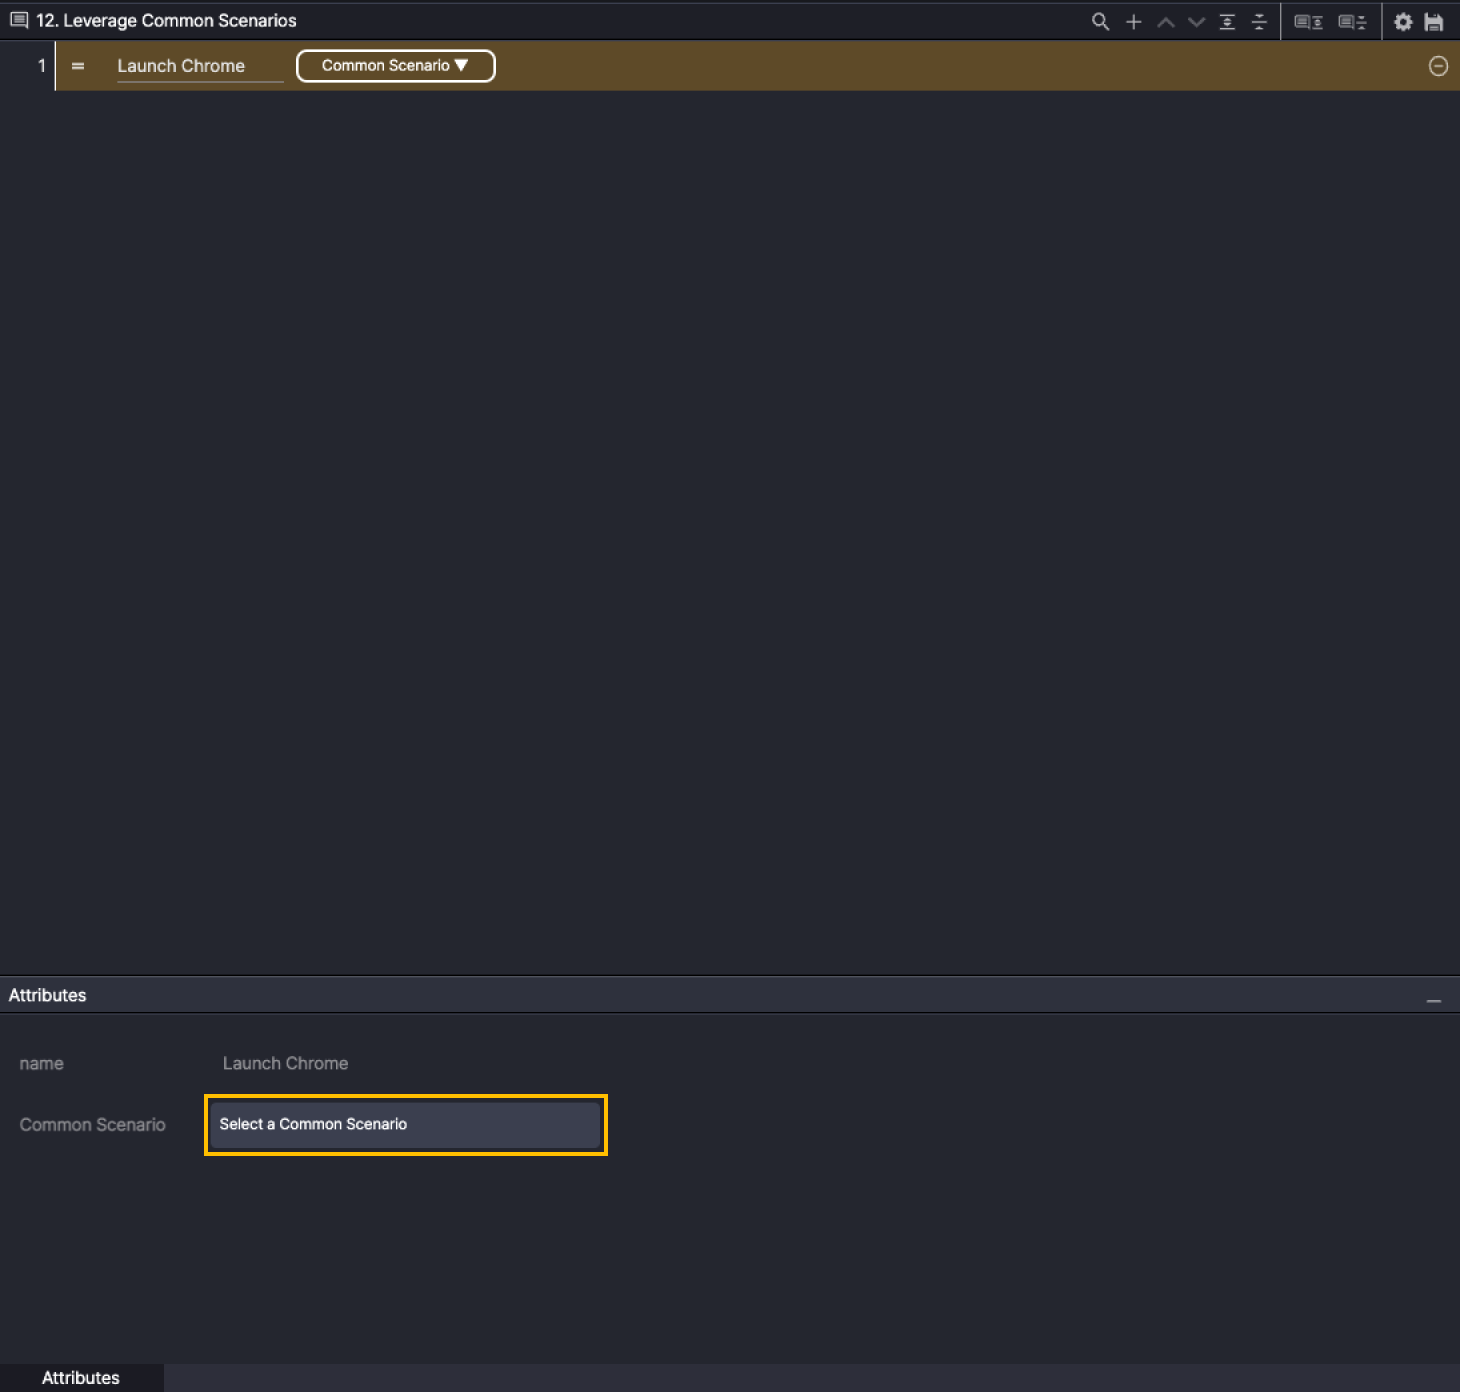
After creating a new scenario, add a new step.
Step 1. Select the Common Scenario action, and under Attributes, click Select a Common Scenario.
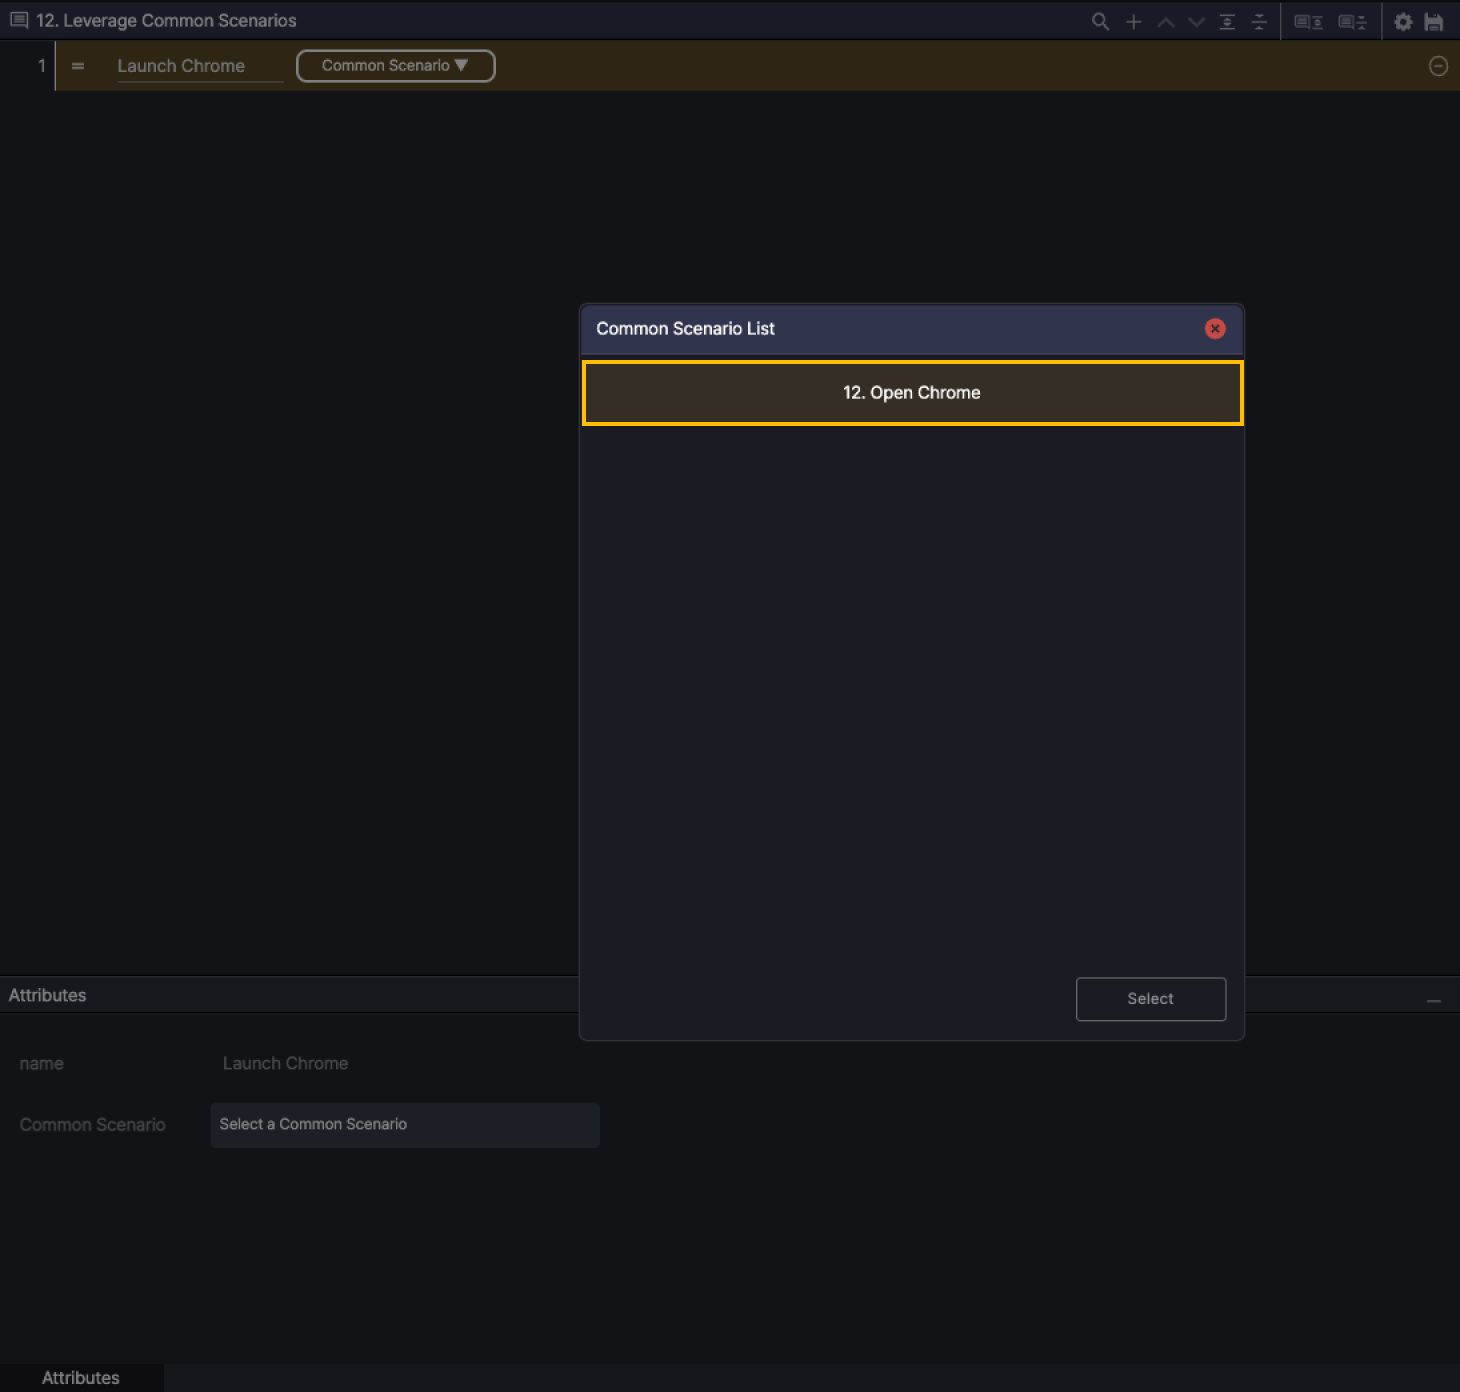
In the Common Scenario List, select Open Chrome scenarios.
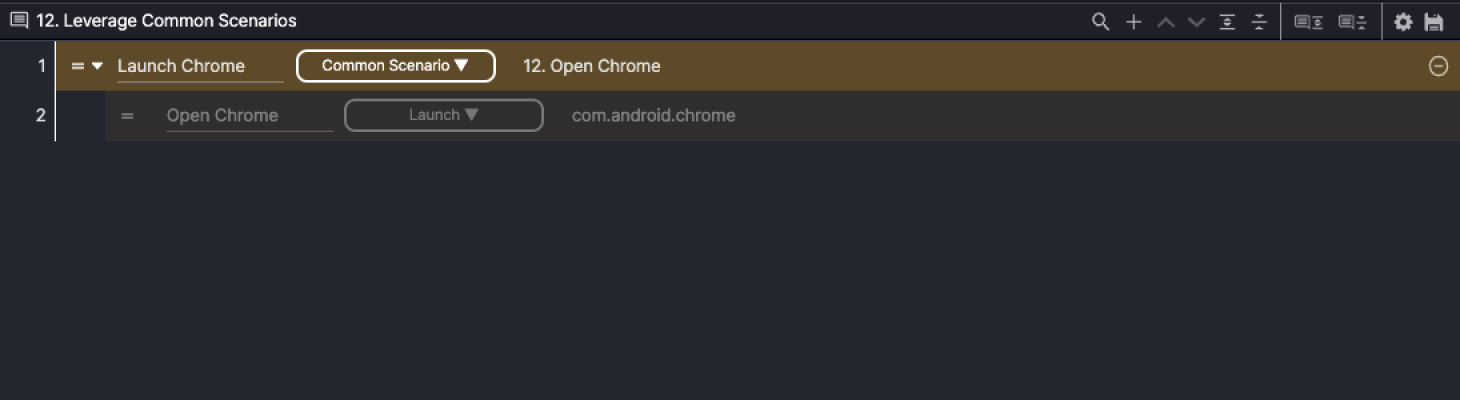
If the selected Common Scenario is successfully added, it will be displayed as disabled because it cannot be modified.
Send and receive emails #
A scenario that validates the ability to send and receive emails between two devices in a device-to-device (D2D) environment.
For the D2D scenario, two devices need to be connected, and in this example, we use Galaxy S22 and Galaxy S10.
If the test fails because the recipient does not receive the email, the test result displays the error message:
“The recipient did not receive the email.”
After creating a scenario, click at the top of the ![]() Scenario Editor panel to access the Scenario Settings.
Scenario Editor panel to access the Scenario Settings.
Set the recipient email to be utilized in the scenario to User Variables:
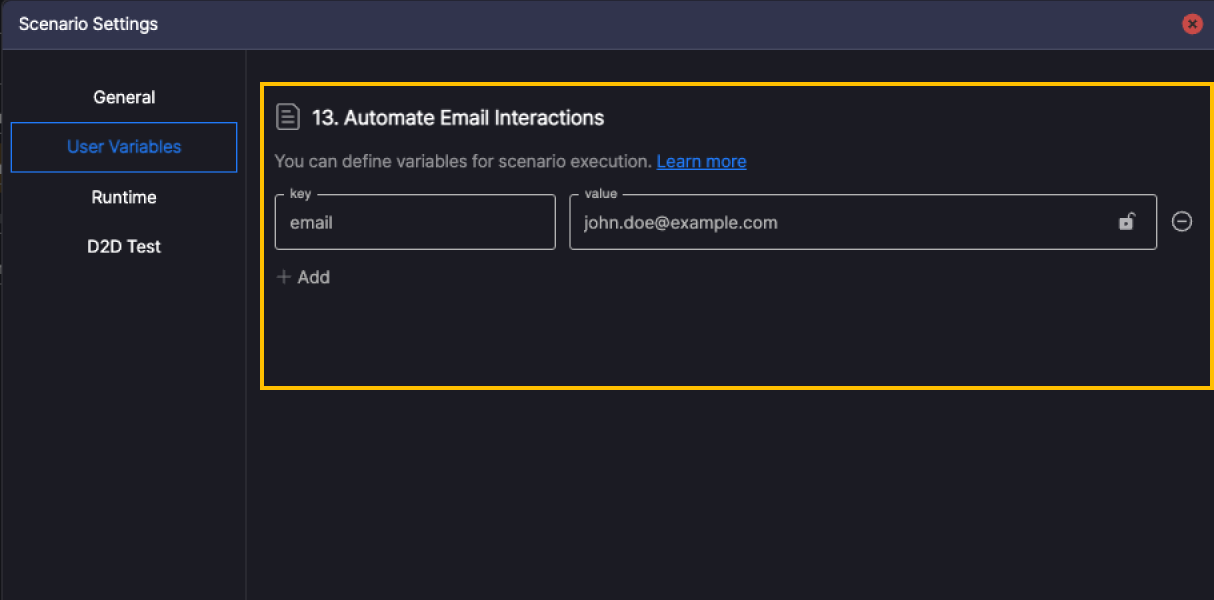
- key: email
- value: john.doe@example.com (recipient email)
Enable the Scenario Settings > D2D Test entry and define the device role:
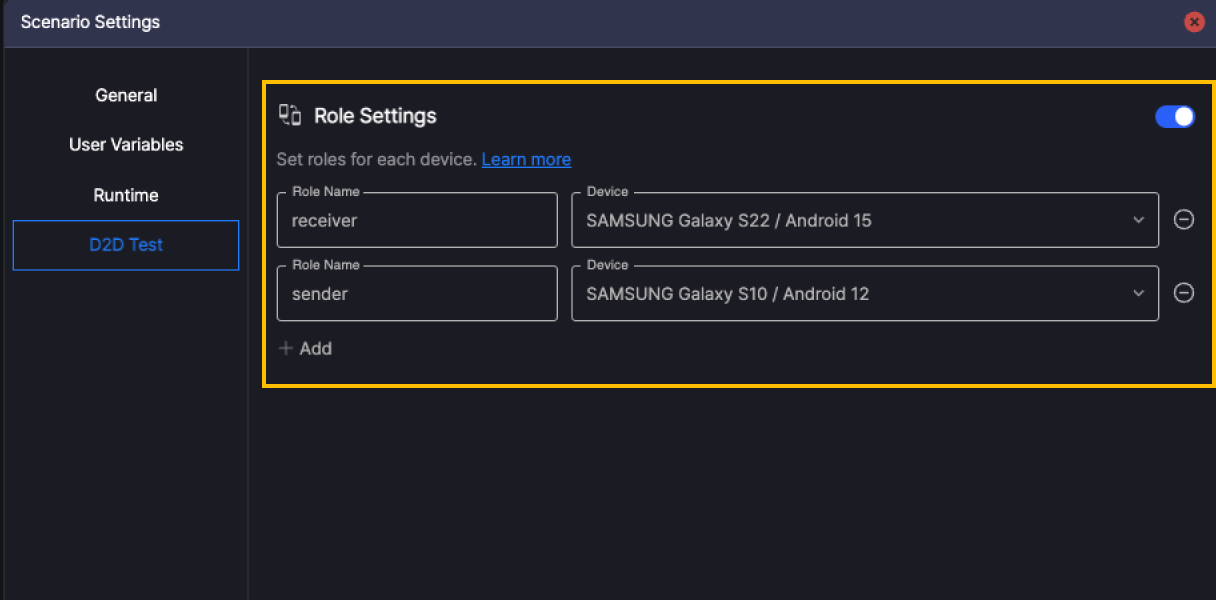
- receiver: The device responsible for receiving and acknowledging emails
- sender: The device responsible for composing and sending emails
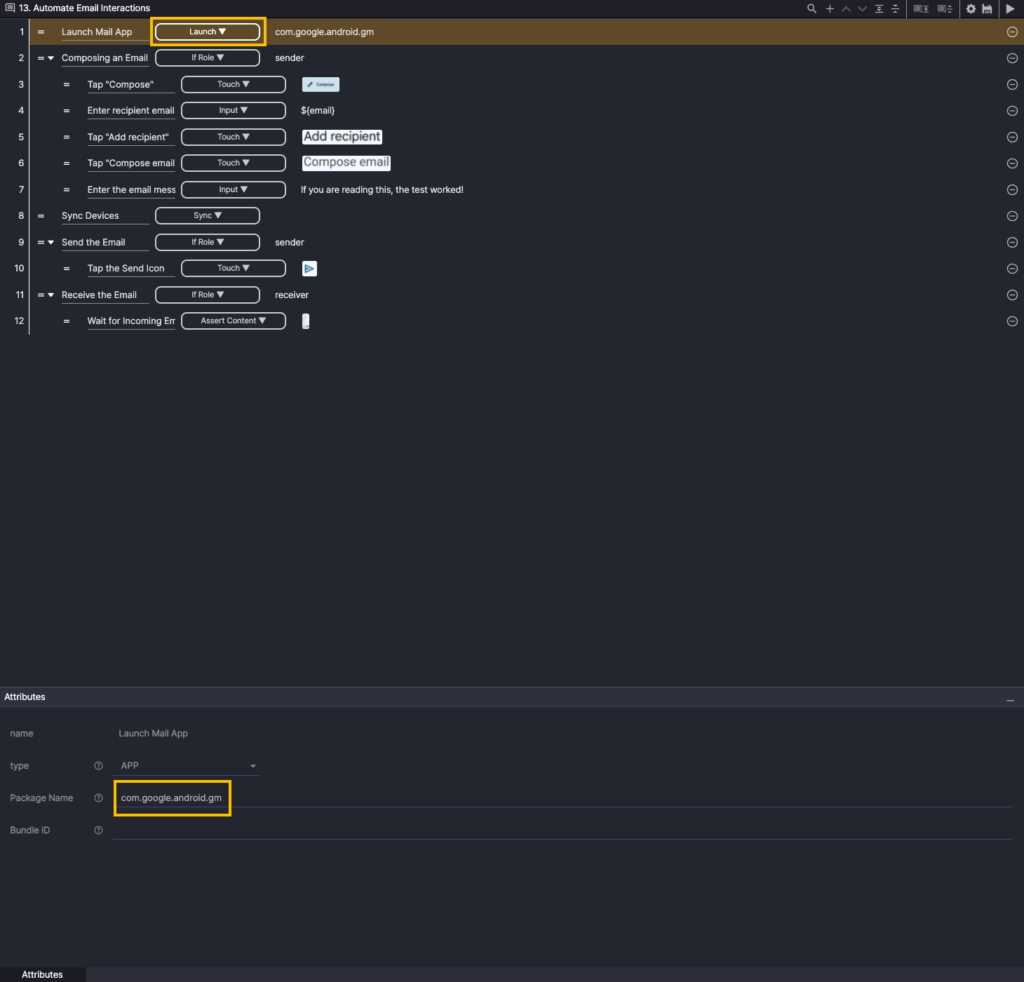
Step 1. Create a new step and select the Launch action.
For Attributes, for Package Name, enter the Android app ID for Gmail.

Step 2. Add a new step, select the If Role action, and enter a sender in the role of the Attributes.
The child step of Step 2 (If Role) is executed only on the sender device.
Right-click Step 2 and select Insert child to add a child step.
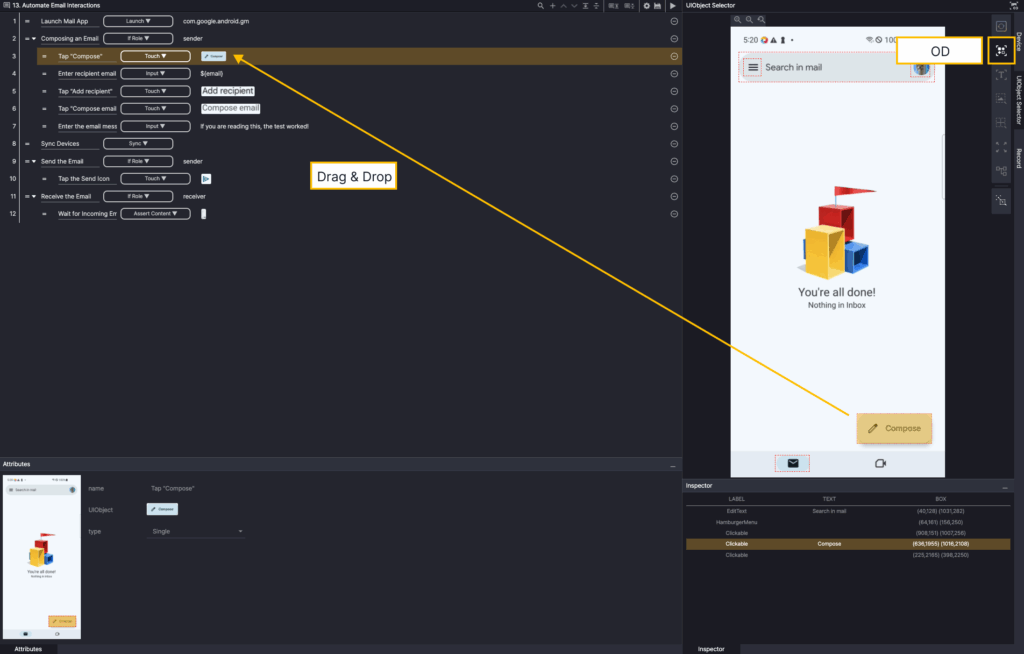
Step 3. Select the Touch action, and in the Screen Analyzer tool, select OD to add the Compose button OD as a UIObject.
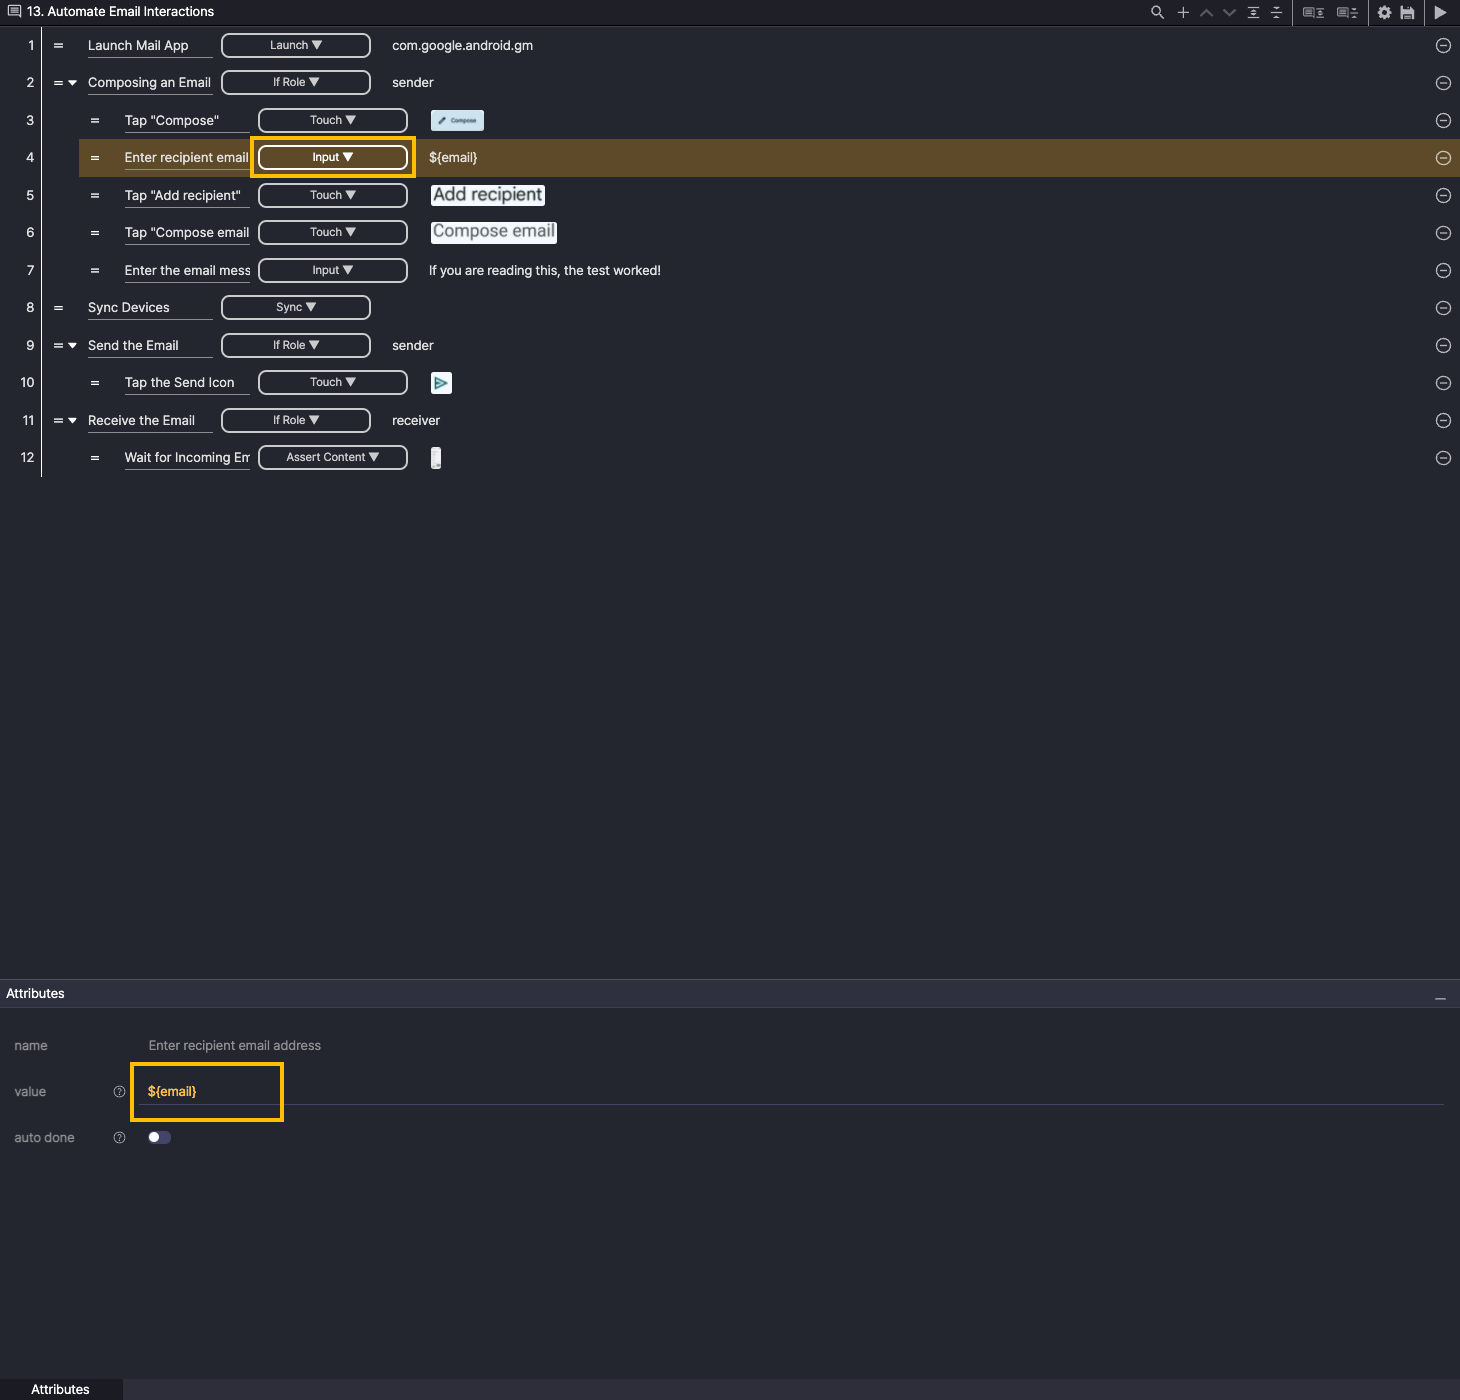
Step 4. Add a new step, and select the Input action. For Attributes, enter ${email} in the value.
When the scenario runs, the value of the email user variable (john.doe@example.com) is entered automatically.

Step 5. Add a new step, and then select a Touch action.
In the Screen Analysis tool, select OCR to add Add recipient OCR as UIObject.
You can select multiple OCR targets at once by dragging.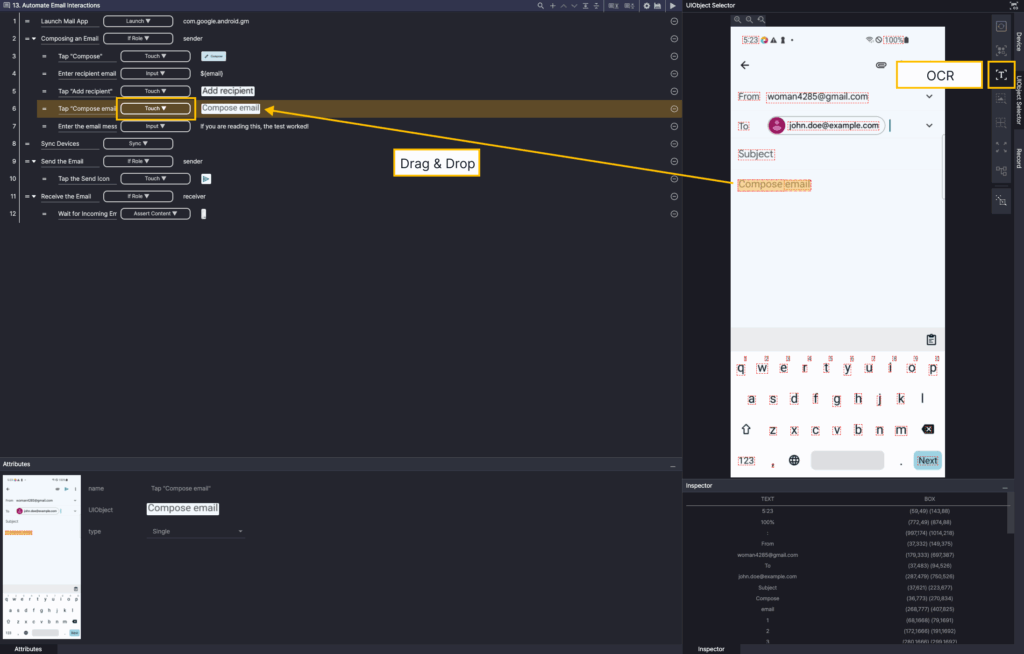
Step 6. Add a new step, and then select a Touch action.
In the Screen Analysis tool, select OCR to add Compose email OCR as UIObject.
You can select multiple OCR targets at once by dragging.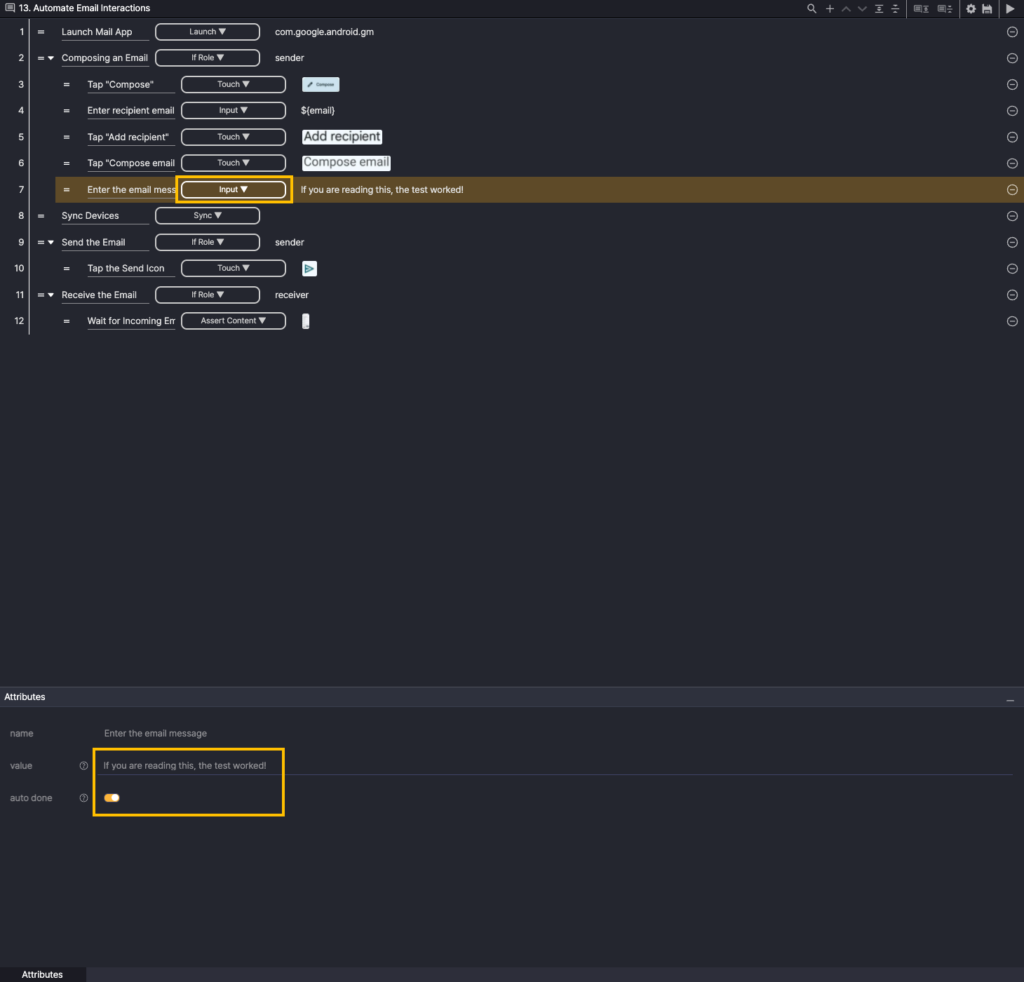
Step 7. Add a new step and select the Input action.
Enter “If you are reading this, the test worked!” in the value field, and enable the Auto Done option.
When the Auto Done option is enabled, the keyboard closes automatically after input is completed.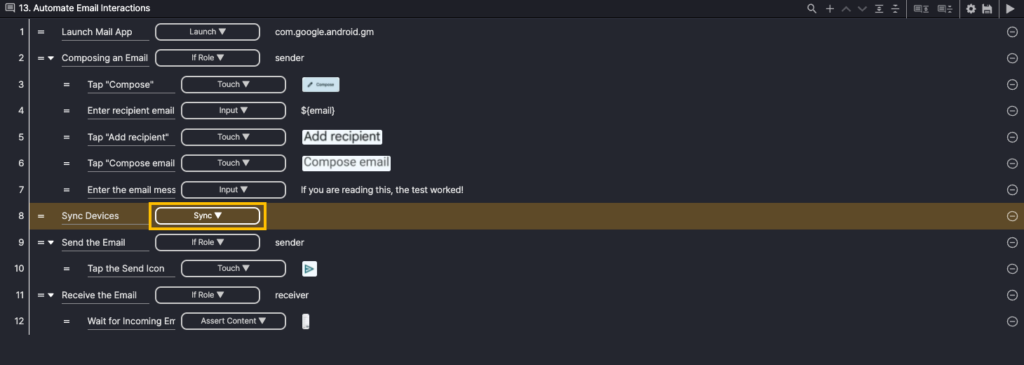
Step 8. Add a new step, and select the Sync action.
The Sync action is used to synchronize scenario execution timing between two devices in a D2D environment.
One device waits until the other reaches the Sync step, after which both devices proceed simultaneously.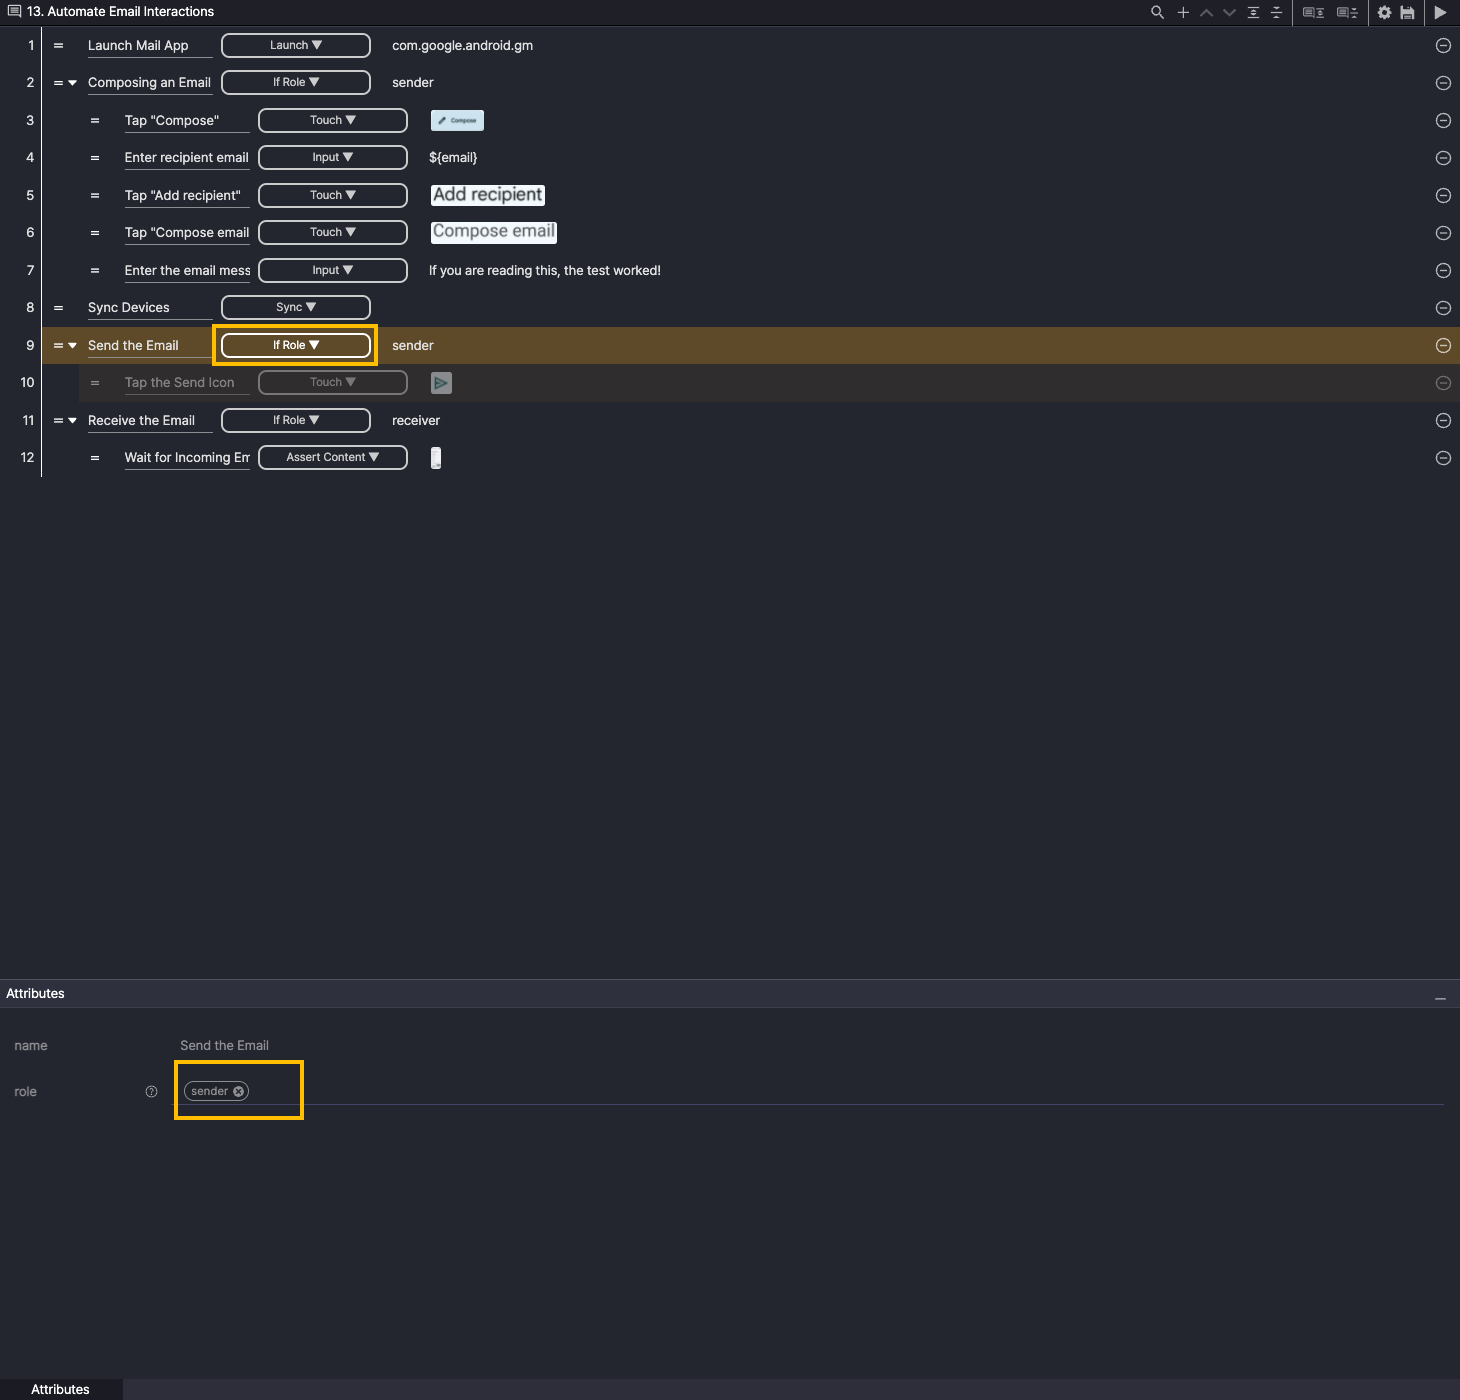
Step 9. Add a new step, select the If Role action, and enter a sender in the role of the Attributes.
The child step of Step 9 (If Role) is executed only on the sender device.
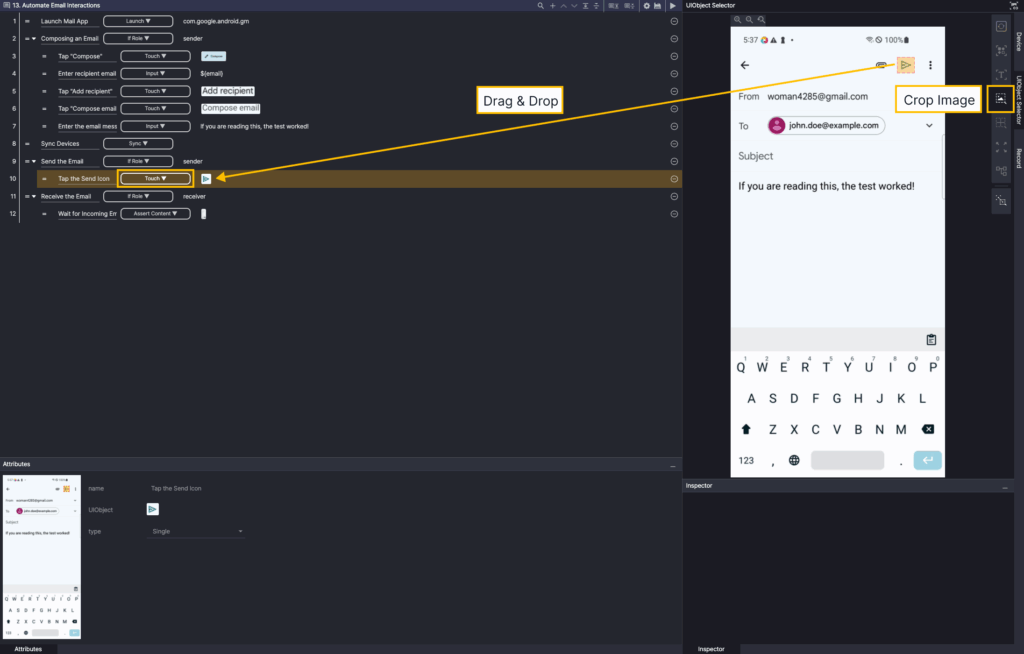
Step 10. Add a new step, and then select a Touch action.
Select Crop Image in the Screen Analyzer tool, then drag the cast icon to add it as a UIObject.
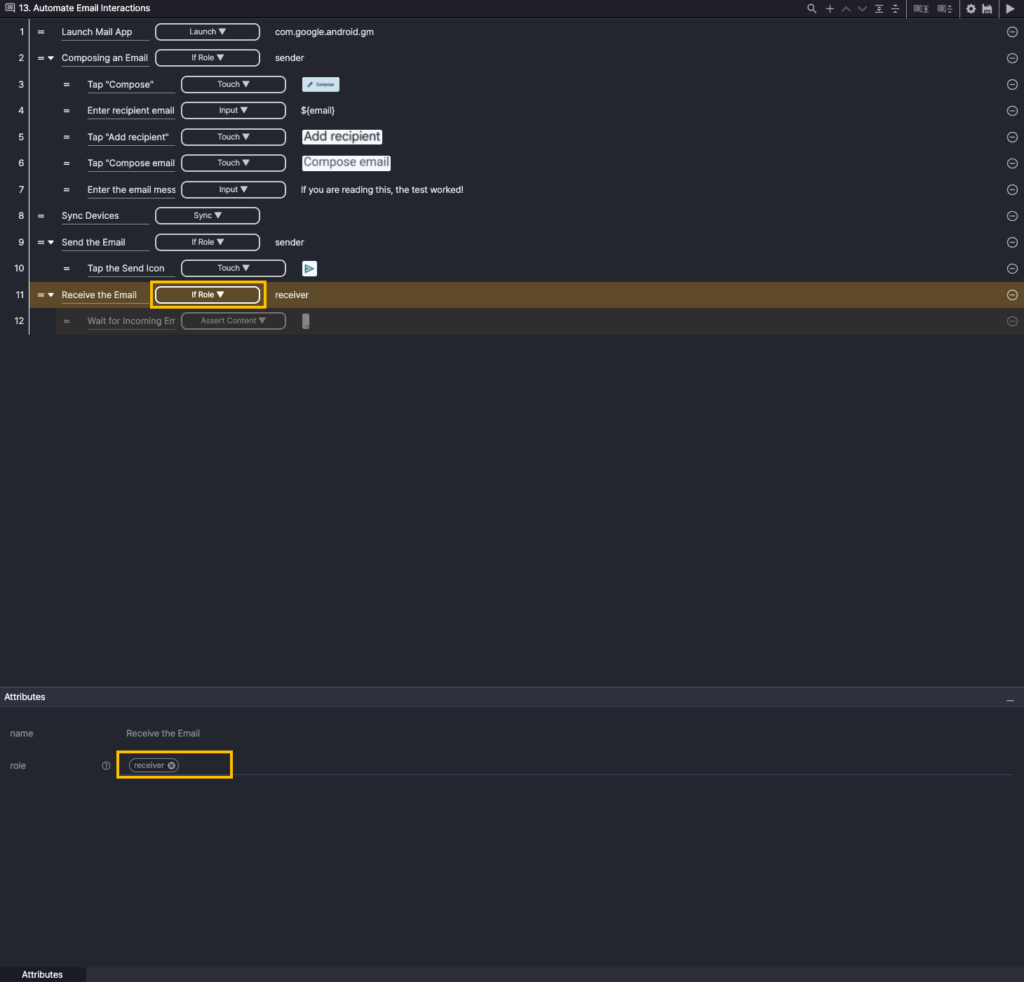
Step 11. Add a new step, select the If Role action, and enter receiver in the role of Attributes.
The child step of Step 11 (If Role) is executed only on the receiver device.
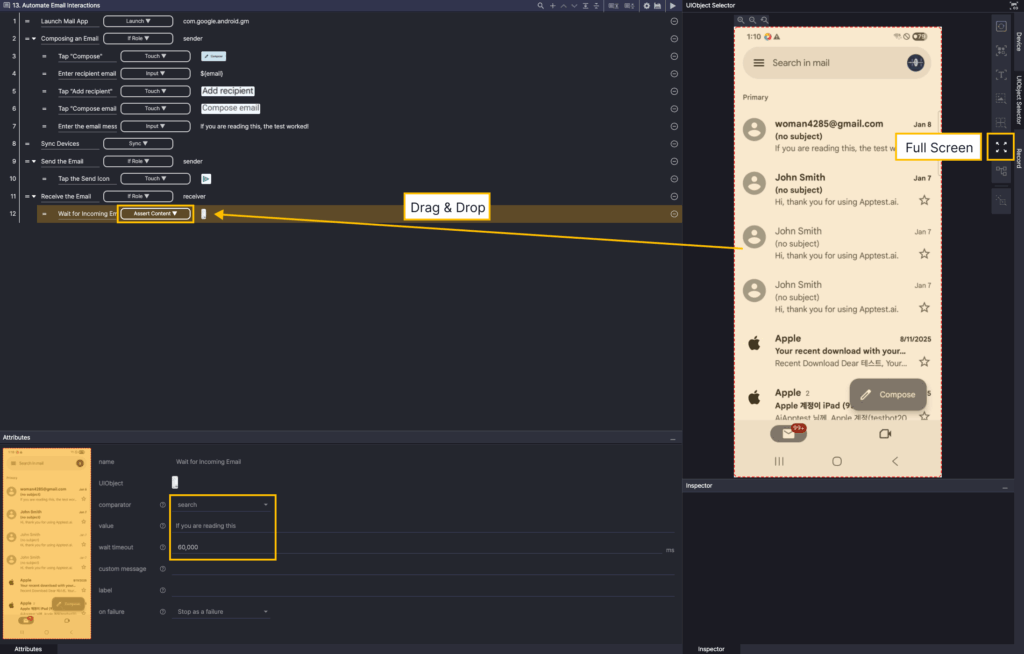
Step 12. Add a new step and select the Assert Content action.
Set the comparator of the Attributes to search, and enter If you are reading this in the value field. Set the waittimeout to 60,000 ms.
Select Full Screen from the Screen Analyzer tool to add it as UIObject.
This verifies whether “If you are reading this” appears anywhere on the screen within 60,000 ms.
Utilizing Checkpoints Actions #
A scenario that leverages the Checkpoints action to validate the Assertion for multiple items on a single screen.

Step 1. After creating a new step, select the Checkpoints action.
Under Attributes > checkpoints, select the + button to add a checkpoint. Set the Target Type to UIObject.
In the Screen Analyzer, select OD and add the Sign In button object as a UIObject.
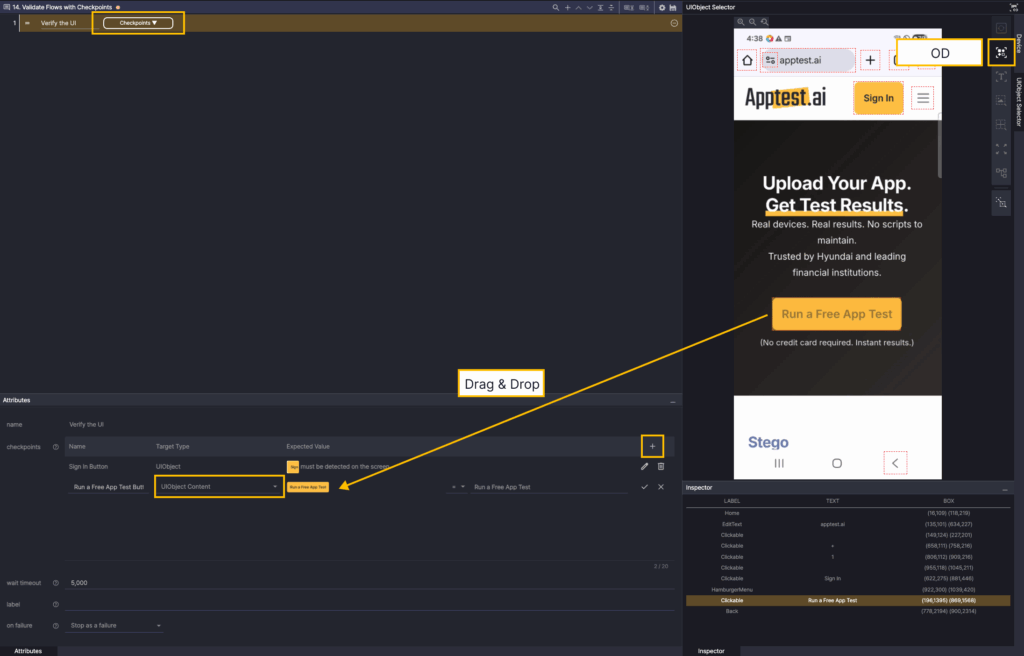
Under Attributes > checkpoints, select the + button to add a checkpoint. Set the Target Type to UIObject Content.
In the Screen Analyzer, select OD and add the Run a Free App Test button object as a UIObject.
Set the comparator to =, and enter Run a Free App Test.
This verifies that the text of the Run a Free App Test button matches “Run a Free App Test.”
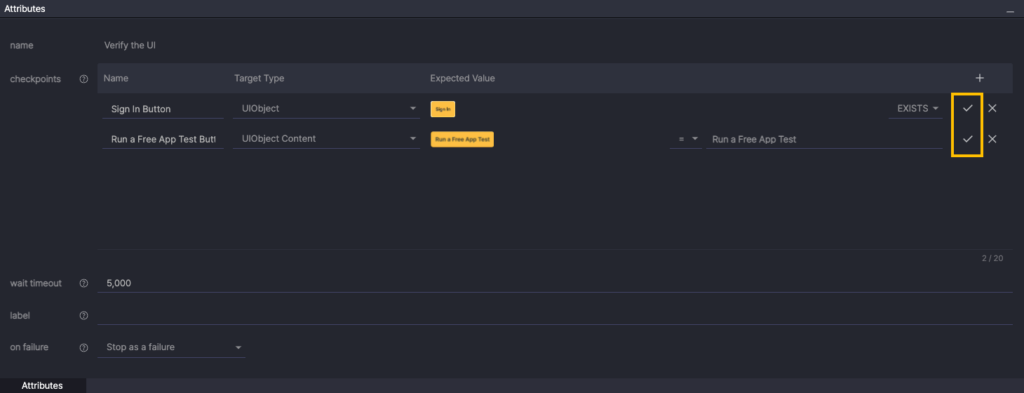
Select the check button to save.

When you run the scenario, you can see the Checkpoints results.

Click the Output result to see the condition matching results for each checkpoint target.
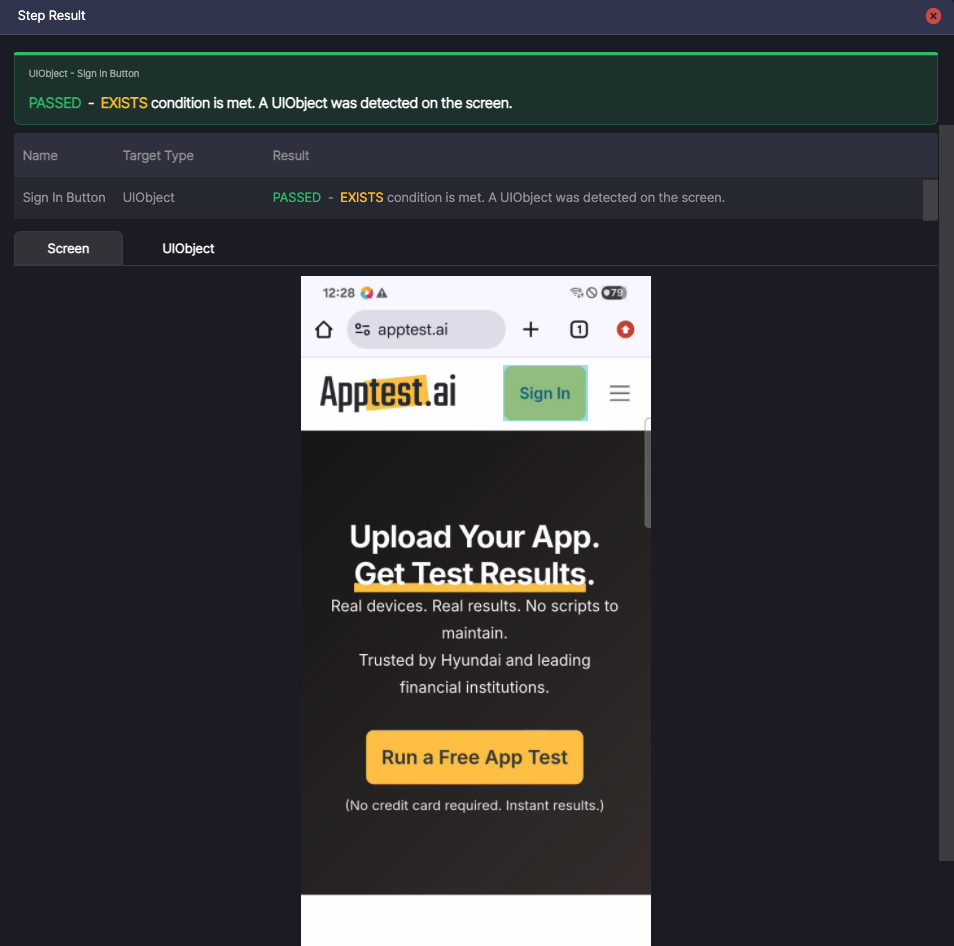
If you select a checkpoint item in the Step Result, you can see the detailed results of that item.