
This section introduces the main panels and menus in Stego used for creating, editing, and running test scenarios.
You can use six panels for creating, editing, and running scenarios.
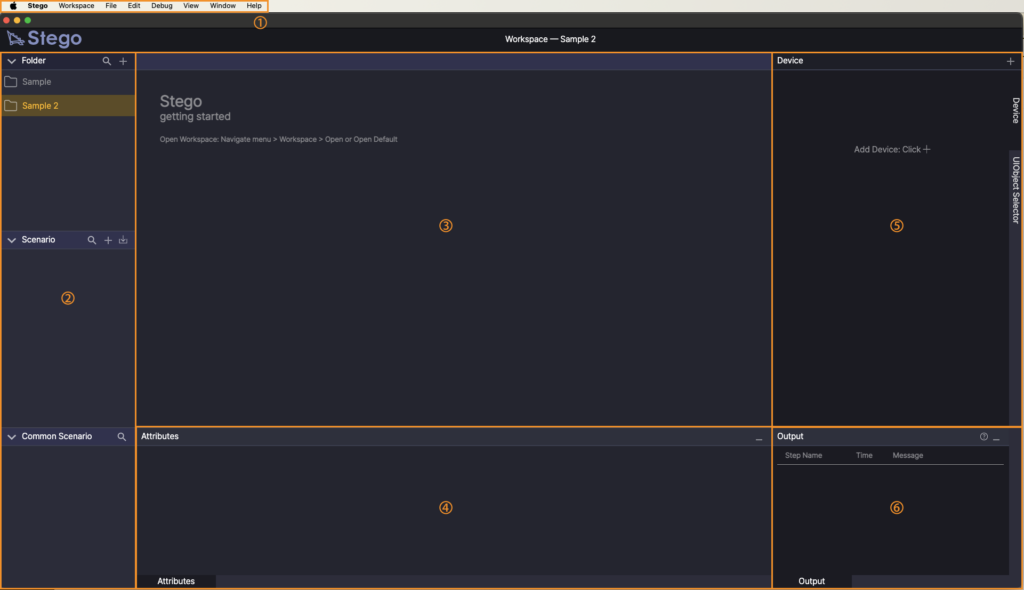
- Menu bar: Use the menu bar to access file operations, run scenarios, and configure settings.
- Folder / Scenario / Common Scenario
- Folder: Structure scenarios by app, project, or feature.
- Scenario: View all scenarios in the selected folder.
- Common Scenario: Displays reusable scenario blocks from the selected folder.
- Scenario Editor: Create and edit scenarios.
- Attributes: View detailed properties of the currently selected step.
- Device: Connect and control test devices used in your scenarios.
This panel includes two tabs:- Device: Manage device connections and interact in real time.
- UIObject Selector: Capture and configure UIObjects from connected devices.
- Output: View results of scenario execution.
Menu Bar #
Use the Menu Bar to quickly access core features in Stego—from creating scenarios to adjusting your workspace and layout.

- Stego: Check the Stego version information or open settings.
- Workspace: Set or switch your working folder.
- File: Create a new scenario or step, and save your work.
- Edit: Cut, copy, paste, or undo your recent changes.
- Debug: Run the scenario you’re currently editing.
- View: Adjust the panel layout or zoom level.
- Window: Hide the Stego window.
- Help: Open the Apptest.ai online documentation site in your browser.
To learn more about workspace, see [Stego User Guide > 6.0. Choosing Your Working Folder].
Folder Panel #
The Folder Panel helps you organize test scenarios by app, project, or feature.
Organizing them into folders keeps your workspace structured and scalable.
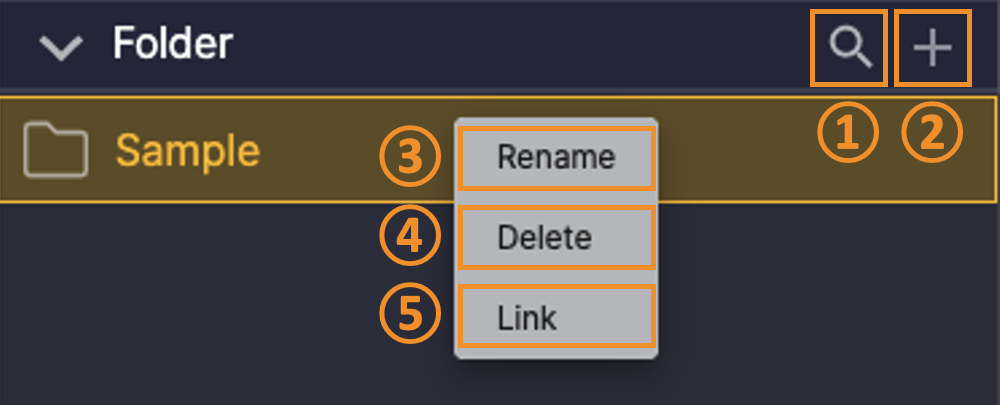
- Search Folder: Locate folders quickly using the search field.
- Shortcut: Cmd + F (Mac), Ctrl + F (Windows)
- Add Folder:
- Create new folders to organize scenarios by project or feature (e.g., ‘Login’, ‘Payment’, ‘Cart’).
- Right-click Options (3-5)
- Rename
- Delete
- Link Folder
- Connect the folder to Ptero’s Scenario Repository.
(Available only after registering an Access Key in Stego.)
- Connect the folder to Ptero’s Scenario Repository.
To learn more about integrating Stego with Ptero, see [Stego User Guide > 4.0. Stego–Ptero Integration].
Scenario Panel #
Use the Scenario Panel to create, manage, and upload test scenarios to Ptero.
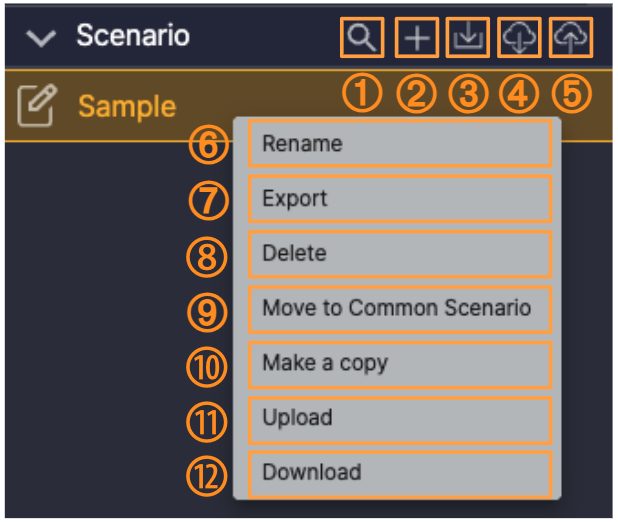
- Search Scenarios: Locate scenarios using keywords.
- Shortcut: Cmd + F (Mac), Ctrl + F (Windows)
- Add Scenario: Create a new scenario in the selected folder.
- Import Scenario: Load
.stegofiles from your PC/Mac. - Download Scenario: Download scenarios from Ptero’s Scenario Repository.
- Upload Scenario: Upload scenarios to Ptero Scenario Repository.
- Right-Click Options (6-12)
- Rename
- Export: Save the selected scenarios as
.stegofiles.- When multiple scenarios are selected, they are exported together as a single
.zipfile.
- When multiple scenarios are selected, they are exported together as a single
- Delete
- Move to Common Scenario: Convert to a Common Scenario.
- Make a Copy: Duplicate the scenario.
- Upload: Upload the scenario to Ptero’s Scenario Repository.
- Download: Download the selected scenario from the linked Ptero Scenario Repository.
- This option is available only when the selected scenario already exists in the Ptero Repository.
Note
Upload and download features are only available after linking your folder with Ptero’s Scenario Repository.
To learn more about integrating Stego with Ptero, see [Stego User Guide > 4.0. Stego–Ptero Integration].
Common Scenario Panel #
Use this panel to manage reusable scenario blocks across multiple test scenarios.
Common Scenarios are ideal for storing repetitive flows—such as login, setup, or user registration—to improve test efficiency and maintain consistency.
To learn more about Common Scenario, see [Stego User Guide > 8.0. Working with Common Scenarios].
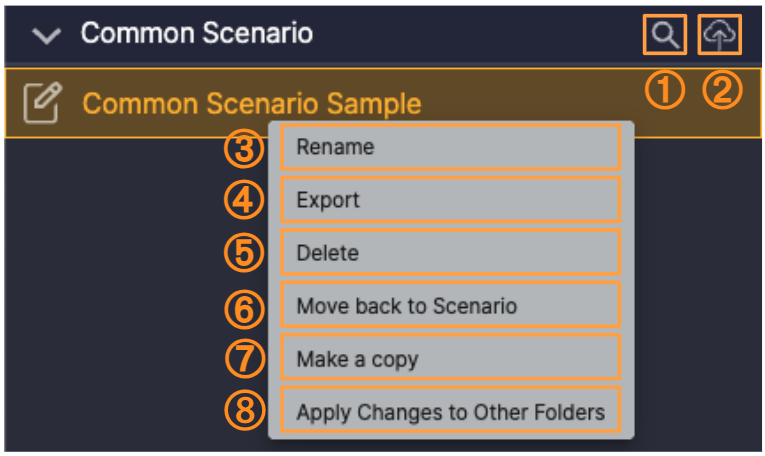
- Search Scenario: Locate Common Scenarios using keywords.
- Shortcut: Cmd + F (Mac), Ctrl + F (Windows)
- Upload Scenario:
- Upload selected Common Scenarios to Ptero’s Scenario Repository.
(Available only after saving your changes)
- Upload selected Common Scenarios to Ptero’s Scenario Repository.
- Right-Click Options (3-8)
- Rename
- Export: Save the selected Common Scenarios as
.stegofiles.- When multiple scenarios are selected, they are exported together as a single
.zipfile.
- When multiple scenarios are selected, they are exported together as a single
- Delete
- Move Back to Scenario: Convert it to a regular scenario.
- Make a Copy: Duplicate the Common Scenario.
- Apply Changes to Other Folders:
Overwrite the same Common Scenario across other folders where it exists, then upload the updated version.
To learn more about Apply Changes to Other Folders, see [Scenario File Management > 1.0. Managing Scenario Files].
Scenario Editor Panel #
Use the Scenario Editor Panel to build and manage your scenarios step by step.
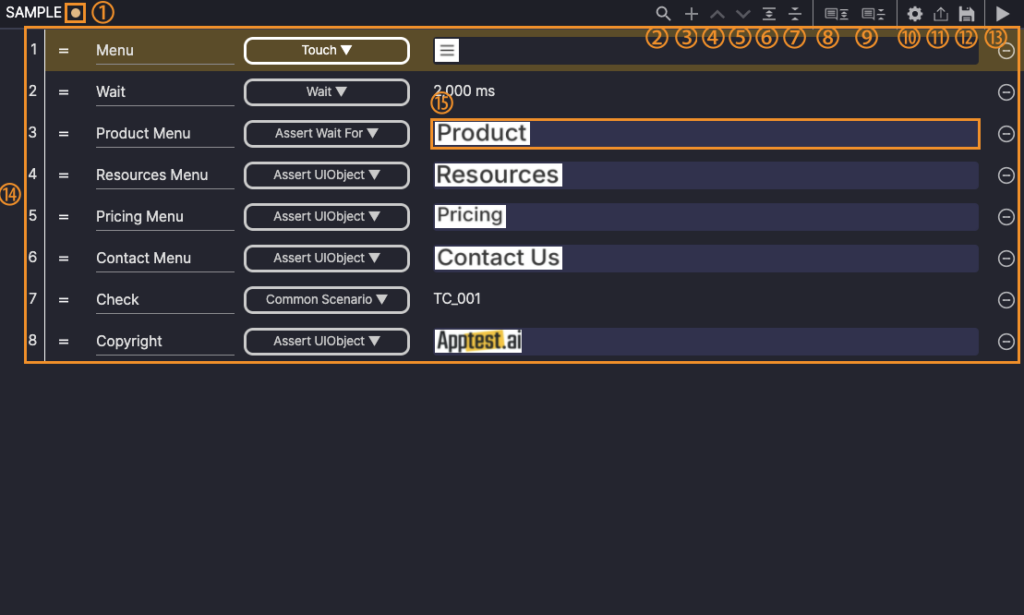
- Check Save Status: See whether there are unsaved changes.
- Search Step: Find steps by name.
- Add New Step: Add a new step at the end of the scenario.
- Scroll to Top: Jump to the first step in the scenario.
- Scroll to Bottom: Jump to the last step in the scenario.
- Expand All: Display all child steps.
- Collapse All: Display only top-level steps.
- Expand Description: Show descriptions for Block steps.
- Collapse Description: Hide descriptions for Block steps.
- Scenario Settings: Configure scenario-level settings.
- Export Scenario: Export the current scenario as a
.stegofile. - Save Scenario: Save recent changes.
- Play Scenario: Run the scenario from beginning to end (Only available when a device is connected).
- Step List: Display all steps in the current scenario.
- You can reorder steps by dragging and dropping them using the “=” drag handle on the left side of each step.
- UIObject Field: Check and edit UIObject information directly for each step.
To learn more about scenario configuration, see [Stego User Guide > 6.2. Scenario Settings].
Attributes Panel #
Use the Attributes Panel to view and edit properties of the selected step.
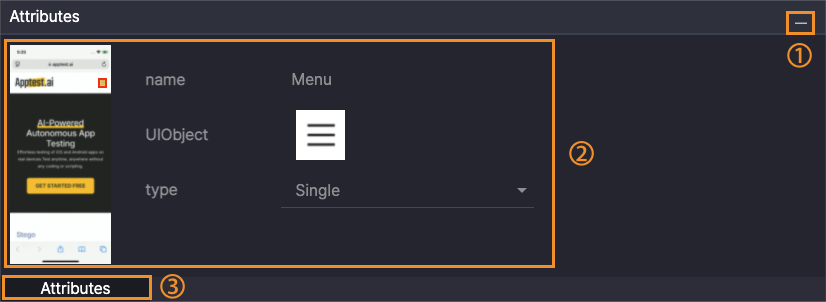
- Hide Panel: Collapse the Attributes panel.
- Show Attributes: Display the attribute fields for the current step.
- Open Panel: Expand the panel if it’s hidden.
Device Panel #
Use the Device Panel to connect test devices, control them in real time, and analyze screens using AI-powered vision features.
Device Tab #
Connect and control real devices from the device farm.
You can interact with devices directly, monitor the live screen, and run tests in real time.
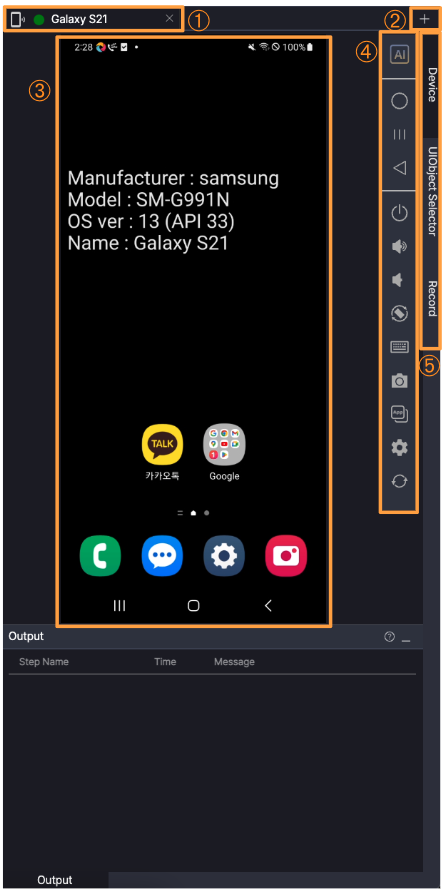
- Device Info: View the name and connection status of each device.
- Add Device: Connect a new device.
- Mirrored Screen: Display the device screen in real time.
- Device Control: Tap, swipe, press the home button, and perform other actions.
- Switch Tab: Navigate to the UIObject Selector or Record tab.
- The Record tab is available only when a scenario file is selected.
To learn more about using connected devices, see [Stego User Guide > 5.0. Device Control Features].
UIObject Selector Tab #
Use the UIObject Selector tab to analyze the device screen using AI and select UIObjects for scenario creation.

- Recognize UIObjects: View UIObjects automatically detected by AI screen analysis.
- Add Screenshot URL: Load screen images from external URLs to extract UIObjects.
- Choose Detection Strategy:
Select how the UIObject will be detected—using Object Detection (OD), Optical Character Recognition (OCR), etc. - Switch Tab: Return to the Device tab.
- Inspector:
Displays UIObjects detected based on the selected strategy (OD, OCR, or Accessibility).
Use it to browse and inspect each element individually.
To learn more about UIObjects, see [Stego User Guide > 7.2 Working with UIObjects].
Record Tab #
The Record Tab is available only when a device is connected.
It automatically generates test steps based on user interactions from the mirrored device screen or control actions detected in the Device Tab.
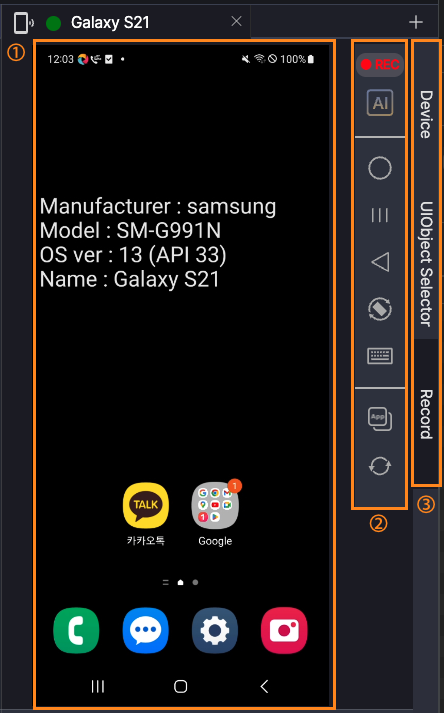
- Mirrored Screen Actions
When you interact with the mirrored device screen, Stego detects the gestures and creates corresponding steps automatically.
Supported actions include:- Touch (Single, Double, Long, N Times)
- Swipe
- Swipe To
- Scroll
- Scroll To
- Drag
- Input
- Device Control Actions
When you select a control icon (such as Home, Swipe, or Scroll) from the Device Tab, Stego detects the interaction and records it as a new test step. - Switch Tab
- Switch between Device, UIObject Selector, and Record tabs as needed.
- The Record Tab is available only when a device is connected and a scenario file is selected.
To learn more about configuring actions, see [Stego User Guide > 7.1. Using Actions].
To learn more about device control, see [Stego User Guide > 5.0. Device Control Features].
Output Panel #
Use the Output Panel to review step-by-step results after running a scenario.
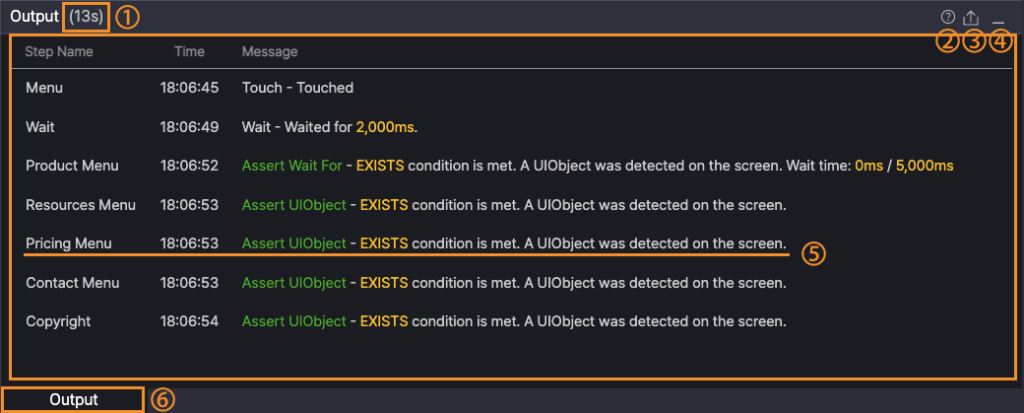
- Run Time (in seconds): Displays how long the scenario ran.
- Result Limit Tooltip: Up to 1,000 step results are available for review.
- Save Results: Export test logs as a
.zipfile after the run completes. - Hide Panel: Collapse the Output Panel.
- Step Results: Click individual steps to view detailed execution results.
- Click a step to open its detailed Step Result window.
- Expand Panel: Expand the Output Panel if hidden.
To learn more about reviewing results, see [Stego User Guide > 9.0 Running and Checking Scenarios].